Showing posts with label Landswood Park. Show all posts

Friday, 4 June 2021

Coincidence?

I came across Fair Price Models who have a small but interesting range of laser-cut wood building kits. What struck me is this low-relief stables/workshop kit (available in 4mm and 7mm scales)...


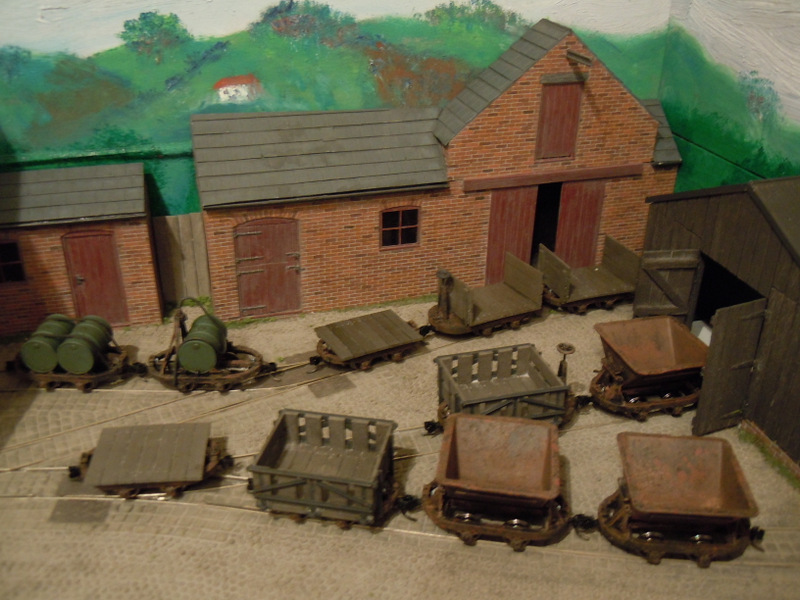
It looks familiar, because back in 2011 I built a remarkably similar building in 7mm scale for my O14  Landswood Park Farm box-file layout:


OK the height of the loft store is different, but otherwise the proportions and details are spot on, even the windows and doors. 

Now that layout was inspired by a visit to Tatton Park Farm, but this building was not based on a prototype but "freelanced" in a similar style to fit the scene, and the outline was evolved during planning. If there is a real building that looks like this I've not seen it, though I wouldn't be surprised as it was meant to look plausible.

So, coincidence or inspired? 

Thursday, 4 December 2014

Point Maintenance

In-between train-set updates here's a quick post showing some maintenance on Landswood Park.

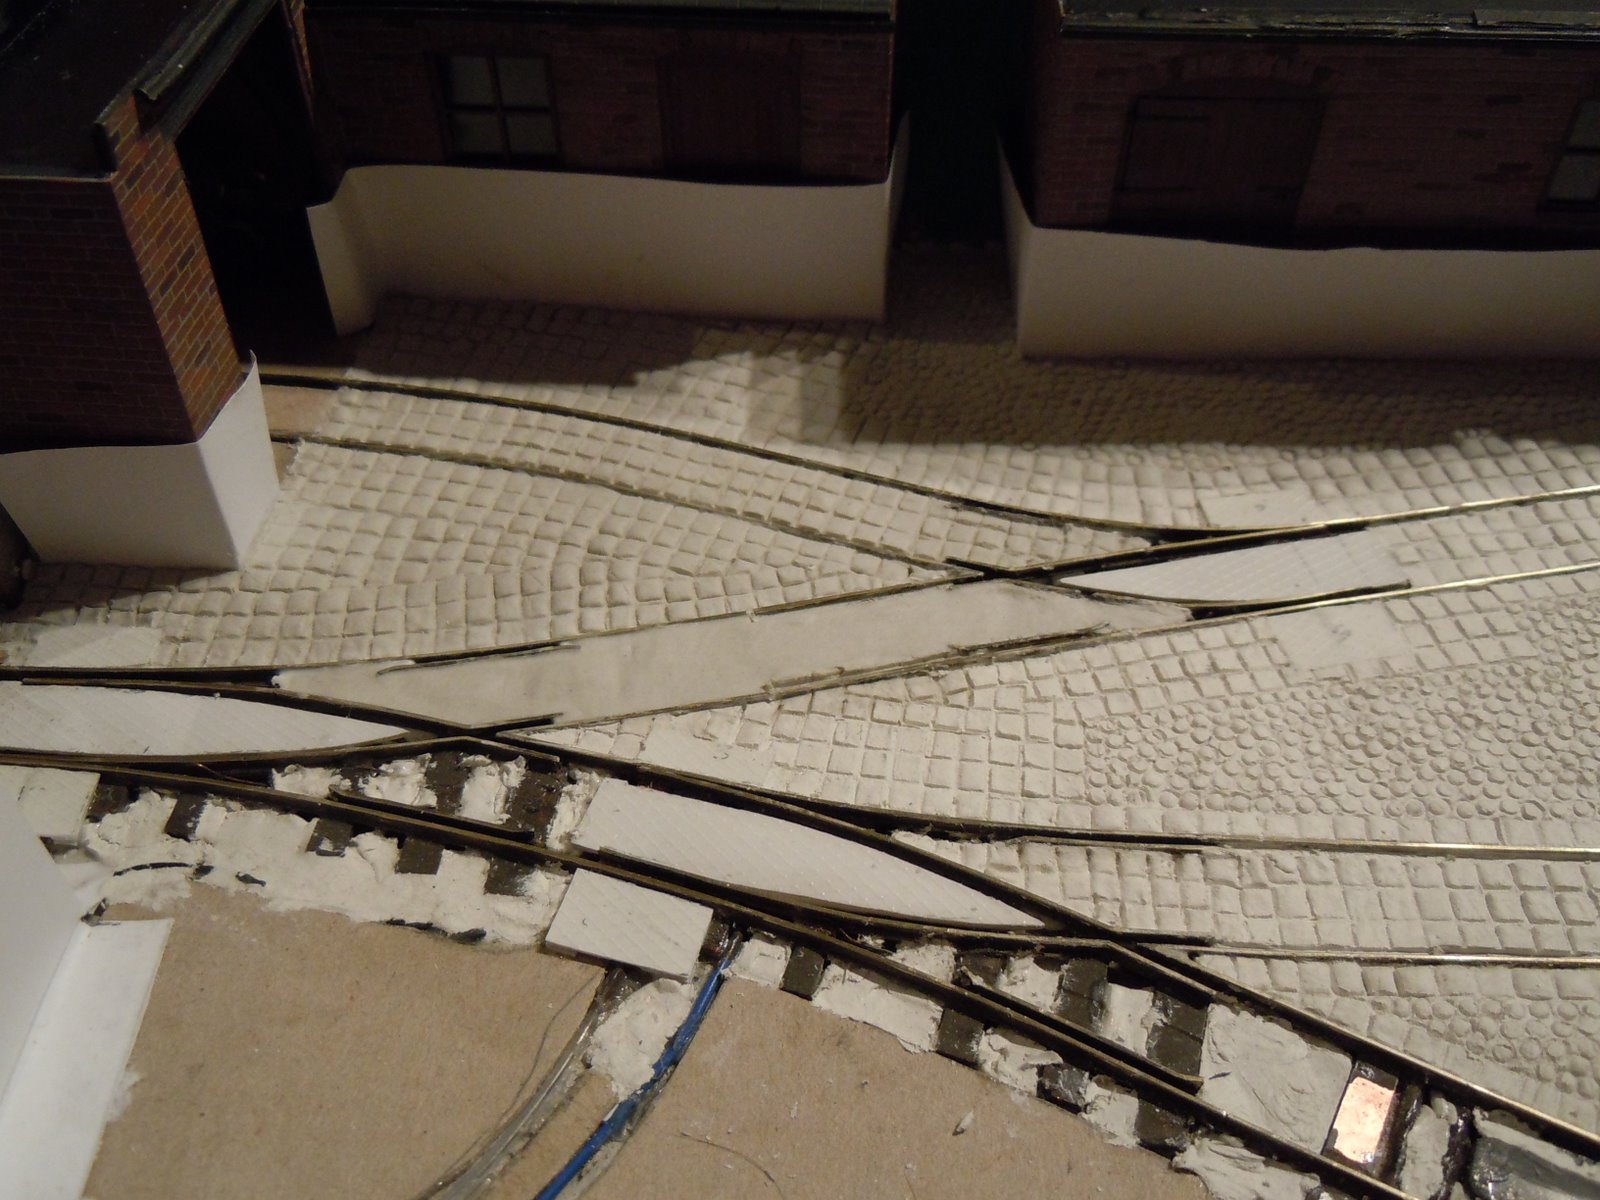
The tight kick-back siding point had failed some time ago, which didn't matter that much as it was rarely used (little can get round the corner anyway). However when one of the other points failed it was time to do some repairs. Both had failed the same way - the soldered joint between the blades and the tie-bar, a common weak spot on hand-built points.


Fortunately I had thought ahead when I built the layout and that part of the point was covered in plastic chequer-plate rather than set into clay setts. The plastic was simply eased off, exposing the joints that needed re-soldering. Once repairs were complete and tested, a little impact adhesive was used to secure the plastic back in place.

The points on Thakeham Tiles were constructed with much more thought and have pivoted joints at the both ends of each blade, so shouldn't suffer this issue, but as Landswood Park is built in a box-file there was no space underneath the board for such tricks.

Wednesday, 30 January 2013

Making a start on the O&K

With the weather still too cold and damp to start spray painting in the garage, and enthused by the Landswood Park article, I thought it a good time to start on the Nonneminstre Models O&K loco kit I got last year.

With the main parts spread out it is clear there is a fair amount of flash to clear up, and probably a bit of fettling to get the parts to fit together well. However the detail of the mouldings is as good as I have ever seen in a white metal kit. The same can't be said for that poor driver figure though...

 
However I should start with the chassis, which is supplied assembled without pick-ups, and for 16.5mm gauge. The instructions say to push the wheels in for 14mm gauge, easier said than done but I found placing a wheel face onto a piece of wood with a hole for the axle, and hitting the other end of the axle with a hammer, got the job done! I have a KB scale gauge which includes a back-to-back check. However the axles were then a very tight fit, so I found it necessary to file the sides of the chassis block very slightly.

 
There isn't space for the pick-ups to go behind the wheels at 14mm gauge so they act on the tread, so it is suggested to fit them to the underside of the chassis, though I didn't want as they may then be visible. The instructions do say "We reckon those working in 14mm gauge are wee bit able!", hmm, thanks for the confidence but I'm not so sure.

The pick-ups are made by soldering springy wire onto a piece of PCB stuck to the chassis side in such a way it won't be visible after assembly. The instructions suggest soldering one side direct to the chassis, but I didn't want to solder it to white metal. I wanted to be able to disassemble the chassis without removing pick-up wires, so a notch was cut into each side of the chassis block so the wires can route to the motor through the same hole in the footplate.

 
With the footplate and bottom keeper plate attached the chassis can be test run. The first attempt didn't go well, the motor couldn't seem to overcome the resistance of the chassis. So I stripped the chassis down including removing the motor and layshaft, and spent some time filing back the chassis block and adjusting the pick-ups until it could be freely rolled. The second test was much better - now running smoothly - although it needed a lot of weight to make the pick-ups work well (although the track was dirty too!). With all that gearing it will be another slow runner...

 
Posted by Picasa

Wednesday, 23 January 2013

Landswood Park in Print!

 
Landswood Park features in the current issue (93) of Narrow Gauge and Industrial Railway Modelling Review!

This is a real honour, as the 'Review is a highly-regarded magazine amongst modellers, especially those with more "obscure" railway interests! I consider the modelling featured in the magazine to be of high quality and inspirational, so I am still rather surprised I was asked to prepare one for my little box file. However the editor Bob Barlow has done a great job with presentation, and I have already received nice comments from those who have read it.

For more on NG&IRM Review Magazine click here.
Posted by Picasa

Saturday, 4 August 2012

Return to Tatton Park

About four years ago I posted about a visit to Tatton Park Farm, and the narrow gauge tracks around the farmyard. Having commented about it being an interesting subject for a layout, last year I built that layout - Landswood Park Farm - in a boxfile for the EXPO-NG challenge. While building the layout (and even though I picked a freelance setting and name) I could have used a few more photos to help me out, but living 250 miles away it wasn't practical! Today while visiting family we decided once again it would be a nice afternoon out with the kids, so I took the opportunity of getting some more pics and research. It is of course a bit late for my model, but in case you are interested...

 
This 3-storey building I now know was the mill, and beyond it the boiler-house and engine. The siding running in would presumably been to take grain in and/or flour out, not a traffic I had factored in to my model even though it may well have been the main reason for this short line.

 
A close-up of the track, setts and cobbles, and the simple wagon-turntable. The red door on the building at the top of the hill is some kind of store I think, perhaps that is where the grain was stored, and wagons used to move it down the hill and into the mill?

A check with my size 11's suggests the track gauge to be approximately 2ft. I'm very pleased to say I think I got the size, arrangement, and colouring of my setts and cobbles spot-on on my model.

 
I think I got the building styles captured too.

 
The rear of the mill building, with the chimney marking the position of the engine-house beyond. The track in the first picture seems to run inside the building to the centre/right, probably ending behind the bricked-up archway, although there is no sign of any rails in this courtyard.


Finally the steam interest - the engine, although I suspect the Vax is not original. The Lancashire boiler was in a separate building immediately to the left of this picture, but I couldn't see if it was still in there.

Plenty more inspiration there, and who knows, perhaps another layout based on this farm may one day get built! I'd also say that Tatton Park Farm is well worth a visit if you are in the area, especially with kids.
Posted by Picasa

Saturday, 7 January 2012

Happy New Year!

Since this is the first post of 2012, may I wish a Happy New Year to all readers. I know we are already a week in to this "Olympic" year (does anyone else think they will be bored of the Olympics before they even start?), but I have contracted my usual post-Christmas cold, leaving me with little energy for picking up the modelling of an evening. And anyway, the way I am coughing now, holding a scalpel would be dangerous! Fortunately for you the common cold is not a virus that can be spread via the internet.

Last year proved a busy one for my modelling, as I couldn't resist entering the EXPO-NG Dave Brewer Challenge, and a year ago I was hacking about a box-file and building track for the first time. The whole project took me in new directions and was great fun, and the result  Landswood Park even won the competition! While I was building that I also had an invitation for Awngate to be shown at EXPO-NG too, which as one of the biggest NG shows in the UK, was a great honour. So I also spent some time upgrading and completing some of the scenics, and finishing some stock, and of course the day of the show was rather busy! The concentrated effort to have both layouts ready resulted in a lot to report on this blog, with my busiest year yet averaging 5 posts per month.

So what will 2012 bring? Well probably not quite so much modelling activity, but Awngate is booked to appear at Narrow Gauge South at Winchester in April (another of the big NG shows!), and I have a few jobs I'd like to do by then. There is the possibility of further shows later too. I have some ideas for locos and rolling stock to build, although that will probably be as I fancy, as there is already sufficient stock to run the layout.

Landswood Park may have no further purpose as the competition that it was built for has passed, but it is a fun little layout and I have enjoyed working in 014, so more wagons may appear. And a couple of months back I took delivery of a new project:


The photo above shows the prototype for the kit, an O&K RLc1 now at the Amberley Museum, not far from me, which I think it would be entirely suitable for a farm railway.
Posted by Picasa

Thursday, 17 November 2011

Landswood Park - More photos and it's own page

Landswood Park now has it's own page, which you can find from the links on the right. While I am at it here are some more photos which have come out rather well.


You probably won't be surprised that after such intense activity in preparing two layouts for EXPO, I'm enjoying a rest from modelling. However there is another reason too, we're having a new kitchen fitted and suffering the upheaval that goes with that, not least that both layouts are in storage! And while I am not fitting the kitchen myself, there are plenty of associated DIY jobs to keep me busy...
Posted by Picasa

Saturday, 29 October 2011

Exhibiting Myself

Well it has certainly been a long day. The traffic was kind and we arrived at the EXPO-NG venue a little before 8am, which gave plenty of time to unload and set up. This went smoothly too, and both layouts were set up and being tested by soon after 9am. This left me a little time for a quick look around the show. A big thanks to Simon Wilson and Mark Holland for helping out with operating, set-up and packing up, we rotated between the layouts and breaks which certainly kept boredom at bay!

Simon Wilson mastering the controls of Awngate just before the show opened
Awngate attracted a lot of positive comments, which is nice to hear, and some potential show invites too. The preparation of the locos paid off as the layout ran very well all day, with the only track-cleaning before the show opened. The fiddle yard improvements were worthwhile too. However the couplings were temperamental, with some items of stock refusing to uncouple and some magnets less effective than others, so shunting the goods was a brave move! The passenger trains ran more smoothly though.

Landswood Park set up and ready to operate

Landswood Park behaved well too, with the couplings working as intended about 95% of the time (remember both layouts use the same couplings!), perhaps better magnets? However with only one loco it was guaranteed to cause problems, which it did about half an hour into the show when it refused to go. Having checked the track power I stripped down the loco chassis and fettled the pickups, which seemed to cure the problem and apart from the occasional relapse requiring a poke, it ran fine the rest of the day. The other problem was that a point blade came loose, fortunately it was the "kick-back" to the workshop which I never use, so it could be ignored. Despite the size of the layout, the "inglenook" plan and the easy-shunting made it a pleasant and surprisingly engaging to operate.

This layout generated a lot of interest too, I'd say it provoked more conversations than did Awngate, perhaps because of it's unusual theme and relatively uncommon gauge. There was a good turnout for the box file competition with 11 entries making it, most of which were complete, and showing a good standard of modelling. So I was honoured to be awarded first prize!
Posted by Picasa

Friday, 30 September 2011

Closing the file!

So after a busy few weeks the Box-File is complete. This is one of those stages of building a model railway where everything comes together, and it appears that a lot of progress has been made in a short space of time, in reality the preparation and painting of the details has been ongoing for a couple of months. I'll do painting in batches two or three evenings at a time, but then need to do something different or I'll go potty!

The details are mostly from Duncan Models and Phoenix, and have been picked to be in keeping with the farmyard/estate setting. I've tried not to get carried away, although to be honest the scene is a little crowded, hardly surprising given the size of the layout! This 7mm scale is still bigger than I am used to ... anyway such a small layout needs visual interest, and I think the balance is about right.


I'm very pleased with the end result of Landswood Park Farm, especially given that it was entirely built within 9 months, including track, scratch-built buildings, and of course the loco and all the stock. It was my first exercise in building my own track, just as well it is buried in the cobbles! Indeed it is my first ever venture into 7mm scale, so despite it's tiny size this layout has provided plenty of challenges and interest, and best of all, fun.
Posted by Picasa

Wednesday, 28 September 2011

Coal, Straw, and Manure!

The farmyard is now being "dressed" with the details that will make it appear to be a working farm. In the era in which the farm railway would have been used (up until the early '50s at the latest) coal would have been important to the working and domestic needs of the farm, such as household fire places, the blacksmith, the dairy, and steam traction engines. More obvious materials found in a farmyard are straw, and of course manure.

Coal is best modelled using ... real coal! I liberated some from my parent's bunker and smashed it up with a hammer until about the right size - old photos show lumps of coal that are surprisingly large, so not too small. A pile has been created by the tracks in the yard, probably the dairy is just off-scene. Manure is simply paster (filler) mixed up really thick and lumpy, with powder paints added for the colour. This was splodged around the animal pens, and a big pile added outside the barn waiting to be loaded into a skip and taken to a field! Straw is mixed in using long static grass in a suitable shade of yellow.


The photo above shows that I have disguised the end of the layout with a gate behind the barn, and a lean-to the other side containing the stocks of straw (or is it hay?). The barn has a pen inside. I've used more coffee stirrers for these. At the other end of the layout I have made another pen, this time using cocktail sticks and "chicken wire". You know those balls of netting that women have in the shower? I've no idea what they are for, but my wife's has a bit missing!


It has always been my intention that the rolling stock is very much part of the layout, so some of the wagons are recieving loads of the same materials (and traces of them when empty). The skips have plasticard false-floors, which in this picture are having the manure or coal added. The cling-film is to stop the loads sticking into the wagons, hopefully they will be a removable snug fit.


Posted by Picasa

Monday, 26 September 2011

A gaggle of wagons

I'm not sure what the correct collective noun for a group of wagons is, but anyway I've finally completed the 11 you see here, which should be sufficient for Landswood Park. They are all KB Scale kits and based on the Hudson "Rugga" Skip, but using some of the KB Scale variations (including brake ends) plus my own interpretations I've made a variety of different wagons. My intention is to use different loads too, so they all look different, having visual interest in the wagon fleet is important to such a small layout, and is one of the reasons I chose a farmyard as a subject for the model.


I painted all the wagons as a batch, starting with Halfords Red Oxide primer as an undercoat (all wheels, couplings etc. removed and blue-tak in the bearings). I used a trick I hear of for rust, spraying them with water and liberally sprinkling salt over them. Once dried they were sprayed with Humbrol matt black (aerosol can), then rubbed until the paint came away from the salted areas. Although not quite as effective as I'd hoped it did reveal patches of red oxide and peeling black paint.

A couple of washes of rusty brown to tone down the red oxide and dirty the black, plus a dusting of weathering powders and a spray of Testors Dullcode matt varnish finished the job. Woodwork was washes of grey/brown and the barrels picked out in militay-ish green, they must be MOD surpless! The photo below could have better lighting, but hopefully shows the effect, which I am quite proud of.


These wagons are little bigger than those I am used to building in 009, and being plastic are quite light, so I have packed them with as much lead (old roofing offcuts) as possible. This is easy for the flat and open wagons, having a useful floor, and I did remember to put some lead in the barrels, but open skip chassis have had to have strips of lead put under the centre and end bracing bars. A strip is also added to the bottom of the V skips too, which I hope to be able to hide.


Wheels popped back into place, couplings fitted and adjusted, V skips held in place with a dab of PVA, and they are ready to go. Apart from those loads of course ...!
Posted by Picasa

Wednesday, 21 September 2011

Spring has arrived!

Well there are now leaves on the trees anyway!

As you can see from the picture I've had a tree foliage session. The tree in the polystyrene block on the left is the wire-trunk one I made for Landswood Park, the rest are for Awngate. The two in front in cork bases are based on whitemetal trunk/branch armatures from Realistic Modelling Services, the other smaller trees in the polystyrene block are based on plastic trunk mouldings picked up for a few pence at an exhibition. Given a lick of paint to take away the shiny plastic look, and with foliage matting stretched over the outside, the effect is quite good considering the little effort involved!

Foliage is the matting type, I had some Heiki and some Woodland Scenics, which is teased out and either stuck accross the branches (in the case of the large tree), or just stretched over the outer branches like a tent. The second method was much quicker and just as effective for smaller trees! The branches were coated with PVA glue first, and after the main foliage was in place a spray of glue (or hairspray) was applied, and any left over foliage scattered over the top, ensuring no bare areas.


The big tree fitted in place on Landswood Park, it adds to the rural feel, helps hide the hinge in the backscene (lid), and disguises the fact that the buildings are low-relief. It is actually a "low-relief" tree, he long trunk slots into the plasticard "pocket" fixed to the back of the box-file, which has now been hidden by a short fence made from coffee stirrers.


The buildings have now been fixed in place with PVA, the joins where they slot into the ground have had a little excess glue applied and some static-grass applied with a Noch puffer bottle. It hasn't stuck up as much as I expected, it's the first time I have used it and perhaps it will work better on a flat area.

This is really coming together now, I have been gradually making and painting up detail items which are about ready to be added. I also need to have a tree-planting session on Awngate!

Posted by Picasa

Friday, 16 September 2011

Painting the ground


I've been doing some painting, including the cobbles of the farmyard. I used thinned enamels, as I was worried that water-based paint would dissolve the DAS clay - it probably wouldn't. I started with a dark grey, which took a lot of paint to cover well into all the cracks. Then I applied coats of lighter grey/browns over the tops of the stones to try and match the photos of Tatton Park farm. The "metal" plating over the points was given that rusty dark brown colour that manhole covers go. After checking that the track still worked and a loco would traverse it (and after fettling with a screwdriver to clear any excess paint and clay from the rail head and sides), the whole lot was given a final, well-thinned wash of muddy brown.

The result is delightfully uneven and looks about right to me. Not sure that the photo shows the colours right though, the back of the layout looks darker which must be a combination of shadow and a mix of the tungsten room light and flourescent layout lamp!


Here's a photo of Tatton Park Farm, which shows the ground effect I was after, and I think reasonably achieved.


Posted by Picasa

Sunday, 11 September 2011

A load of old cobbles!

And so to a job I have been thinking about for a while - laying the cobbles in the farmyard. As this covers the entire ground of the layout, including the track, it is pretty critical to the look and operation of the layout to get it right! Now I have read on the NGRM Forum and also Chris Nevard's Brewhouse Quay of using DAS clay for inset track. I last used DAS as a teenager for stone buildings but never got the stonework looking right, but that was some time ago so why not give it another go?

First as you will have seen previously the area between the tracks was covered in thick card up to sleeper height, then any gaps between the sleepers were levelled with small pieces of clay. I wanted to cover right up to the buildings, but didn't want to get them messed up, so gave them all a "skirt" of paper. This may not have been necessary as no doubt the clay could have been wiped off, but remember some of them need to be removable. Then the clay was rolled out to a thickness of about 1.5-2mm, cut to approximate shape (some paper templates were used), and laid onto a layer of PVA. The idea was to have the ground surface just below rail height, so as not to lift wheels off the track and to allow the rail head to be cleaned.


The picture above shows the clay being laid, that between the tracks in the centre has just been smoothed into place and is having the flange-ways  opened out. 014 standards a fine-scale so the flange-ways are mercifully small, especially having been so used to 009! The dark clay beyond has just been laid and embossed with setts, while the lighter clay to the right has already dried. There you can see a mixture of setts (mostly around the rails and doorways) and cobbles, exactly as I saw at Tatton and something I wanted to reproduce. Cobbles help with the rural farmyard feel, setts throughout would have felt more industrial to my mind.


I embossed the clay whilst damp using a variety of home-made tools, shown above. On the left is a flat piece of plasticard with handle, sized to fit between the rails, used for smoothing and levelling the clay. Next is another one with slots for the rails, and ridges for the flange-ways. The black one is also for clearing flange-ways to the right depth. In the centre is a square-section plastic tube, and next to it a block of three, with chamfered ends used to emboss the setts. These work out about a scale 7 inches square, probably a little too big but that's what I had to hand. On the right is a round tube, and a block of 7, also with chamfered ends. These were used for the cobbles, at about 3 inches scale size they are probably about right.


Embossing in this way was relatively easy, and gave a good result - but not too even. Even so, it took me three (long) evenings to complete this scene, only about the size of a sheet of A4 paper! I think it was worth it, the scene is really coming together now. Next up, painting it. And let's hope the track still works at the end of it.
Posted by Picasa