Friday 24 May 2013

Starting to set the scene

Alongside finishing the baseboard and building the bridge I have been experimenting further with the block walling. The Scalescenes printed paper sheets looked good, and will save a lot of time in painting. I printed them out on the laser printer at work - this gave a slightly darker and more defined finish, and is resistant to water drops (bubblejet ink smudged and ran when wet). I also understand laser prints are more resistant to fading.

Once the paper is applied to the card or foam-core model I have added a little relief by scribing with a blunt metal object - actually one point of my tweezers. It is easy to follow the printed courses and although the relief is barely visible, it does make a difference, especially when viewed at an angle. The depth of mortar courses is very small in reality so I think this is enough.

 
These photos show the embossed finish, that has also had some colour variation added using brown and grey weathering powders. Again this helps bring the prints to life, and allows dirt or rust staining. I don't have a green powder but I need to find a way to represent the moss on the real walls under the bridge. Finally a coat of Testor's Dullcote matt varnish should protect the paper and weathering powder, and ensures a nice matt finish. The piece of stone wall is polystyrene pizza base embossed with a pencil. So far I am not happy with the colour on this, or the render on the sloping buttresses.

 
You will also see the bridge has been painted. It was given a coat of red primer, then painted with brown rust colours. Dabs and smears of PVA glue where applied, and once dry, it was painted green. The glue patches were scraped off, and soaked off (leaving the bridge in water) to reveal lots of rust, final touching up and some weathering powders finish it. The result is not as rusty as in the photos of the real bridge, but the model is set 20+ years ago when the bridge was much newer!

 
Loosely put in place the bridge scene is coming together. I have bought a Gaugemaster sky backscene, but I'm not sure how best to fix it - any ideas?

Finally I've been looking for a fork-lift truck or other suitable vehicle to add to the scene. I haven't had much success so far, but I did find this in my son's toybox*. It is missing the seat and (obviously) the forks, but it might have potential with a bit of work. However it is a little over-scale, and I think much too modern for the late 70's/early 80's era of the model.

 
*He has given me permission to use it!
Posted by Picasa

Wednesday 22 May 2013

Bridge Building


Perhaps the main scenic feature on the layout will be the bridge over the footpath, which still stands at the site. It is of simple construction, steel girders set into the walls either side and with support poles mid-way, a steel deck with L-section strips under the outer edges, and handrails made from steel tube.


My preferred medium is plastic, and some girder and round section plastic along with some sheet plasticard is all that is required to make this kind of structure. I used plastic rod inside the tube as a joining peg, and as seen below, to go into the ground to locate the bridge.


The handrails are made in the same way, using tube and rod section. A "jig" from a marked out piece of wood and some blu-tack helps assembly, while rods inserted in the bottom of the tubular stanchions locate in holes in the deck.

 
The handrails could be rather vulnerable and may be better made of soldered brass, but I prefer plastic and they seem strong enough. Once in place on the model the bridge shouldn't need handling.

 
Posted by Picasa

Tuesday 21 May 2013

Plywood

The foam-core baseboard is nice and light but vulnerable to knocks, so really benefits from being clad in a robust material such as plywood. I had an off-cut of 4mm ply in the garage, so spent an evening marking it out. The shapes are quite complex, as well as the board being triangular the ply forms the scenery fascia, has openings for access and the control panel, and of course the back panel forms the backscene.

 
Another evening was spent beating the ply into shape! The sides are simply glued to the board, but the backscene being curved was somewhat more complicated. I poured boiling water over the part to be curved, which helped a little I think, but while 4mm ply is happy to warp into all sorts of curved surfaces getting it to bend a little was surprisingly difficult!

 
With the help of a lot of PVA glue, some screws, and some big clamps, it all came together. It may not be quite square and a bit rough in places, but I'm pretty pleased. Plus even now it only weighs 150g!

 
Posted by Picasa

Sunday 19 May 2013

Shopping at the SWING Show

The "SWING" Show (Small and Wonderful Industrial and Narrow Gauge) held in Bognor by the 7mm Narrow Gauge Association local group has become a show to look forward to, and this year as usual hosted a selection of top Narrow-Gauge and Industrial model railways. Quite a few of the layouts I'd seen before at specialist shows, but several I hadn't, and they were all worth seeing.


It was great to see Giles Favell's "The End of the Line" again, and see the radio control lorries after the recent NG&IRM Review article. My Son loved the tipping NG trucks, the "big" train, and the working lorry, and insisted we vote it as best layout (I can't argue with that).

Another layout it was nice to see again was "Southern Cross" (009) by Des Trollip, this won last year's "Pizza" challenge at EXPO-NG. This time it had a lighting rig fitted, and could be viewed from all angles, allowing some views I hadn't seen last time, and showing the level of detail in this small model.


There was a very nice model of Wantage in 7mm by Dave Cox, and even a ride-on (5" gauge?) steam train in the garden. However the award for the most original and fun layout has to go to the Lumpy Barmcake and Salted Cracker Railway by Matt Wildsmith!


However for me the show proved very useful, allowing me to stock up on a number of essential and otherwise difficult to obtain items - including rail, switches and connectors, embossed sheet, Testors Dullcote, glue, and some figures. All required for Thakeham - I had taken a shopping list!

Anyway if you want more pictures click here.

Wednesday 15 May 2013

Something Shiny!

My wife and I recently celebrated 10 years of marriage. Apparently this is traditionally marked with a gift of Tin, so I was thinking a container of biscuits would do the job, however I was informed that something smaller, shiner, and much more expensive was required if I wanted to get to 11 years.

The bonus was I was also given something small and shiny - not so small or quite as expensive(!) but to my mind much, much more exciting...

 
Opening the box reveals a very flat-packed kit for a Hudson Hunslet diesel. This will be perfect for Thakeham (there was one there) if I can get it built in time, and alongside the layout, for EXPO-NG. However this is easily the most complicated and scary kit I have ever had!

 
Posted by Picasa

Sunday 12 May 2013

One weekend, two Exhibitions

This weekend I managed to get to not one, but two local exhibitions. Better still the Sussex Downs 009 group were represented at both! Saturday was the Burgess Hill exhibition, where my friend Tim Sanderson was showing his layout, Elmgate.


This show is very good for a local club show, with two halls of layouts across a range of scales and genres, and good trade support too - I was able to pick up a selection of materials including "wire in tube" for point control (I've got a half-used pack somewhere, but can I find it?!). It was good to see narrow gauge represented, as well as Thatcham there was Linden Street in O16.5 (by Charles Benedetto), a nice small-but-spacious station which I haven't seen before, and featuring this scratch-built Sentinel.


Phil Garnder was making the case for 009 (sorry) with "Lydford LBSCR" - that's Lynton & Barnstaple Suitcase Railway.


Today there was opportunity to pop into the much smaller show in Sompting. Although held in a rather "cosy" venue the organisers had packed in a good selection of layouts, from finescale 3mm scale to Continental N to Thomas for the kids to play with. No show guide though so no details of the layouts. From the Sussex Downs 009 group Mark Holland had his "Temark Valley" layout.


009 was also present (with 00) on Snailspeed, one of my favourite layouts ever but I've shown you photos before. I also really liked this 3mm scale, 14.2mm gauge layout of a Gypsum factory.


Two enjoyable shows, and if you want to see more photos click here for Burgess Hill and here for Sompting.

Friday 3 May 2013

A Three-Pointed Start

For such a small layout, the dimensional requirements of the challenge (54 cm by 72 cm by 81 cm) make the baseboard trickier than usual to make - well, given my woodworking skills anyway! To make matters worse the footpath needed to drop below the track level, and I wanted to show a gradient to the track too.

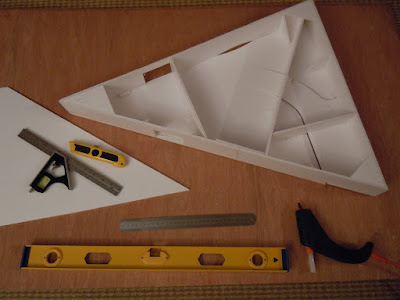
I chose to use 5mm Foam-core board (expanded polystyrene sandwiched between thin layers of card), I found A1 sheets in 3mm and 5mm thickness in my local WH Smiths. I last used this for Pen-Y-Bryn Quarry, and it is dead easy to work with - simply cut with a knife (the Stanley type works well) and stick with a hot glue-gun. The tricky bit is working out the pieces needed for the 3-D jigsaw, but once stuck together "egg-box" style it is very strong, the pictures below show the construction method.

 
The fascias of the board will be clad in thin Ply (the 4mm stuff, here being used as a cutting mat!), which will also be used to add a back-scene along the back edge. The ply neatens up the appearance but more importantly, protects the foam-core which is strong but vulnerable to dents and tears.

 
This form of construction makes different shapes and levels easy to accommodate. The footpath was partially cut out, then after the board was assembled it was removed completely and dropped.

 
At this stage the layout is easily picked up with a little finger, and is more of a sail than a model railway...
Posted by Picasa