Tuesday 24 January 2023

Adding some fuzz

A little while ago I treated the scenic areas of Hexworthy to a coat of green scatter. While this makes a big difference to the look of the layout, the use of static grass adds an extra level of realism when viewed close-up. The scatter provides a good base preventing the bare ground showing through the static grass, and the use of ground foam scatters provides an unevenness, onto which the static grass provides the texture. 


So, here's a selection of the fibres I used. It seems I've collected a lot of bags of scatter, mostly at exhibitions when I see it and think I might need some, but I've ended up with some duplicate packets, lots of long dead grass, and I could do with more shades and lengths of green! Still, this proved to be a reasonable selection. I mix fibres in a pot to suit the location; here I used shorter lengths (1, 2, and 4mm) of mid-light greens for the pasture where sheep graze, a more lush look by the river (some darker greens plus some longer yellow grass), and longer/more mixed paler grass (2, 4, and 6mm mid-pale greens and some yellows and browns) for embankments. 


I use Peco basing glue for static grass, I find this doesn't form a skin like PVA meaning it allows larger areas to be covered, and the fibres stick better, it even allows a second pass. It's also the right consistency to apply neat. I think the scatter base helps stop the glue running too. Cheap kids brushes are needed for this, they won't be good for much else afterwards. 


I use a Peco applicator, this works much better than the cheap tea-strainer meets fly-swat type I bought cheap years ago and is much safer, but I guess that isn't surprising! Here I've clipped the ground to a convenient rail, but if there isn't one nearby, a pin pushed into the ground is used. The applicator is shaken and moved at different angles to ensure even coverage, I find rotating it helps too.


I then vacuum off the excess almost immediately. A piece of jay cloth catches the fibres so they can be returned to the pot. Vacuuming while the glue is wet doesn't seem to dislodge fibres that are stuck, if anything it can help them stand up. The applicator can then be refilled, or filled with a different mix, and another application made while the glue is still wet - sometimes adding longer grass for example. 


Grass doesn't have to cover large areas. A small brush not only helps get into corners and close up to walls, but also to apply small areas of glue around objects, along the edges of pathways and in drainage gullies. 


Here's a close-up of the are seen being grassed above, once the glue has dried. This embankment has shorter grass in mid-green with longer yellow grass and a few browns too. The small brush allowed glue to be pushed between the rocks so the grass grows from between them. 

In a wider view some subtle changes in texture can be seen, the shorter and brighter green grass of the pasture at the rear, the longer yellower grass of the embankments (the join will be marked with a fence in due course), and slightly darker green close to the waters edge. The mixtures of fibres and variations of the mix avoid the lawn look, although it will still need breaking up with various types of bushes and weeds. It does show I needn't have worried too much about the colours of the base scatter though, the result of the static fibres being pleasingly dense and even. 

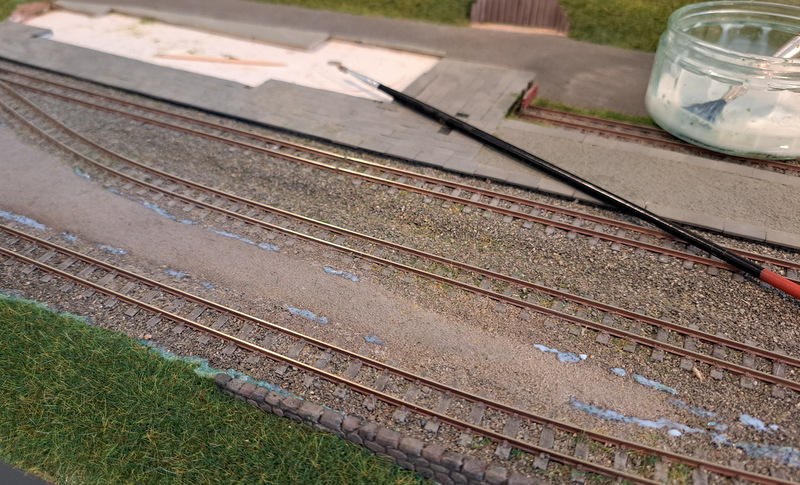
And here are the grassy strips along the edges of the track ballast. These seem to have worked well. I've tried not to overdo these, especially in busy yard areas, I'm not aiming to show neglect. 

Monday 16 January 2023

The play switch

The last stage of the animated playground construction is to wire it into the layout, with a switch so it is easily started and stopped. There was space on the control panel, so I edited the Word file I'd created it in to add a couple more switches. 


I actually create two copies of the panel, one has outlines of the switch positions to ensure the design allows for the space they need and when printed out marks where to drill the hole, the other is the printout that is used for the panel. The playground switch has been added bottom right marked "play", you can see I have also added a switch for lighting as I plan to add platform lamps at some point. The holes in the paper were opened out with a scalpel after placing over the drilled aluminium panel (see below...)


The existing panel was removed from the layout and all the switches were removed, the clear plastic front and existing print-out taken off. 6mm holes were drilled in the aluminium panel for the new switches. This is the rear, upside-down (i.e. flipped over towards the camera) so the "light" and "play" switches are top-right, the sharpie labels help me remember which switch goes where. Just above the switch hole (so below in the photo) is a 2mm hole about 1mm deep used to locate the "tab" on the switch washer, this stops the switches rotating in the hole. 


With the new printout placed on the aluminium and the clear plastic over the top, the track switches were reinserted, then the holes for the new switches opened out through the plastic with a scalpel before fitting the new switches in place. Since point motor switches are bare metal and the only colour caps I had in that didn't match colours already in use were yellow, the new switches have yellow caps!

The playground motors are fed via a voltage regulator, these little circuit boards output controlled DC from a range of AC or DC inputs, and are cheaply available on ebay (something like this although I've had these in a while). In this case the input uses 16V AC which is provided from my transformer packs to the layout though the 6-pin DIN connection I have standardised on, removing the need for additional specialist power supplies, and the screw potentiometer is adjusted to give about 3V. The output from the regulator goes to the two motors via the panel switch - simple. While at it I put a second regulator in for the future lighting, which can be set to a different voltage. The regulators attached with some tiny screws to an offcut of MDF glued to the foam-core baseboard. 


I attached a choc-block connector to the underside of the playground sub-base with hot glue and wired the motors to it - there are enough connectors to allow a resister to be added to either motor if ever needed. The playground can then be removed by unscrewing the terminals to the two orange wires. 

That's all the practical work done, I just need to finish the playground scenically now. 

Thursday 12 January 2023

How to build a model railway (the book!)

There have been a lot of books about how to build a model railway over the years, although perhaps less so in recent times. Maybe newcomers to the hobby turn to the internet instead these days, although from the basic questions frequently asked on forums it is clear there is a lot to be said for a reliable source from which to pick up the basics. This book, How to build a model railway by David Ashwood and Market Deeping model railway club, is a first book on model railways by publishers Pen & Sword as well as a first book by the author, and aims to provide an introduction to those basics.


It does indeed provide an introduction to the hobby, covering scales and gauges, planning, baseboards, tracklaying, electrics, and care and maintenance. It will be obvious to modellers that isn't a comprehensive how-to since it omits the scenery and buildings, and indeed the trains themselves, so presumably there is meant to be a part 2 - although the title doesn't acknowledge this. The basics are covered as expected, although sometimes I wondered if terminology and techniques are explained well enough for a complete beginner. Also, in places I thought the subject chosen to include were unusual; there is a description of using computer control through MERG CAN-BUS - this is to give an example of advanced techniques not a how-to, but it is given more space than DCC, which is more likely to be of interest to a newcomer to the hobby. Overall though the book does what it says on the cover, at least so far as the topics listed, and will help newcomers to the hobby get started with the essentials of baseboards and working track. 


One way the book is a little different is how it uses examples to illustrate different approaches and techniques in a practical way, the author drawing on layouts built by the club or club members. This works well, using actual applications rather than a dry description, and brings in different perspectives as well as showing a range of types of layout, scales and genres. Mostly the approaches shown are relatively traditional, which is reasonable given the target audience. In reality, this book is likely to be one of several sources of information for a new modeller, and it is likely to complement the use of magazines and the internet very well. 

Now if the name of Market Deeping MRC rings a bell, it is the club that a few years ago suffered mindless vandalism to its exhibition, with models of the club and its members destroyed. This shocking story hit the news and modellers like myself could only imagine the hurt this must have caused them. The book opens with the author describing how he opened up the school hall to discover the destruction, but also the support and generosity they received from around the world following the news. Out of these metaphorical ashes the club is now working to promote the hobby and open it up to people who may not otherwise have thought of modelling - such as through schools - and this book is a manifestation of that ambition. Now that is an excellent reason for the book, and I really hope it helps bring people into the hobby.

Sunday 1 January 2023

Playing around and around and around

When I was a kid, I did like a roundabout. Maybe it was the sensation of speed, maybe because it didn't matter if there was a group of kids or just yourself. Since a roundabout should be the easiest play equipment to animate I thought I would add one, but the Gaugemaster kit didn't include one. There was a spinning thing kids can hang from, but I wanted a traditional ground-level roundabout. This was built from scrap parts and my imagination. 


The basis is a large gear with the teeth cut off, this was attached to a shaft, put in the Dremel, and while spinning a file applied gently to ensure the edge was round and smooth. I then drilled small holes near the edge 90 degrees apart.


A length of tube was opened out to slide over the projecting shaft, and at the top four notches cut. Four handrails were added upright from the holes and across into the centre-post notches (two are L-shape and one is an inverted U-shape running right across). The wire was later blackened. 


The centre post was topped with a plastic disc cut from a leather punch. I also added a seat onto the gear boss, this would have been easier before fitting the handrails! 20 thou plastic was cut to the circular shape and the centre punched out, then cut into two semi-circular pieces which were glued around the centre-post sitting on the boss. I also raised the ground around the roundabout with a piece of 40 thou plastic to disguise the depth of the roundabout. 

The roundabout is simply motorised with it's own motor/gearbox, mounted on a couple of blocks of wood, the lower is a spacer for the motor output drive, the upper has a 2mm hole through which the shaft passes to keep it vertical.

The animated playground equipment fitted to the sub-base in place on the layout, the motors and mechanism are hidden within the layout. The foam-core board construction of the layout means there is no access to the motors and mechanism from below, so the sub-base needs to remain removeable in case of maintenance. 

The animation may be a little jerky but it works surprisingly well, although the motors are really quite noisy.