Just got the latest 009 News...
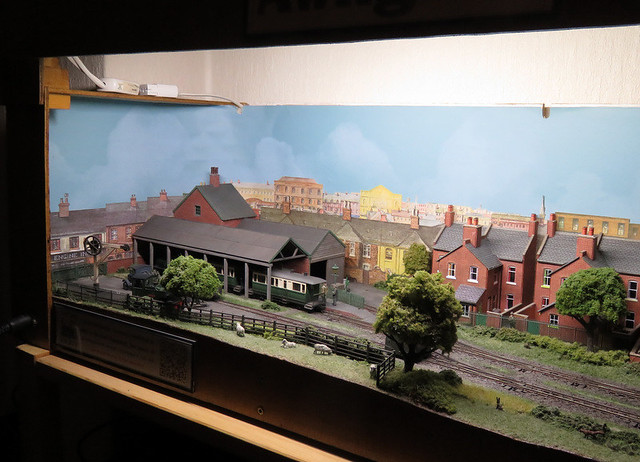
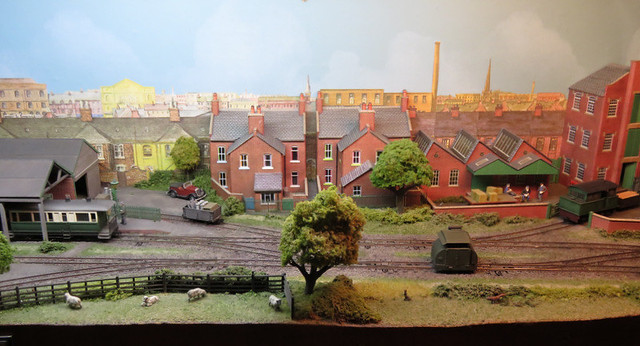
Loctern Quay is the winner of the 009 Society competition!
Michael Campbell's blog about his model railways. Building model railway layouts in 009 (OO9) scale
Showing posts with label Layout. Show all posts
Thursday, 7 May 2020
Sunday, 1 December 2019
Corrugated warehouse
You might remember I was planning a curved-roof shed for the right hand end of the layout, as shown by various mock-ups.
The building was made out of 40-thou (1mm) plasticard. Basic dimensions were taken from the card mock-up and transferred to the plastic with the help of calipers, and of course a compass - this one is a left-over from university technical drawing classes, and usefully can be fitted with a point at both ends, which was used to scribe the curve.
With the curve already scribed it was easy to cut out, but what about curving the roof? The plastic was taped to something round - a tin mug looked about right - and boiling water poured over it. Once cooled the plastic is nearly the right shape, and is easily to fit.
Here's the same technique being applied to the corrugated sheet - I used Wills clear corrugated material, as I had some in that was starting to go yellow, and it is much thinner than the moulded stuff making curving it possible, and the edges look better.
Back to the shell of the building, the back of the front is given lots of bracing, and the roof/walls piece stuck in place, note how the preformed curve means it is already almost the right shape.
Next I worked out how to attach the corrugated sheet, the building was too tall for a single sheet to cover it but this thin plastic corrugated sheet can be overlapped, rather like the real thing.
I stuck it on with double-sided tape, sealing the edge with solvent. The corrugated material is a shiny, hard clear plastic that doesn't glue easily, solvent won't stick it together but does hold it reasonably well to the softer white plastic. Over a large area though the double sided tape should be quite strong, and means no warping. Even superglue seemed to struggle, though with patience it was used to hold the top piece in place.
With a quick waft of red oxide primer it can be placed on the layout to see how well it fills the gap - looks OK to me. I'm planning to paint it tar black, which seems most common for such buildings, with a bit of rust showing through. However, my wife rather likes it in red...
I just need to make a door, and get the rest of the painting done, there will also be a brick plinth along the bottom.
I've also been working on the rest of the street along the back of the layout, so more soon!
The building was made out of 40-thou (1mm) plasticard. Basic dimensions were taken from the card mock-up and transferred to the plastic with the help of calipers, and of course a compass - this one is a left-over from university technical drawing classes, and usefully can be fitted with a point at both ends, which was used to scribe the curve.
With the curve already scribed it was easy to cut out, but what about curving the roof? The plastic was taped to something round - a tin mug looked about right - and boiling water poured over it. Once cooled the plastic is nearly the right shape, and is easily to fit.
Here's the same technique being applied to the corrugated sheet - I used Wills clear corrugated material, as I had some in that was starting to go yellow, and it is much thinner than the moulded stuff making curving it possible, and the edges look better.
Back to the shell of the building, the back of the front is given lots of bracing, and the roof/walls piece stuck in place, note how the preformed curve means it is already almost the right shape.
Next I worked out how to attach the corrugated sheet, the building was too tall for a single sheet to cover it but this thin plastic corrugated sheet can be overlapped, rather like the real thing.
I stuck it on with double-sided tape, sealing the edge with solvent. The corrugated material is a shiny, hard clear plastic that doesn't glue easily, solvent won't stick it together but does hold it reasonably well to the softer white plastic. Over a large area though the double sided tape should be quite strong, and means no warping. Even superglue seemed to struggle, though with patience it was used to hold the top piece in place.
With a quick waft of red oxide primer it can be placed on the layout to see how well it fills the gap - looks OK to me. I'm planning to paint it tar black, which seems most common for such buildings, with a bit of rust showing through. However, my wife rather likes it in red...
I just need to make a door, and get the rest of the painting done, there will also be a brick plinth along the bottom.
I've also been working on the rest of the street along the back of the layout, so more soon!
Labels:
009,
009 Society Challenge,
buildings,
Layout,
Loctern Quay
Wednesday, 5 June 2019
Goodbye Awngate, hello Hexworthy
A big event happened at the weekend. Awngate has moved on to a new home. It's been growing on my mind for some time that I would have to dispose of the layout in order to make room for Hexworthy, I just don't have space to keep it safely. So when someone at an exhibition last year commented how they'd love to buy it if I ever sold, I said I'd give them first opportunity when the time came. And that time has come.
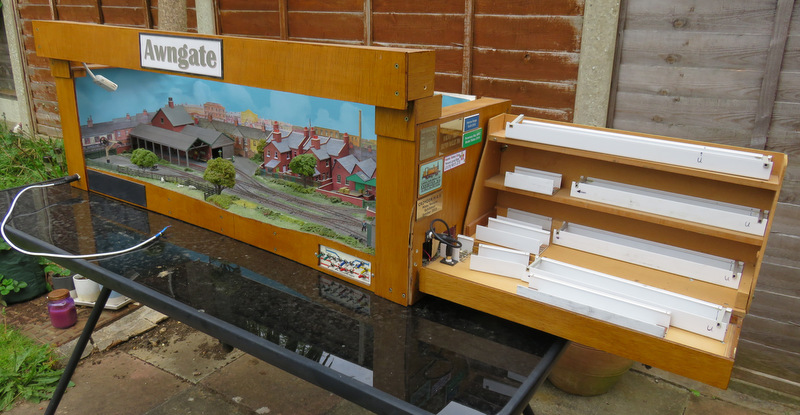
These are the last photos I took of the layout in the condition it sold, with the original cassette fiddle yard. I have to say I've been very pleased with the way Awngate turned out, an excellent home layout with plenty of operating interest in a small space, and has shown that a small well-presented layout can reside in the house, it has also proved a good exhibition layout.
In fact it was my first "proper" exhibition layout, rather than a micro or Expo challenge, and although primarily intended as a satisfying home layout it was designed with exhibitions in mind. The plaques show it has attended a good number - including some of the top NG shows - though I think there's at least one plaque that never got attached, and a few shows without plaques. Who knows, the new owner may exhibit it too.
Awngate was also the seed that started this blog, with the idea that blogging as I went might encourage me to make better progress. I think that's worked, and it's been great hearing from people who say they read about the layout on the blog. It's also nice that many people have commented at exhibitions or online about how they like the layout - that's a great encouragement.
So maybe I should feel sad about moving on from Awngate, but I don't. I've had my enjoyment from building and showing it for the last 11+ years, and I am happy that someone else can get some enjoyment from it, rather than it deteriorating, being broken up, or worse - ebay!
Meanwhile the shelf in the dining room has been filled by Hexworthy. Out with the old, in with the new. Hopefully this will mean faster progress with the layout?
These are the last photos I took of the layout in the condition it sold, with the original cassette fiddle yard. I have to say I've been very pleased with the way Awngate turned out, an excellent home layout with plenty of operating interest in a small space, and has shown that a small well-presented layout can reside in the house, it has also proved a good exhibition layout.
In fact it was my first "proper" exhibition layout, rather than a micro or Expo challenge, and although primarily intended as a satisfying home layout it was designed with exhibitions in mind. The plaques show it has attended a good number - including some of the top NG shows - though I think there's at least one plaque that never got attached, and a few shows without plaques. Who knows, the new owner may exhibit it too.
Awngate was also the seed that started this blog, with the idea that blogging as I went might encourage me to make better progress. I think that's worked, and it's been great hearing from people who say they read about the layout on the blog. It's also nice that many people have commented at exhibitions or online about how they like the layout - that's a great encouragement.
So maybe I should feel sad about moving on from Awngate, but I don't. I've had my enjoyment from building and showing it for the last 11+ years, and I am happy that someone else can get some enjoyment from it, rather than it deteriorating, being broken up, or worse - ebay!
Meanwhile the shelf in the dining room has been filled by Hexworthy. Out with the old, in with the new. Hopefully this will mean faster progress with the layout?
Labels:
009,
Awngate,
exhibition,
Hexworthy,
Layout
Tuesday, 17 April 2018
Lighting with LED's - experimentation
I've been looking into LED lighting for layouts for some time, with the build of Hexworthy underway. They offer distributed light in a light-weight flexible format, with low power consumption and heat output. There are potential pitfalls though, I've seen layouts far to dimly or unevenly lit, or worse still, with an unnaturally blue light (I've even seen a layout actually lit with blue LED's!).
One problem is that "white" LED's are not often white, the options seem to be "cool white" at the bluer end of the spectrum (6000K), or warm white (3000K) which is much more yellow. I find the cool white is too blue, and while the warm white is more preferable it is rather too yellow - more Mediterranean than British! However I recently found that it was possible to get "Natural white", which at around 4000K is somewhere between the two.

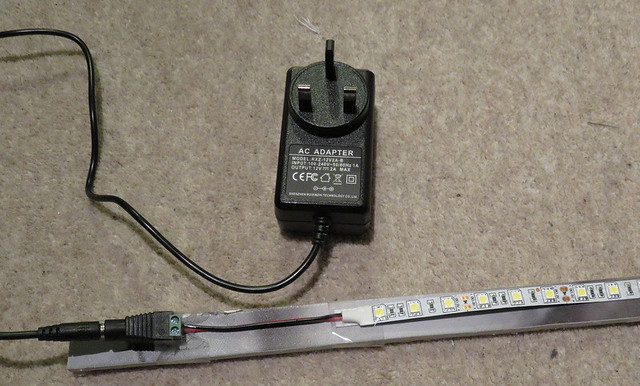
So here's what I bought:

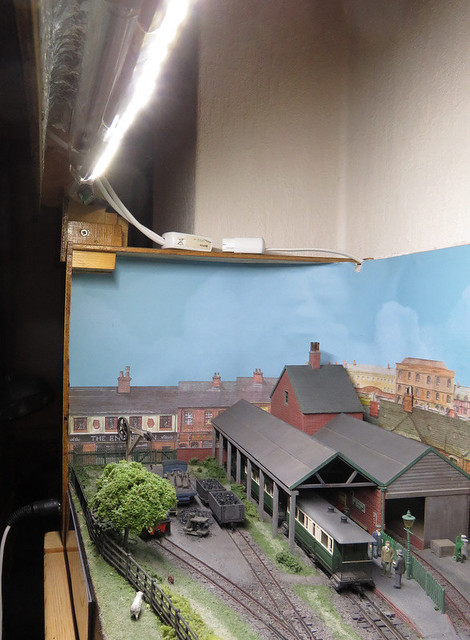
This assembly was then roughly taped to the lighting beam above Awngate, at a slight angle towards the rear, to see how it looked.

The result looks good, the colour does look "natural" to me, and while far less yellow than the tungsten strips used on Awngate, it does not have the blue tint of cool white LED's. Placement may be better - objects near the front are in shadow - and shadows are a little harsh, but otherwise light distribution looks OK.

The effect in a darkened room looks good to me. I wasn't sure if it was bright enough at first, so how does it compare to the existing lighting?

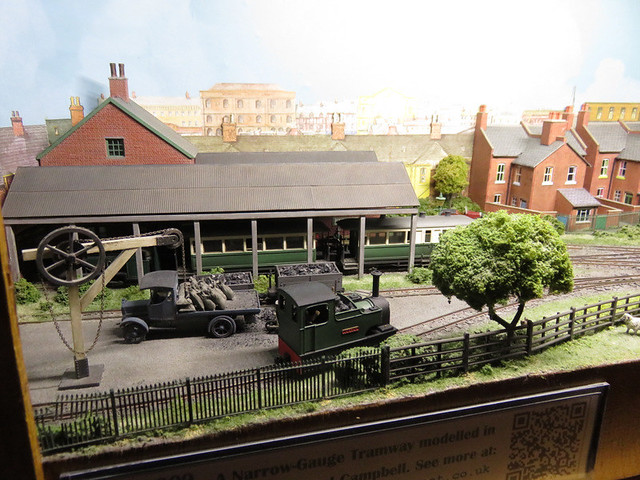
This shows the layout lit with the LED strip on the left side, and the existing 30W tungsten strip lighting the right hand end (the one at the left end is switched off). The difference in colour balance is obvious, the tungsten light is much more yellow - cheerful and summery perhaps, but less realistic. Brightness seems reasonably consistent to me, although the LED light may be less well spread, and shadows are perhaps a little sharper. So a 12" deep layout may be adequately lit by a single strip of LED's, but using more lights and possibly use of reflectors and diffusers might spread the light better.

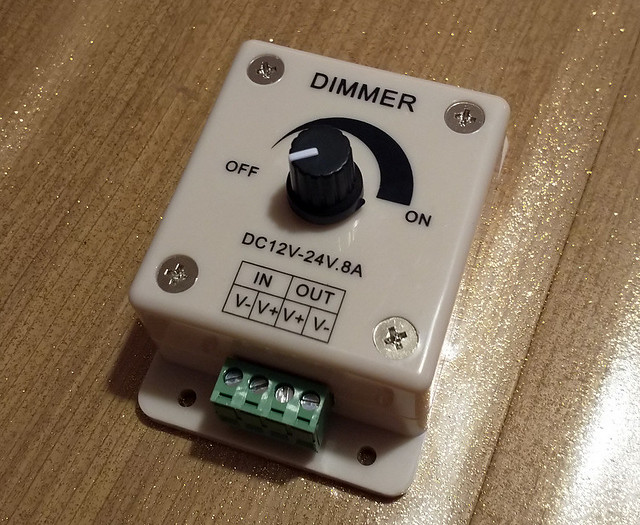
I also got this dimmer switch (link), mainly because it was so cheap. I wonder if it may be helpful if adding more LED lights to dim down to what is needed. Also I suspect that the small power supply I got will do for very small layouts, but I may need to get a bigger power supply for larger layouts. More experimentation to follow, but I am happy with the colour balance of these lights.
One problem is that "white" LED's are not often white, the options seem to be "cool white" at the bluer end of the spectrum (6000K), or warm white (3000K) which is much more yellow. I find the cool white is too blue, and while the warm white is more preferable it is rather too yellow - more Mediterranean than British! However I recently found that it was possible to get "Natural white", which at around 4000K is somewhere between the two.

So here's what I bought:
- Natural White 4000K SMD 5050 LED strip, 60 LED's per meter (link)
- A 12V 2A Power Supply Adaptor, which should be good for about 2m of LED's (link)

This assembly was then roughly taped to the lighting beam above Awngate, at a slight angle towards the rear, to see how it looked.

The result looks good, the colour does look "natural" to me, and while far less yellow than the tungsten strips used on Awngate, it does not have the blue tint of cool white LED's. Placement may be better - objects near the front are in shadow - and shadows are a little harsh, but otherwise light distribution looks OK.

The effect in a darkened room looks good to me. I wasn't sure if it was bright enough at first, so how does it compare to the existing lighting?

This shows the layout lit with the LED strip on the left side, and the existing 30W tungsten strip lighting the right hand end (the one at the left end is switched off). The difference in colour balance is obvious, the tungsten light is much more yellow - cheerful and summery perhaps, but less realistic. Brightness seems reasonably consistent to me, although the LED light may be less well spread, and shadows are perhaps a little sharper. So a 12" deep layout may be adequately lit by a single strip of LED's, but using more lights and possibly use of reflectors and diffusers might spread the light better.

I also got this dimmer switch (link), mainly because it was so cheap. I wonder if it may be helpful if adding more LED lights to dim down to what is needed. Also I suspect that the small power supply I got will do for very small layouts, but I may need to get a bigger power supply for larger layouts. More experimentation to follow, but I am happy with the colour balance of these lights.
Friday, 14 April 2017
The Baseboard Core
Phase 2 of the baseboard construction involved 5mm foam-core board, this is the stuff made with expanded polystyrene sheet between two layers of thin card. It's easy to cut with a knife and can be glued with PVA, or more quickly and strongly with a hot glue gun, making baseboard construction easy and flexible - and relatively quick. I've used the technique for Pen-Y-Bryn Quarry and more recently Thakeham Tiles, with the former I learned it is easily damaged so needs a protective layer, with the latter I clad it in 3mm ply which worked well. Hexworthy is a much bigger board, and the need to connect it to an existing fiddle yard led me to make the outer ply "skin" first and make the foam-board core to fit. Actually this is probably a harder way to do it...

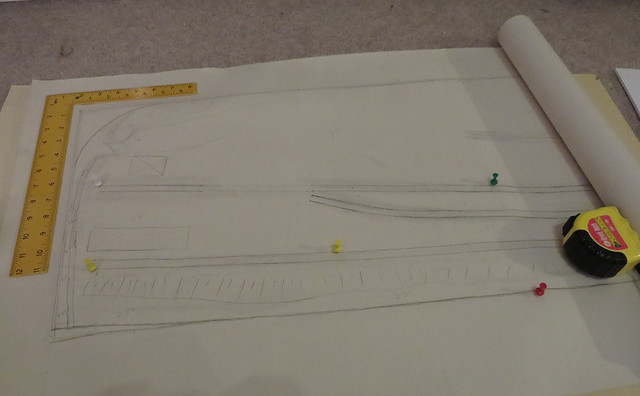
The first task was to mark out the "deck" including transferring the track plan from the paper plan, which was done with the highly technical method of using pins...
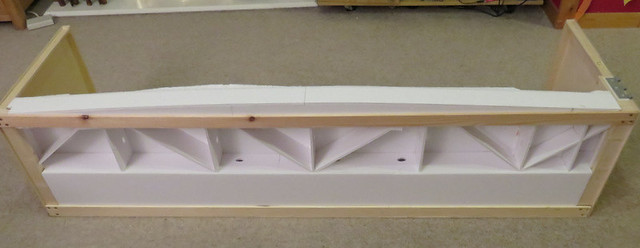
Now I forgot to photograph the construction phase, but it was pretty similar to that of building the board for Thakeham. Here I doubled the thickness of the foam-board under the track, not because I think it needed the strength, but to increase twist resistance and to enable cuts (e.g. drainage ditches) to be added to the top surface later. Bracing was cut and glued to the underside at about 9" intervals, interlocking where longitudinal and cross bracing met, like an egg-box. Some diagonal bracing was added too.

A complication was the river along the front, which is set about 1" lower than the track bed, polystyrene sheet was glued in the gap to firmly join the two layers and will be cut to form the river-bank in due course. There's also a stream under the tracks, which has yet to be fully cut out but the base is ready underneath. The front will have a thin ply fascia, though this has yet to be cut and fitted, and there will be "wings" at each end which will help stiffen the end boards.

Underneath the bracing can be seen. Due to the length of the board I was concerned about flex or twisting, so I decided to box in the rear part of the frame to make a "torsion-resistant" beam. There's little track over this part, and if I need access to wires etc I can cut access holes. Once the board was glued into the ply outer shell (with PVA) it turned out to be surprisingly stiff. The strip-wood runners along the base are more to protect the foam and bear the weight onto the supports, than to add strength.
The resulting board seems pretty strong, there's no bending and no end-to-end twist unless significant force is used. There's a little flex in the back-scene, which is unlikely to be an issue but I plan a couple of diagonal braces. It's certainly easy to move about on my own despite it's length, at around 4 kg I think. Hopefully I'll get it finished over Easter, and maybe even buy some track...

The first task was to mark out the "deck" including transferring the track plan from the paper plan, which was done with the highly technical method of using pins...
Now I forgot to photograph the construction phase, but it was pretty similar to that of building the board for Thakeham. Here I doubled the thickness of the foam-board under the track, not because I think it needed the strength, but to increase twist resistance and to enable cuts (e.g. drainage ditches) to be added to the top surface later. Bracing was cut and glued to the underside at about 9" intervals, interlocking where longitudinal and cross bracing met, like an egg-box. Some diagonal bracing was added too.

A complication was the river along the front, which is set about 1" lower than the track bed, polystyrene sheet was glued in the gap to firmly join the two layers and will be cut to form the river-bank in due course. There's also a stream under the tracks, which has yet to be fully cut out but the base is ready underneath. The front will have a thin ply fascia, though this has yet to be cut and fitted, and there will be "wings" at each end which will help stiffen the end boards.

Underneath the bracing can be seen. Due to the length of the board I was concerned about flex or twisting, so I decided to box in the rear part of the frame to make a "torsion-resistant" beam. There's little track over this part, and if I need access to wires etc I can cut access holes. Once the board was glued into the ply outer shell (with PVA) it turned out to be surprisingly stiff. The strip-wood runners along the base are more to protect the foam and bear the weight onto the supports, than to add strength.
The resulting board seems pretty strong, there's no bending and no end-to-end twist unless significant force is used. There's a little flex in the back-scene, which is unlikely to be an issue but I plan a couple of diagonal braces. It's certainly easy to move about on my own despite it's length, at around 4 kg I think. Hopefully I'll get it finished over Easter, and maybe even buy some track...
Saturday, 1 April 2017
Work starts on a new layout...
Yes, I have started a new layout....
I've been doodling plans for some time, and will expand on those in a future post. Suffice for now to say it's 009, and will eventually fill the space on the bookshelf occupied by Awngate, so is a similar size (albeit a little longer). It also uses the "Super-Fiddle-Yard" built for Awngate a couple of years back, meaning I've had to make the end to match.

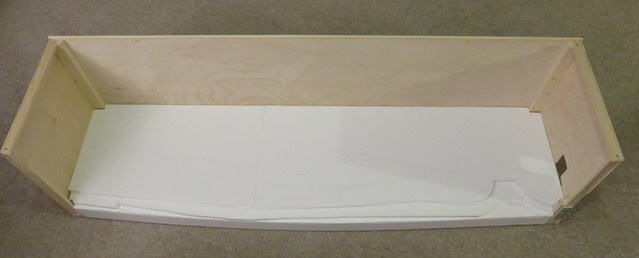
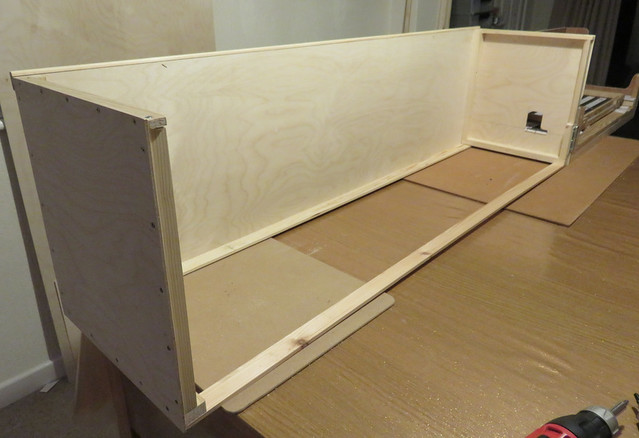
There's some experimentation going on here. I have a plan for where I want to end up, and working back from that I decided to start back-to-front, or at least outside-in. So what you see here is the back-scene with end boards, the middle will follow shortly!
I got some good quality 3mm birch ply from a local timber merchant, who did a few cuts for me so they are straight, and I could fit the bits in the car! I also got various bits of small section timber, some from the off-cuts bin.

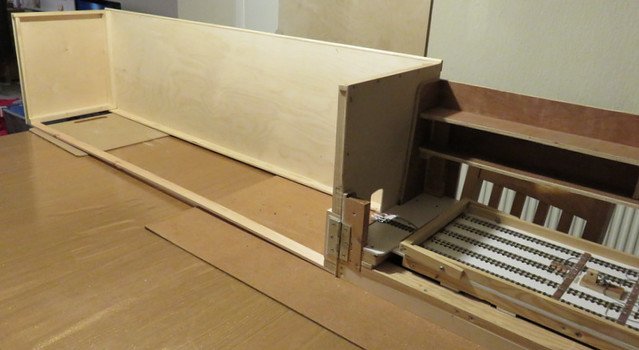
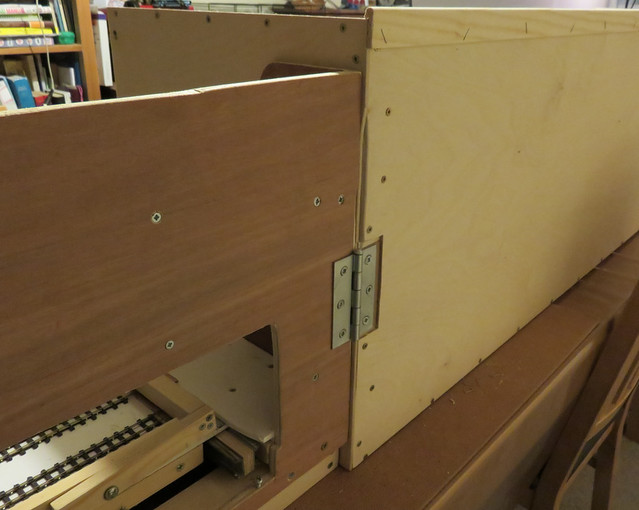
The fiddle yard is joined using the same split hinge system as for Awngate - I got an extra set at the time, which have had to be aligned. I've added a timber frame to the base of the fiddle yard to raise it about 1.5", as the Awngate base-board is very shallow, and this one will be deeper. The frame can be unscrewed for use with Awngate, which has another show booking yet!

Round the back is the other hinge making a rigid and self-aligning join. B&Q do a "Hockey-stick" timber section that is ideal for the top of back-scene brace, and their cheap staple-gun is a good way to attach it.
I've been doodling plans for some time, and will expand on those in a future post. Suffice for now to say it's 009, and will eventually fill the space on the bookshelf occupied by Awngate, so is a similar size (albeit a little longer). It also uses the "Super-Fiddle-Yard" built for Awngate a couple of years back, meaning I've had to make the end to match.

There's some experimentation going on here. I have a plan for where I want to end up, and working back from that I decided to start back-to-front, or at least outside-in. So what you see here is the back-scene with end boards, the middle will follow shortly!
I got some good quality 3mm birch ply from a local timber merchant, who did a few cuts for me so they are straight, and I could fit the bits in the car! I also got various bits of small section timber, some from the off-cuts bin.

The fiddle yard is joined using the same split hinge system as for Awngate - I got an extra set at the time, which have had to be aligned. I've added a timber frame to the base of the fiddle yard to raise it about 1.5", as the Awngate base-board is very shallow, and this one will be deeper. The frame can be unscrewed for use with Awngate, which has another show booking yet!

Round the back is the other hinge making a rigid and self-aligning join. B&Q do a "Hockey-stick" timber section that is ideal for the top of back-scene brace, and their cheap staple-gun is a good way to attach it.
Labels:
009,
baseboard,
fiddle yard,
Hexworthy,
Layout
Wednesday, 13 February 2008
Sliding mounts now fitted
Last weekend I managed to get the layout fitted to it's permament support, rather than just resting on top of the bureau! The key components are these drawer sliders, recovered from some old furniture by a Sussex Downs club member. I have used 4, 2 each side, to take the weight without twisting. They are fixed between two strips of wood, one fixed the the wall (in this case the side of the chimney breast) and the other to a shelf.The shelf
is a ply and MDF laminate, the ply (top layer) is cut to fit inside the bottom of the layout. The shelf doesn't take the weight of the layout as it baseboard is rigid, so the weight is supported by the softwood ends straight onto the sliders.The layout sits flush into the alcove, but for full operation it slides forward by about 7 inches, allowing the fiddle yard to slot onto the right-hand end, canterlevered over the mantelpiece. The fiddle yard just pushes in supported by it's extended frames.
When I put the wood for the sliders on the walls I got my calculations slightly wrong, and the layout was about 1/4 inch high and hit the shelf above - that's how tight the clearances are! With a little
adjustment of the shelf design I managed to lower the layout by 1/4 inch so got the clearance back.Once the layout is finished the ply will be stained a similar colour to the shelves above and the fireplace, so it appears to fit into the room as a piece of furniture.
So there it is, pulled out and reasy for use. Well apart from the rest of the work to complete the layout!
Subscribe to:
Posts (Atom)