Showing posts with label turntable. Show all posts

Monday, 22 May 2017

Latching Fiddle Yard Mechanism - A Prototype

The Sussex Downs 009 group are building a new layout, and discussion at the last meeting came to how we'd build the fiddle yards. The design calls for two turn-tables each with 4 tracks, that are able to quickly change between trains and turn them without handling. This is far from a new idea, the traditional design uses a sliding bolt (as seen on doors and gates) to provide both mechanical alignment and electrical contact to each track. A simple idea that works well enough, but in the smaller scales, the need for precise alignment conflicts with the need for the bolt to slide and engage easily, which can mean they can be stiff or fiddly to use.

I saw an idea posted on a forum some time back that used a pivoted lever with a notch that engaged on metal edges aligned with and underneath the tracks, all that was needed was to depress the lever to release the engagement and move the deck until the next one engaged. The problem was it was bulky and required a lot of space below the deck, which the club layout design didn't allow. I felt the concept was sound though, and after some thought I came up with way that a similar idea could work in much less space, and be constructed with minimal need for accuracy and without special tools or skills.

Ideas are all well and good, but the only way to be sure it works in practice is to try it out. So I raided the garage for leftover bits of wood and PVC foam-board, and with literally no expense spared incurred, built a mock-up over a couple of spare hours at the weekend. The size was dictated by the materials to hand - the deck is about 18" long and 9" wide, long enough to demonstrate it - while construction is somewhat crude. I've added other ideas too like the handle/gate. Now, let me show you the idea...
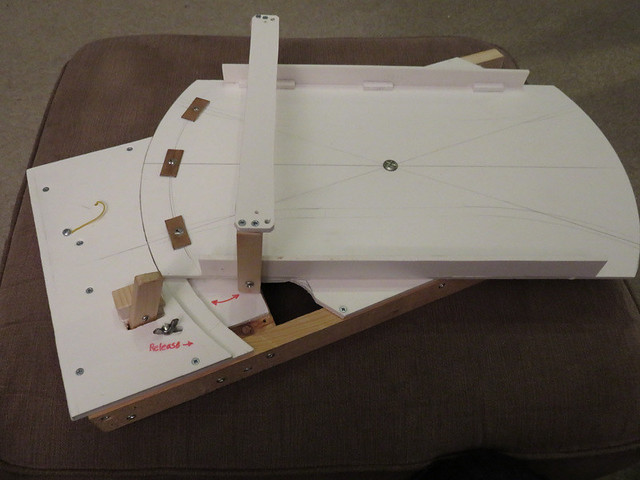
1_Overview_

An over-view with the deck turned to the front track. On the deck are three pieces of PCB to which tracks would be attached, and through them the top of a brass tube/pin protrudes and is soldered. The handle we’ll come to later. To the left is the release mechanism – push the wooden lever to the left to unlock the deck to turn. The lever was an afterthought "improvement" - initially I just pushed the wing-nut (which could have been a nice wooden knob) to the right, but the lever is nicer to use. I guess that's the point of the mock-up!
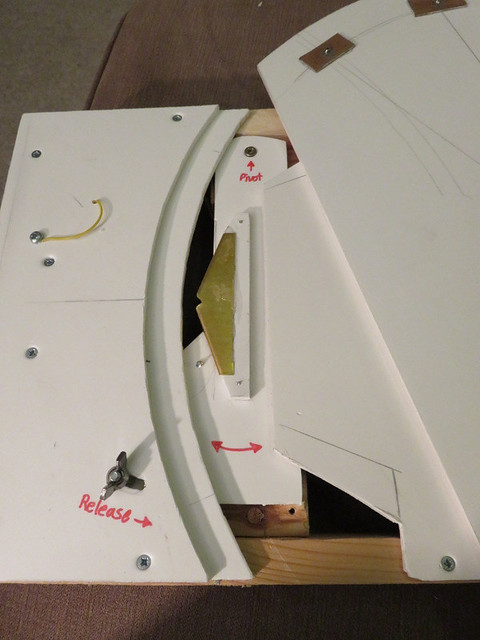
2_LockingMechanism_Top

Under the deck you can see a brass “latch” (triangular with a notch at the top) attached to a pivoted lever, the free end of which is moved by the release knob (bolt) - and now the lever too (fitted after I took this photo). The support for the deck is shaped for a particular reason.
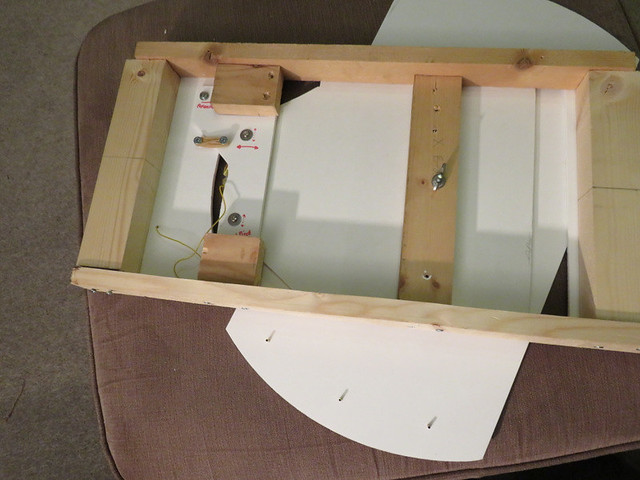
3_Underside

From underneath you can see the three location pins (brass tubes) protruding down through the deck, and the latch arm locking mechanism which pivots on the lower wooden block, the other end slides on the upper wooden block.
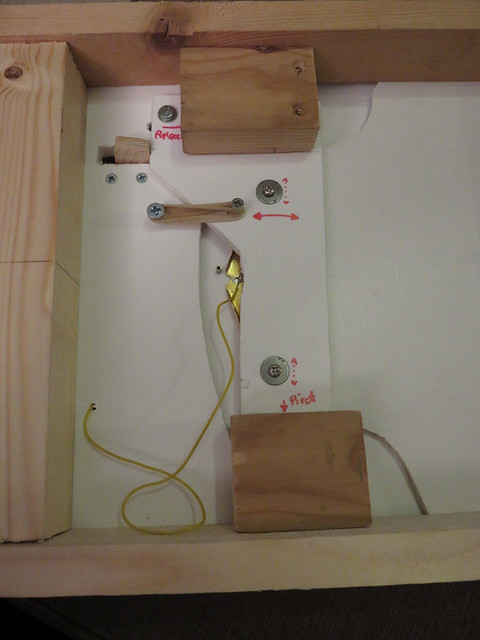
4_LockingMech_Below

The latch arm close up, the bottom is the pivot, the top rotates as per the arrows, and is pushed by the bottom of the wooden lever. The high-tech tension device (rubber band in this mock-up, but a spring would be better!) pulls on back the latch arm. The bass latch can be seen with a wire from it, and against one of the slopes a location pin can be seen from the deck. As the deck is rotated this slides up the brass latch by pushing against the lever until it drops into the vee shaped notch, holding it securely and making electrical contact between the brass latch and the PCB above.
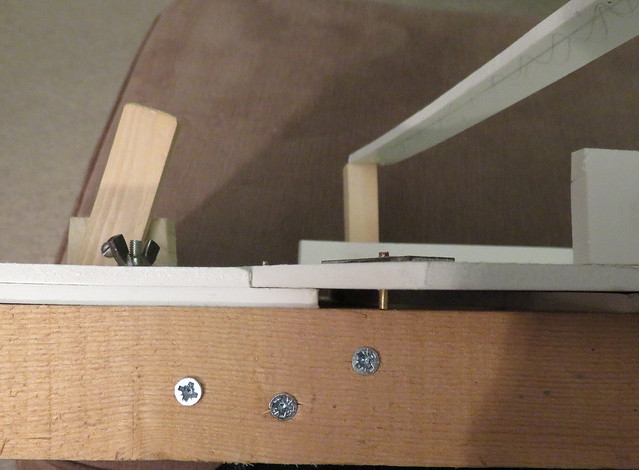
5_SideView

The location pins only protrude about 5 mm below the deck so clear the frame of the board – the foamboard is 5 mm thick - and at the top, protrude just far enough to be soldered to the PCB, and not foul locos passing over them. The rest of the mechanism is contained within the frame. This makes it reasonably straightforward to build this mechanism, and contain it within a conventional design and depth of baseboard.
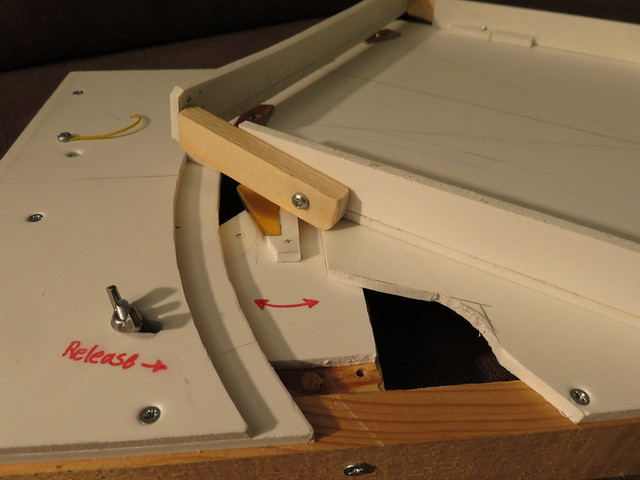
7_HandleFoldedToRotate

Back to the handle. In the up position the tracks are clear, but when pushed right over the bottom of the handle uprights contact the supporting board below stopping excess movement. With the handle folded down the deck is free to rotate beyond the last track – i.e. can turn right around - as seen here.

Operation is simple: simply push the lever  to disengage the pin and rotate the deck, once the lever is released the deck latches at the next track that it aligns with. As the brass pins are round, and the notch is vee shaped (with rounded entry), alignment is actually very precise - as the pin reliably self-centres in the vee. No effort is required by the user to achieve this, the deck is simply rotated until the pin clicks into place. Electrical contact is also made connecting the aligned PCB (i.e. table track) to the fixed track.

This system would be just as useful on a traverser or sector plate as a turn-table, and had I thought of it a couple of years back, I'd have used it on my "exhibition" fiddle yard for Awngate instead of the micro-switches. Some of the construction details could be improved from my quick mock-up, but overall I'm happy to say the concept works well.

Friday, 13 February 2015

Train Set Features

I thought I'd post a few more pictures of my Son's train set, last seen when I'd just finished the track-laying and wiring. The few buildings so far are Hornby, most of which came from my childhood train-set, they are nice and robust which is ideal for this situation. They are stuck to the board with impact adhesive for when the board is folded up.


A busy view with some favourite trains on view! Lots of brick walling will be needed.


I found my old car transporter wagon and loading ramp, which adds a bit of fun.


Joshua got given a PECO turntable for his Birthday, so we spent a little time putting the kit together. I'd left enough space for it, so it was simply a case of mark out the circle and cut out with a jig-saw.


The kit is easy enough to assemble, so soon it was in place and having the tracks laid. The turn-table track takes it's power from the approach track, but I have yet to power the spur tracks - I'm sure there is a clever way to power them from the turntable position but I'll probably use a rotary switch.


Finally - in use! That track to the right needs a bridge now...

Friday, 7 September 2007

Southon Yard - Shoebox Layout

Southon Yard is the motive power depot of one of the Welsh narrow-gauge lines. The yard features a 25-foot turntable, a two-road engine shed, and a workshop for maintaining the line’s engines and rolling stock. Locos enter and leave the yard via the line behind the engine shed, they are turned if required, coaled and watered. You may also see shunting of coal wagons and supplies to the works. The turntable may seem unusual on a line such as this, but the Ffestiniog and the Lynton and Barnstable lines had similar ones, as did tramways such as the Glyn Valley, as the locos usually ran cab-first on tramways. In fact, this line has some tram engines so it may have been originally built as a tramway.


The layout was designed and built to fit into a shoebox for a competition at EXPO-NG in 2004, although I do have large feet which helped! The lighting and back-scene remove for this, as was allowed in the competition rules. It was also designed to be a setting for displaying my growing collection of 009 locos, and can be placed on a shelf. The design and construction of the layout had to be carefully thought out because it is so small. The turntable is motorised through a set of gears and shafts, the motor is in the workshop!

It was great fun to build this layout for the competition, even though it was designed and built within a tight 5-month timescale! I managed to use some buildings from a previousl layout that was never completed, but even so there was a surprising ammount of work for such a small layout. The icing on the cake was that I won the competition!

More pictures can be found at:
http://campbell-modelrailway.fotopic.net/c689395.html
Posted by Picasa