Sunday 23 January 2022

A pane of a job

As I am trying to clear a few unfinished projects from the workbench I thought I should finish this Welsh Highland coach, which I'd assembled way back in August 2019. It had actually visited the paint shop soon after, but the job of cutting and fitting the glazing looked tedious, the clear plastic was included in the kit but needed to be cut to fit the recess for each window. It was last summer before I made a start, but it was indeed tedious, progress was slow and the project stalled again until I decided it really deserved to be finished. 

Using my callipers to measure the size and to score onto the clear plastic helped but each pane had to be checked and trimmed several times before it fitted. The recesses allowed just a fraction of a millimetre around each window so poor cutting would result in gaps, or the glazing not fitting flush and flat behind the openings. Each piece was then glued around the edges with Micro Krystal Klear (though my pot is drying up which didn't help) and placed in with tweezers. There are different sizes of windows, and those at the ends have virtually no frame at all, making cutting and fitting difficult. While excess glue is clear and can be removed, the glazing seems to mark easily and unfortunately has gained many visible scuffs and scratches, but at least the job is finally done!


Underneath, the bogies didn't seem to move as freely as I'd like, the contact area being quite large and only allowing rotational movement. The solution is simply a thin strip of plastic either side of the pivot bolt, which reduces the contact area and friction, and allows the bogie to rock slightly. Setting the strip at one end of the coach lengthways and at the other across the coach allows sufficient flexibility in the bogies without allowing the coach to rock from side to side. 


The bogies are fixed to the captive bolts with a nut and washer, but the nut would soon come off with the movement of the bogies. I applied glue to the bolts before adding the nuts, I used the Micro Krystal Klear since it was on the workbench but PVA would do as well, this provides enough hold to retain the nut but it could be removed if force was applied. I also stuck pieces of roofing lead sheet between the frames to add a little weight. 

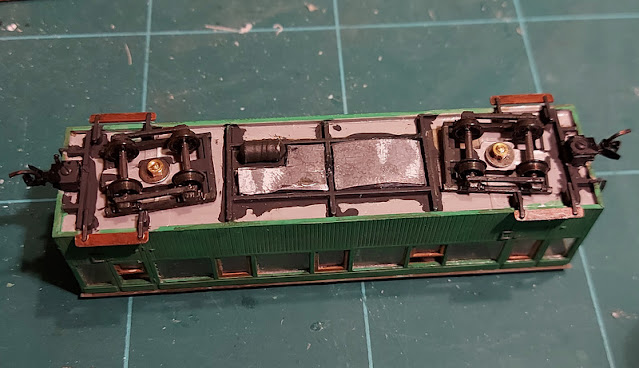
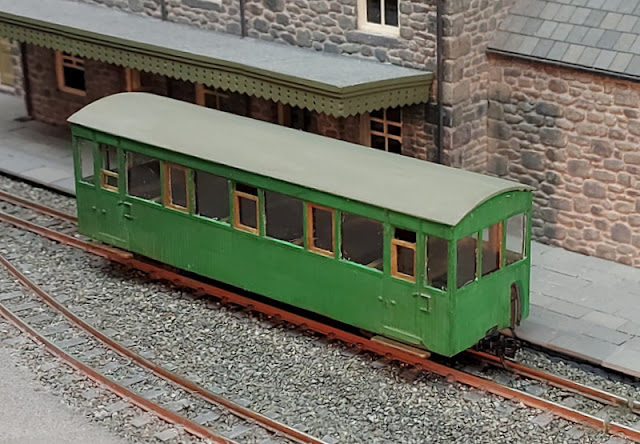
Finally the roof was fixed with the same glue, which can be prised apart if needed - such as when I get around to fit passengers! At least the glazing doesn't look too bad at normal distances. Although I'd applied subtle weathering when I painted the coach, it doesn't seem to show in these mobile phone photos, though it does look effective to the naked eye. 

Sunday 16 January 2022

A brake van for the PW train

I've been trying to work though a couple of unfinished projects. One is this 009 Society kit for a Royal Naval Ordinance Depot brake van, which I actually started back in the summer while demonstrating at the 009 Society stand at the Amberley rail gala. The body went together easily enough though I took time to make sure the corners went together nicely, the frames at the end of each side are fragile. 


The kit has a nice interior too, with benches and a central brake stand, so the roof has been left off to facilitate painting. However, those delicate sides were clearly going to bow inwards and needed support. The kit sprue provided suitable material to cut a couple of sturdy braces from - cut slightly oversize and filed to be a tight fit. 


I fitted the handrails after the exhibition, always a slightly fiddly job but they do look good. That was as far as it got for months, but looking to clear the part-finished jobs from the workbench this looked a quick win. So I fitted the underframe and wheels, and added mounting blocks for the couplings. 


The brake blocks proved more challenging. First, with the wheels in place they couldn't be fitted around the wheels - the flanges prevented them sliding in from behind, and there wasn't space to fit them between the wheels and the floor. So I prised the wheels out and stuck them - but once the wheels were back in they didn't rotate! The wheels touched the supporting part of the brake blocks. The solution was to remove the wheels, cut away part of the brake block support plastic to clear the wheel, and refit again. Fortunately, for the second axle I could trim the brake mouldings first! The final job was to fit the steps, left until last as they might have been vulnerable in construction.


The little brake van will look good as part of the permanent way train on Hexworthy, though the loco looks like it needs dusting. First though, the roof is still loose for painting, the wheels have been removed (again!) as have the couplings, and it is heading for the paint shop. 

Monday 3 January 2022

Upnor Castle

As an easy post-Christmas project I looked out a 3D printed loco kit I got for my Birthday last year. It is a model of Upnor Castle on the Ffestiniog Railway which was produced by the Merseyside group of the 009 society in memory of Roger Christian, a long-time member of the group who inspired many with not only his modelling skills but his willingness to encourage others, through articles in the 009 News and Railway Modeller, many exhibition appearances, and the 009 Society groups, along with Stan Williams. When I was a young 009 modeller Roger and Stan were a great help and encouragement to me. What a great idea to produce a model in his memory.


The loco is finely detailed and appears to have a good finish, comes with a separate roof and interior, and was supplied with a Kato 109 chassis. This model had a partially broken and distorted cab step, Stan had warned me before dispatch. There are no instructions, but clearly the Kato chassis would need shortening to fit the body. 


I cut of the balconies leaving the chassis much shorter than the body, it fitted neatly in but I felt the body sat too high. I cut off the clips and a strip from the "shoulder" of the chassis alongside the motor which allowed it to sit much lower, but the chassis rocked fore and aft. I added strips of 40-thou plastic to the flats at the corners of the chassis allowing it to sit level. Finally, plastic end-stops added in the corners of the loco frames stop the chassis moving fore and aft within the body. The chassis is held loosely vertically in the body, though it doesn't fall out I may use blue-tack or a spot of glue to hold it in place when finished. 


The next job is fitting couplings. Opening up the buffer-beams for the Microtrains couplings was easiest with a saw, since the 3D printed resin is sawn and files cleanly but isn't easy to cut with a knife. I passed a fretsaw blade through the slot and opened out the hole, then cleaned up with a file. I drilled a hole for the retaining screw, and made a recess in the bottom of the buffer-beam for the screw head. 

I spent some time checking the body and cleaning up blemishes, which I guess are from the support structure during printing, and were mainly on the bottom of the frames and footplate, and around the window openings. The deformed step was easily superglued back together, and I glued plastic strips across the back of the cab handle recesses which were open into the cab. I also thinned the back of the cab back where it meets the roof, and the back of the protrusion below the cab roof, as it initially sat a little forward with no overhang to the rear. 


Now I need to get some primer to continue, the first coat will show how smooth the surface is though it appears pretty good.