Monday 30 December 2019

Loctern Quay Terrace

The last building for Loctern Quay is another Petite Properties kit - this one is "Station Road Terrace". As usual the laser-cut MDF shell goes together quickly and accurately, which I then fitted to a 5mm foam-core base to increase the depth to help plating into scenery. I then covered it with brick-paper, this one is from Scalescenes, note the brickpaper was cut away around the door openings. The detail parts are attached to a piece of card with blu-tack, partially assembled where appropriate but kept separate where helpful for painting.


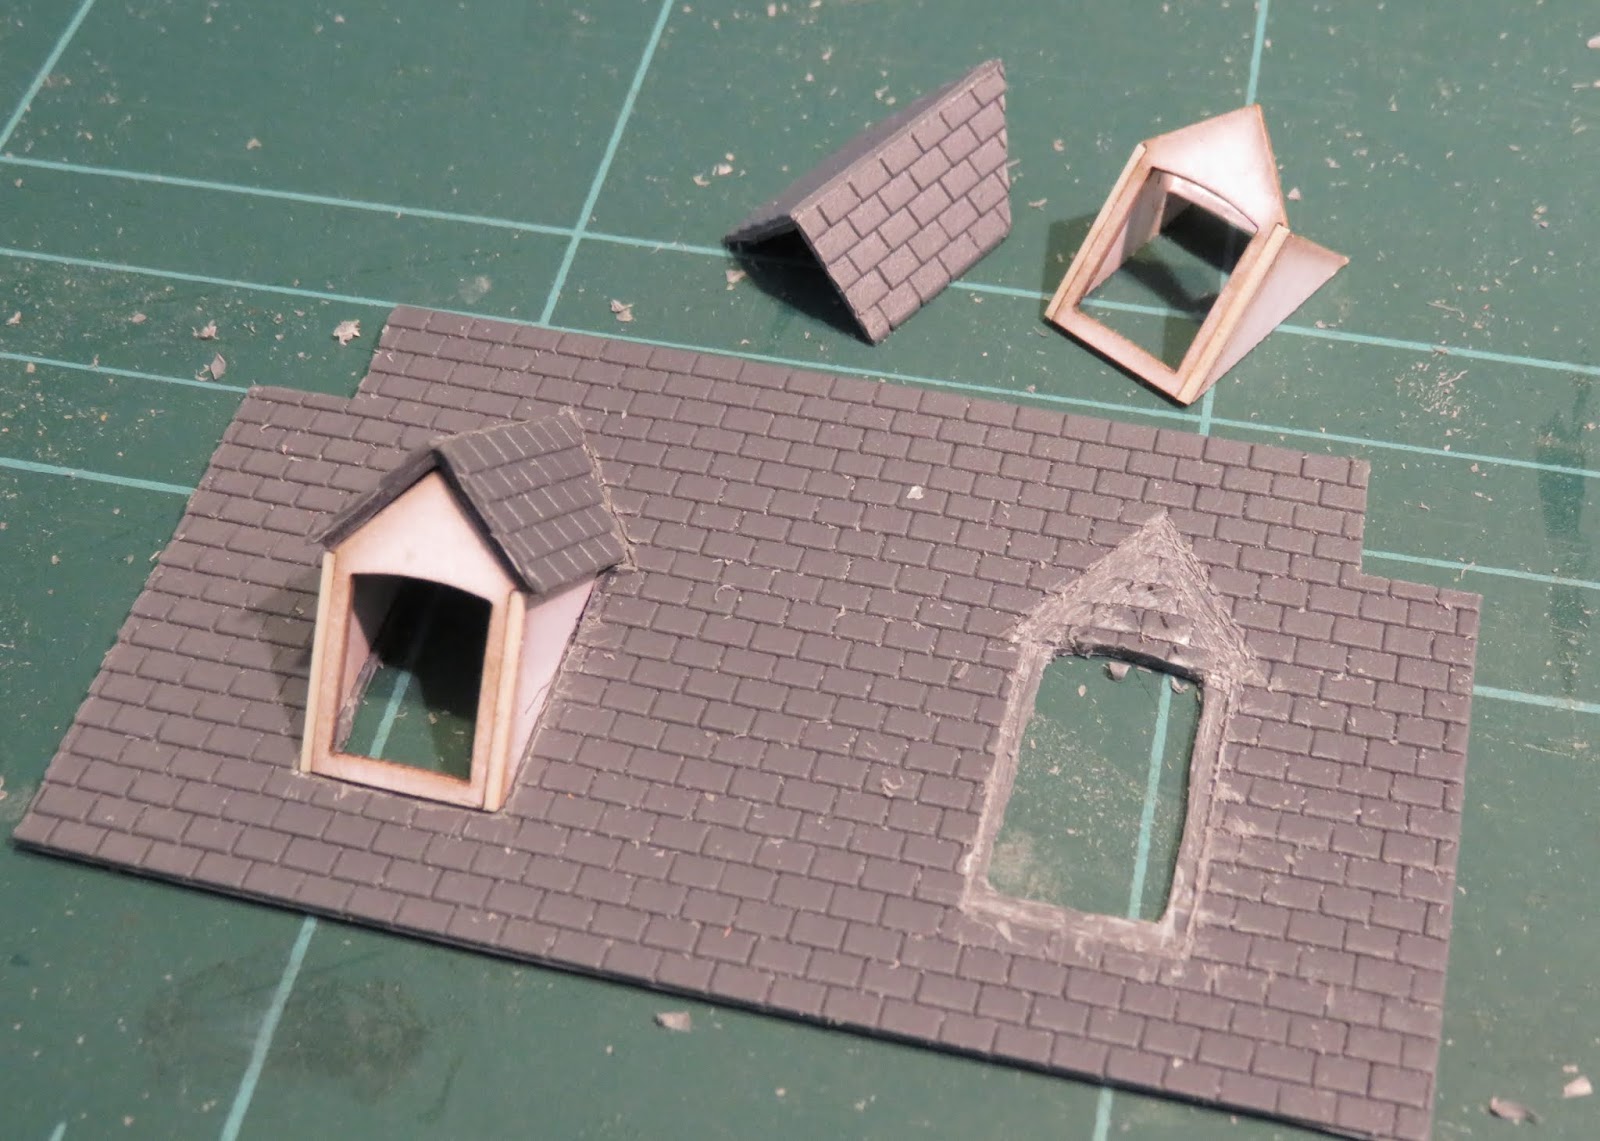
For this one I used the supplied roof parts, although I trimmed a little off both the width and the depth to make it a better fit. I had fitted the chimneys to the walls rather than sticking them on the roof, so the roof was cut to fit around them.


The short rear part of the roof (being a low-relief model) is attached with off-cuts of card and foam-core, while barge-boards are cut from card (none being included in this kit) and fitted to the outside of the ends.


Now I omitted to take photos of the intervening steps, so here's the completed model after the details were painted and fitted.


A few notes on the details:
  • The door openings were painted the same stone colour as the surroundings, and the window lintels and cills
  • Doors, porches, and frames were painted separately. Curtains are coloured paper, and the inside of the building is painted black
  • Inside the porches were floored with checker tiles and lined with ceramic tiles to waist height, using textures from the internet
  • The roof was made from York Modelmaking slates, which were then painted picking out individual slates before being given a grey wash to harmonise and fill the gaps (I should have painted the roof base black first, but fortunately it isn't visible). 
  • The ridge is a strip of micro-strip, covered with a strip of newspaper margin coloured grey with a felt tip pen, to represent a lead ridge. The lead flashing around the chimneys is made in the same way
  • The gutter is a strip of 40-thou black plasticard with the front lower corner rounded, simple but very effective. Down-pipes are 40 thou micro-rod with the brackets represented by small strips of plastic. 

I'm pretty pleased with the result, which looks pretty good even in this cruel close-up photo.

Despite the distractions of Christmas and the general busy-ness of this month I've also been working on completing the other buildings, but I'll update on those in another post.

Thursday 19 December 2019

Book Review: The Corris Railway - Peter Johnson

This is a new release from Pen and Sword books, "The Corris Railway - The story of a mid-Wales slate Railway" by Peter Johnson, and it is pretty much what it says on the cover.


The Corris Railway is one of the oldest of the Welsh slate railways, but one of the less well-known, and I have to say, one of my favourites. The locos and carriages were attractive, the stations quite distinctive, and the scenery through which it ran is beautiful, though of course home to a number of slate quarries. The book tells the story of the line chronologically through four eras - proposals and early horse-drawn years, ownership by a tramway company, and then the GWR, and finally the revival by preservationists in recent years. The text is well written and easy to follow, and introduces the characters involved in the promotion and running of the railway as well as the describing the development and operation of the railway.


As usual from this publisher this hardback book is of good quality, with a good selection of well produced photographs, I don't know how many haven't been seen before but a good number were new to me. There are contemporary maps, and the endpapers feature the route highlighted on 6" OS maps from 1902, but no track plans and I'd have found a simplified map showing key locations mentioned in the text helpful (some places seemed to have several names). There are no drawings, nor stock-lists except a summary of the locos.


So perhaps it isn't a definitive volume about the railway, but it is nonetheless worth of a place on the bookshelves of enthusiasts of narrow gauge and other quirky independent railways, and is a valuable record of the history of this little railway and it's place in the Dulas valley. I found it an enjoyable and informative read, and as a modeller, a good source of inspiration.

Thursday 5 December 2019

The end of the road

Faced with an exhibition form to fill in I was forced to come up with a name for the 009 society challenge layout, so I chose "Locktern Quay".

Meanwhile, work is progressing on the street at the back of the layout, particularly the left hand end of the road, where buildings were needed to disguise the sector plate and the fact the road goes nowhere. As these buildings have to fit some very specific sites and are odd shapes they had to be scratch-built to fit. Hopefully they will give the impression that the road continues around a corner, and there is more to the town/village than the buildings seen.


The central building here had a mock up you may have seen in earlier photos to confirm the size, actual construction used foam-core board for the ends (double thickness for the chimney) and mount-board card for the side walls, the foam-core trimmed to recess the card behind the outer layer of card at the corners. This makes a sturdy yet relatively simple core to which brick-paper is added. Chimney pots are Dart Castings set into an off-cut of Wills roofing plastic, with the detail sanded off and turned face down.


The white building is simply card, which has a texture I hope will look like plaster once painted, the edges are not normally visible. The lintel details are cut from thinner card. I thought the "London" style hidden roof would be different, and avoids an obviously odd-shaped roof given the narrow tapered shape of the building.


The final building is simply a gable and short side walls (foam-core and card again) with a single window, and a different brick-paper finish. All three buildings will use laser-cut windows, but from two different sources.


The roofs are made from Wills plastic slate or tile sheets, with triangles of 40-thou plasticard used to support them, and L-section plastruct for the ridge scored to look like individual tiles. The ends of each roof piece are rebated to thin the end of the tiles/slates, and barge-boards cut from 20-thou plastic glued into them.


Here's the view from the front of the layout showing how the exit to the fiddle yard and the road exit are disguised, and I think the arrangement of buildings looks natural. You can see I've started making the roadway from card, with packing underneath to give height variation. I've also packed under each building to get the heights about right relative to the road.


From the right hand end of the layout the sector plate is just about visible but not obvious, but the road exit remains discrete. The upward gradient of the road works well.

Now I just need to paint the details and complete this trio of buildings.

Sunday 1 December 2019

Corrugated warehouse

You might remember I was planning a curved-roof shed for the right hand end of the layout, as shown by various mock-ups.


The building was made out of 40-thou (1mm) plasticard. Basic dimensions were taken from the card mock-up and transferred to the plastic with the help of calipers, and of course a compass - this one is a left-over from university technical drawing classes, and usefully can be fitted with a point at both ends, which was used to scribe the curve.


With the curve already scribed it was easy to cut out, but what about curving the roof? The plastic was taped to something round - a tin mug looked about right - and boiling water poured over it. Once cooled the plastic is nearly the right shape, and is easily to fit.


Here's the same technique being applied to the corrugated sheet - I used Wills clear corrugated material, as I had some in that was starting to go yellow, and it is much thinner than the moulded stuff making curving it possible, and the edges look better.


Back to the shell of the building, the back of the front is given lots of bracing, and the roof/walls piece stuck in place, note how the preformed curve means it is already almost the right shape.


Next  I worked out how to attach the corrugated sheet, the building was too tall for a single sheet to cover it but this thin plastic corrugated sheet can be overlapped, rather like the real thing.


I stuck it on with double-sided tape, sealing the edge with solvent. The corrugated material is a shiny, hard clear plastic that doesn't glue easily, solvent won't stick it together but does hold it reasonably well to the softer white plastic. Over a large area though the double sided tape should be quite strong, and means no warping. Even superglue seemed to struggle, though with patience it was used to hold the top piece in place.


With a quick waft of red oxide primer it can be placed on the layout to see how well it fills the gap - looks OK to me. I'm planning to paint it tar black, which seems most common for such buildings, with a bit of rust showing through. However, my wife rather likes it in red...


I just need to make a door, and get the rest of the painting done, there will also be a brick plinth along the bottom.

I've also been working on the rest of the street along the back of the layout, so more soon!

Friday 15 November 2019

Building a Petite Street - Part 2

Here's two kits prepared for painting, I stick all the small detail parts on a piece of card with blue-tack which makes handling them easier. Leaving the parts separate until after painting makes painting easier, and allows signage to be added to the shop as seen later. On this model I've used whitemetal chimney pots from Dart Castings set in plasticard bases, and here already primed.


The small cottage has a roof made from Wills tiles, and the foam-core "foundation" can be clearly seen. I've also added supports for down-pipes, but not yet covered the walls. The porch roof was covered with a single ply of tissue before being assembled, while the door frame was so fragile it is tacked to pieces of card with tiny spots of contact adhesive.

The other building is a 3-storey shop, prepared in the same way. This also has a tiled roof, with barge-boards from plastic set into the edges. This one has the chimney pots made from the tube supplied in the kit, which is tricky to cut straight but works OK.


The tall shop got a coating of fine sand to represent render, while the cottage got a layer of talcum powder which should look a bit like rough plaster. After this they were given a quick waft of primer before painting.


So here they are after painting and assembly, though there are some details still to make such as gutters, down-pipes, curtains, and possibly flashing, and I've yet to paint the insides black or fix the backs or roofs.

This building looked like a pub to me, so it's become the Hog's Head, with signage printed out and trapped between the layers. I've tried a 2-tone shop front, not sure how successful it worked though. The roof was painted lots of shades of grey-blue and given a dark wash, but was still a little shiny, two coats of Dullcote didn't help (probably too cold in the garage this week) so weathering powder has been used. It's come out a little dark and hidden most of the colours, but it will do.


The cottage has come out well, I'm pleased with the finish of the walls, helped with a very thin brown wash drawn into streaks as it dried. The door frame in this kit fits into the door opening, reducing the apparent depth, I think it works well and I'd like to see that on more kits.


I'm pleased with the finish of the shop too, although it took three coats until I got the colour looking right (after the first couple I realised it had come out magnolia...), then a well thinned brown wash was applied which really brought it to life. Again the shop front was given a 2-tone look with a print-out, which also gave an interior. Hopefully it has the look of a mundane shop in a back-street of an unremarkable industrial town.


Here's the line-up, along with my first kit, showing the range of roof heights, wall and roof finishes that hopefully add interest without looking out of place together.


While I had the paints out the York Modelmaking slates on the bookshop were painted random shades of blue and grey, as I thought they were just too plain. They then got a thin dark grey wash to tone them and increase the shadows. Compared to the same slates on the roof of Hexworthy's station building I think they look much better.


Building a Petite Street - Part 1

More Petite Properties kits on the workbench, this time to form the street at the back of the challenge layout. The terrace houses on the left will come later, for now I'm building the other three as a batch.


Here's the parts of one of the kits laid out - the walls (here already stuck together) and chimney from MDF, detail parts and roof from card, plus printed clear windows, and tube for the chimney pots.


It doesn't take long to stick the laser cut walls together to see how they look.


I decided to replace the card roof with one made from Wills plastic slate, which turned out to be pretty tricky because of the dormers. I used the card as a template, except that I reduce the overhangs, and make a cut-out for the chimneys which I stick to the top of the walls - rather than onto the roof as intended. The edges of the plastic are rebated to allow the barge boards to sit just under the slates. The card sides of the dormers were used, with a strip of microstrip filling the corner of the fold.


Surprisingly I got the new roof pieces to fit well. Ridge tiles use L-section plastruct notched every 4mm.


This one has walls covered in brickpaper, in this case from Scalescenes. Before covering I added a piece of 5mm foam-core board under the floor to allow the building to be set into the landscape later - I wish I'd thought of this for the earlier models. The shop front is assembled, but without framing and not yet attached as it and the other small details are to be painted separately.


Monday 4 November 2019

Mini Capacitor Discharge Unit

As I mentioned in the last post, I took my part-built 009 society challenge layout to show on the demo stand at EXPO-NG. This layout has solenoid point motors, and I recently posted about my large power-pack, now fitted with two transformers (for two controllers) and a big capacitor discharge unit (CDU) which will power up to 6 points at once. I also have a mini power-pack with a single transformer, much more suitable for micro layouts, but without a CDU it couldn't power the point motors on the challenge layout. I didn't really want to take the larger, heavier power-pack, so could I fit a CDU inside?

I had a vague idea what was needed, but a quick google turned up a useful site that confirmed the circuit diagram. Essentially a diode creates a DC supply from the 16 V AC input, a capacitor stores energy to kick the point motor over when required, and a resistor prevents the solenoids burning out if a switch is left "on" by limiting current flow. My sketch of the diagram is shown below, along with my implementation using a choc-block screw terminal.


What's more I found a diode, a 2200 uF capacitor, and a pack of resistors all in stock, so I gave it a go. The completed home-made CDU is shown below, about to be squeezed into the box. I didn't know where to start with the resistor, so put in a 1 kohm, it worked but took >30 seconds to recharge before it would work again - not ideal! I went down to 100 ohms which was better, but then I thought I could do some maths. I measured the voltage at the capacitor - about 22 V - and reckoned up to 1 A should be safe for the coil, at least for a few seconds. V=IR means a resistor of 22 ohm is the smallest I should use, so I found one and fitted that. The recharge time is now under a second, so perfectly adequate for a layout with just three points.


So the mini power-pack not only provides a single controller from one winding of the transformer, but the other winding now powers the track cleaner, the CDU (22 V DC pulsed), and a 16 V AC supply for any other accessories. The 5-pin DIN socket is for the controller, and the 6-pin DIN socket takes track power, CDU, and 16 V AC to the layout. Also seen in the box is a switch to power on/off the track cleaner, and a thermal cut-out protecting each of the transformer windings.


The track cleaner is rarely used so I could remove it, which would provide space for a "proper" CDU (larger, faster recharging, better point motor protection). However I'm happy with the way the simple CDU works for one point at a time, and with an acceptable recharge time, at least for small layouts.

Thursday 31 October 2019

EXPO-NG 2019

Last weekend was the Expo Narrow Gauge exhibition. As is often the case I was volunteered to help the Sussex Downs 009 group with the 009 society show-case and demo stand, but also group member Martin Collins had his 009 Llandecwyn layout, so I spent a while helping with that too. I took along my part-built society challenge layout as a demonstration, which generated some discussion, it even got operated from time to time.

Martin had just completed a "Clyde puffer" coaster for Llandecwyn, a nicely built and detailed model that sits well on the layout.


I'd been looking forward to seeing Sandy Shores (009) by Jamie Warne, having seen it develop on the NGRM forum. It's a different, imaginative, and really attractive layout that oozes atmosphere, despite it's small size. It's well modelled and presented too.


I had the pleasure of operating for a while to give Jamie a break, and loads of people commented on how they liked it. In fact I really wasn't surprised when Jamie was awarded the Reinier Hendriksen Trophy, as it was clear this was a layout that followed the spirit of Reiniers work. That's a real accolade and well deserved, congratulations Jamie!


As usual Expo-NG had a wide variety of excellent layouts, and I can only show a handful here. Another favourite of mine was East Works (009) by James Hilton, another small, attractive, and well presented layout but in this case a delightfully simple one, inspired by the Isle of Purbeck clay mining railways.


Charles Insley is a serial layout builder whose layouts have a delightful charm. Ulvaryd Strand (HOe) is the latest, a Swedish lakeside setting.


Derwent Road (O9)by Bill Flude is a little different, depicting a sand quarry line which also sees tourist trains operated by a preservation group, and passes alongside newly built houses (1970's). If that sounds familiar it is inspired by Leighton Buzzard.


David Malton's lovely Abbey Light Railway (O14) appeared at Expo-NG for the second time, this time extended with the loco shed end of the line. The first time 5 years ago I lent David my green Hudson Hunslet to supplement his then limited loco stud, as it was his first exhibition with the layout. Now he has plenty of locos, having modelled all of the locos of the prototype, but thought a reunion would be appropriate.


So above we have my green HH on the right, plus on the left my blue "Thakeham" modified older-style HH. Between them David's model of the ALR's Hudson in near original condition makes an interesting comparison, while an interesting collection of motive power sits outside the shed.

At the other end of the line we have a Lister line-up, my "standard" Lister in the foreground makes an interesting comparison to David's modified ALR Lister, which had a new engine fitted centrally as well as a modified cab. However while the locos may not be "twins", the drivers appear to be!


So once again Expo-NG proved to be a thoroughly enjoyable day, not just for the layouts of which this is just a few, or even the trade and sales stands, but also for the people - I spent a lot of time chatting! If you'd like to see more photos of the layouts click here.

Friday 25 October 2019

De Graafstroom

One layout stood out at Uckfield, even though it was amongst many top-quality layouts, and unsurprisingly it was voted best layout by exhibitors and public - despite not being on a popular theme but being narrow-gauge, in an overseas setting, and with relatively few trains. The layout was De Graafstroom, in HO (3.5mm ft) scale and 12.26mm (scale 3' 6") gauge, by Vincent de Bode, Peter van der Kooij, and Claude Moinier from the Netherlands.


As you can see the model depicts low-lying Dutch countryside with a river between raised banks, a narrow gauge railway on the far bank, a few dutch houses and "big skies". A very attractive composition I think you'll agree.


The standard of modelling and level of detail is very high - don't forget this is HO.


But the real "wow" comes when you see the bridge lift, and the sailing barge slips gracefully into view. We've all seen layout animations before, but I've not seen something this bold on a layout of this standard in a long time - if ever.


The barge is beautifully modelled. Apparently underneath are motorised wheels, guided by a Faller roadway-style magnetic steering mechanism following a wire in the river, yet this is all so well hidden and smooth and silent in operation that the illusion is convincing.


The trains are well modelled too, based on Dutch road-side tramways. But do you see the swan? That too is animated, slowly swimming up and down the river. That's not all, not seen in these photos a bird (stork?) flies in circles above the scene.


The photos are impressive, but I also took a short video on my phone so you can see the animations:


I found this layout stunning - not just because of the animations, but because everything worked together to be convincing. The animations weren't a novelty or distraction, but a natural part of an attractive scene, which made up a cohesive and well-observed model.