Monday 30 December 2019

Loctern Quay Terrace

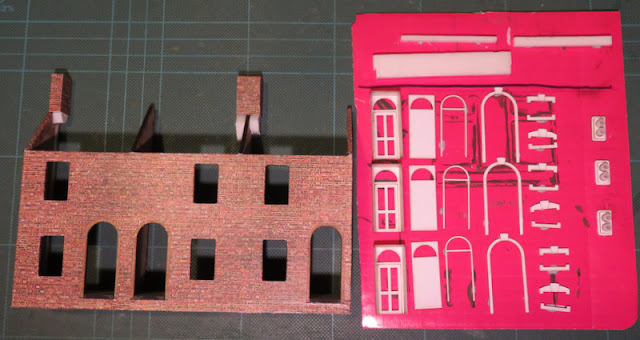
The last building for Loctern Quay is another Petite Properties kit - this one is "Station Road Terrace". As usual the laser-cut MDF shell goes together quickly and accurately, which I then fitted to a 5mm foam-core base to increase the depth to help plating into scenery. I then covered it with brick-paper, this one is from Scalescenes, note the brickpaper was cut away around the door openings. The detail parts are attached to a piece of card with blu-tack, partially assembled where appropriate but kept separate where helpful for painting.


For this one I used the supplied roof parts, although I trimmed a little off both the width and the depth to make it a better fit. I had fitted the chimneys to the walls rather than sticking them on the roof, so the roof was cut to fit around them.


The short rear part of the roof (being a low-relief model) is attached with off-cuts of card and foam-core, while barge-boards are cut from card (none being included in this kit) and fitted to the outside of the ends.


Now I omitted to take photos of the intervening steps, so here's the completed model after the details were painted and fitted.


A few notes on the details:
  • The door openings were painted the same stone colour as the surroundings, and the window lintels and cills
  • Doors, porches, and frames were painted separately. Curtains are coloured paper, and the inside of the building is painted black
  • Inside the porches were floored with checker tiles and lined with ceramic tiles to waist height, using textures from the internet
  • The roof was made from York Modelmaking slates, which were then painted picking out individual slates before being given a grey wash to harmonise and fill the gaps (I should have painted the roof base black first, but fortunately it isn't visible). 
  • The ridge is a strip of micro-strip, covered with a strip of newspaper margin coloured grey with a felt tip pen, to represent a lead ridge. The lead flashing around the chimneys is made in the same way
  • The gutter is a strip of 40-thou black plasticard with the front lower corner rounded, simple but very effective. Down-pipes are 40 thou micro-rod with the brackets represented by small strips of plastic. 

I'm pretty pleased with the result, which looks pretty good even in this cruel close-up photo.

Despite the distractions of Christmas and the general busy-ness of this month I've also been working on completing the other buildings, but I'll update on those in another post.
Thursday 19 December 2019

Book Review: The Corris Railway - Peter Johnson

This is a new release from Pen and Sword books, "The Corris Railway - The story of a mid-Wales slate Railway" by Peter Johnson, and it is pretty much what it says on the cover.


The Corris Railway is one of the oldest of the Welsh slate railways, but one of the less well-known, and I have to say, one of my favourites. The locos and carriages were attractive, the stations quite distinctive, and the scenery through which it ran is beautiful, though of course home to a number of slate quarries. The book tells the story of the line chronologically through four eras - proposals and early horse-drawn years, ownership by a tramway company, and then the GWR, and finally the revival by preservationists in recent years. The text is well written and easy to follow, and introduces the characters involved in the promotion and running of the railway as well as the describing the development and operation of the railway.


As usual from this publisher this hardback book is of good quality, with a good selection of well produced photographs, I don't know how many haven't been seen before but a good number were new to me. There are contemporary maps, and the endpapers feature the route highlighted on 6" OS maps from 1902, but no track plans and I'd have found a simplified map showing key locations mentioned in the text helpful (some places seemed to have several names). There are no drawings, nor stock-lists except a summary of the locos.


So perhaps it isn't a definitive volume about the railway, but it is nonetheless worth of a place on the bookshelves of enthusiasts of narrow gauge and other quirky independent railways, and is a valuable record of the history of this little railway and it's place in the Dulas valley. I found it an enjoyable and informative read, and as a modeller, a good source of inspiration.

Thursday 5 December 2019

The end of the road

Faced with an exhibition form to fill in I was forced to come up with a name for the 009 society challenge layout, so I chose "Locktern Quay".

Meanwhile, work is progressing on the street at the back of the layout, particularly the left hand end of the road, where buildings were needed to disguise the sector plate and the fact the road goes nowhere. As these buildings have to fit some very specific sites and are odd shapes they had to be scratch-built to fit. Hopefully they will give the impression that the road continues around a corner, and there is more to the town/village than the buildings seen.


The central building here had a mock up you may have seen in earlier photos to confirm the size, actual construction used foam-core board for the ends (double thickness for the chimney) and mount-board card for the side walls, the foam-core trimmed to recess the card behind the outer layer of card at the corners. This makes a sturdy yet relatively simple core to which brick-paper is added. Chimney pots are Dart Castings set into an off-cut of Wills roofing plastic, with the detail sanded off and turned face down.


The white building is simply card, which has a texture I hope will look like plaster once painted, the edges are not normally visible. The lintel details are cut from thinner card. I thought the "London" style hidden roof would be different, and avoids an obviously odd-shaped roof given the narrow tapered shape of the building.


The final building is simply a gable and short side walls (foam-core and card again) with a single window, and a different brick-paper finish. All three buildings will use laser-cut windows, but from two different sources.


The roofs are made from Wills plastic slate or tile sheets, with triangles of 40-thou plasticard used to support them, and L-section plastruct for the ridge scored to look like individual tiles. The ends of each roof piece are rebated to thin the end of the tiles/slates, and barge-boards cut from 20-thou plastic glued into them.


Here's the view from the front of the layout showing how the exit to the fiddle yard and the road exit are disguised, and I think the arrangement of buildings looks natural. You can see I've started making the roadway from card, with packing underneath to give height variation. I've also packed under each building to get the heights about right relative to the road.


From the right hand end of the layout the sector plate is just about visible but not obvious, but the road exit remains discrete. The upward gradient of the road works well.

Now I just need to paint the details and complete this trio of buildings.

Sunday 1 December 2019

Corrugated warehouse

You might remember I was planning a curved-roof shed for the right hand end of the layout, as shown by various mock-ups.


The building was made out of 40-thou (1mm) plasticard. Basic dimensions were taken from the card mock-up and transferred to the plastic with the help of calipers, and of course a compass - this one is a left-over from university technical drawing classes, and usefully can be fitted with a point at both ends, which was used to scribe the curve.


With the curve already scribed it was easy to cut out, but what about curving the roof? The plastic was taped to something round - a tin mug looked about right - and boiling water poured over it. Once cooled the plastic is nearly the right shape, and is easily to fit.


Here's the same technique being applied to the corrugated sheet - I used Wills clear corrugated material, as I had some in that was starting to go yellow, and it is much thinner than the moulded stuff making curving it possible, and the edges look better.


Back to the shell of the building, the back of the front is given lots of bracing, and the roof/walls piece stuck in place, note how the preformed curve means it is already almost the right shape.


Next  I worked out how to attach the corrugated sheet, the building was too tall for a single sheet to cover it but this thin plastic corrugated sheet can be overlapped, rather like the real thing.


I stuck it on with double-sided tape, sealing the edge with solvent. The corrugated material is a shiny, hard clear plastic that doesn't glue easily, solvent won't stick it together but does hold it reasonably well to the softer white plastic. Over a large area though the double sided tape should be quite strong, and means no warping. Even superglue seemed to struggle, though with patience it was used to hold the top piece in place.


With a quick waft of red oxide primer it can be placed on the layout to see how well it fills the gap - looks OK to me. I'm planning to paint it tar black, which seems most common for such buildings, with a bit of rust showing through. However, my wife rather likes it in red...


I just need to make a door, and get the rest of the painting done, there will also be a brick plinth along the bottom.

I've also been working on the rest of the street along the back of the layout, so more soon!