Saturday 22 July 2023

Amberley

The Amberley Museum hold an annual rail gala weekend with lots of narrow gauge trains running and a model railway exhibition in the railway hall, and as usual the Sussex Downs 009 group support with our society stand, which I helped with today. 


We have a small demo layout and a showcase to show what is possible in 009, and a modelling demo to show how, and answer questions. Here's Tim and John. There were a handful of layouts and traders, although it's not a big exhibition. This event is unusual in that it is both narrow gauge railway interest and a general public/family attraction, so a real mix of visitors, and the model railway exhibits in the railway hall are a side attraction to the rest of the museum and the full-size railway goings-on. That means at times it can be quite quiet in the hall, so having some modelling to do is useful! 


Outside amongst lots of interesting 2-foot gauge industrial trains, it was nice to see three of the four Thakeham locos, The blue Hunslet was in use on demo freight trains. 


With Polar Bear out of service for a boiler overhaul an alternative yellow loco was on passenger duties, this relatively large and modern Baguley Drewry. I was lucky enough to have a cab ride, thanks to Gerry Cork (seen driving) and Pete Smith. 


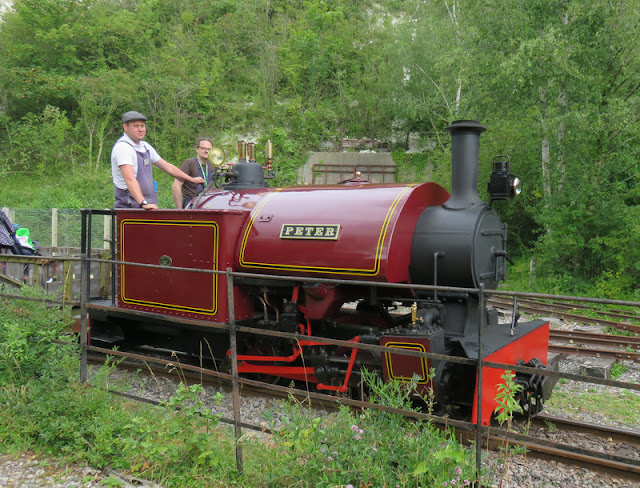
The cab is spacious and comfortable, if a little noisy, and the view through the large windows is excellent. Here's a view over the nose with Peter waiting. From above, it's clear the bonnet really needs a repaint! 

Always nice to see Peter in steam, a charming loco. A pity the rain came in by the afternoon, the demo freight trains had to stop as they slipped on the wet rails, and the afternoon loco "calvacade" was cancelled, not that many would have stood around in the rain to see it anyway. 

Monday 17 July 2023

Reviving a Minitrains Porter

Some time ago I started a Narrow Planet kit for a little Bagnall tank using a Minitrains Porter 0-6-0 chassis. The Porter body had to be removed, which involved cutting part of it away from around the motor as I recall, but after having done so the chassis didn't run smoothly. I then noticed the motor looked wonky, and on closer inspection I found one of the retaining screws had a stripped thread and didn't tighten. After some frustration I put the kit away to think about what I could do about it.

Having made some progress with the Kerr Stuart Haig chassis I figured I'd pull this kit out to see if I could revive the chassis too. The first discovery was that the two screws that hold the top plate of the chassis down are the same M1.4 thread as those that hold the motor, although very slightly shorter and countersink head. However, one could be carefully screwed into the motor in place of the stripped screw, the motor thread is damaged too but not so bad that the new screw couldn't bite. This is made far more difficult by wheels being in the way preventing a screwdriver being lined up straight. The old screw went into the top plate of the chassis where it is not under strain. 


The motor still looked wonky, and the chassis still ran badly, jerking and clunking. With the screws backed off slightly the worm slipped. I tried adding packing (10 thou plastic) under the front of the motor tilt it back slightly, but then it wouldn't run at all. I then rotated the motor 180 degrees, which seemed to result in less of a lean - I've no idea why. The chassis was still jerky and clunky. 

With the motor removed it span freely under power - but the chassis didn't roll smoothly, with a definite clunk once per revolution. Gently, the rear crank-pins were prised out to free the con-rods, but the clunk remained. Finally I had to accept I would have to do what one should never do with these chassis... open it up!


Tiny screws, tiny gears, even tinier washers. Scary. Anyway, on close inspection I discovered one of the gears (on the middle axle) has a damaged tooth. These teeth are tiny so it is very hard to see, but just visible in the picture below - look for the unequal gap between teeth. 

I have no idea how this can have happened, but the real question is how to fix it. I can't fix the gear, but I could swap the axles so the damaged gear is at the front, and remove the idler gear, leaving the just rear and middle axles powered. Of course, getting the two axles in place with the idler gear and their crank pins aligned was rather tricky, but I suppose the same challenge with 3 axles and 2 idlers is even harder. Fortunately it all went back together in the end, and the chassis ran smoothly as a 2-4-0. Encouraged, I then re-attached the coupling rods and connecting rods, first omitting the middle axle crank pins to drive the front axle from the rear, the middle axle appeared to rotate with it's crank pin holes in line so I added the middle pins too. Somewhere along the way one of the tiny washers from behind the coupling rods pinged off the tweezers into space, but it seems to manage just fine. 

Yes, amazingly after all that work, the chassis actually works, and appears to run as smoothly and sweetly as you'd expect a Minitrains to, despite it now lacking an idler gear and relying on the coupling rods to drive the front axle. 


You see from the video the body is placed on. Before giving up on the chassis I'd spend some time smoothing the visible parts of the 3D print and given it a coat of primer. I added another coat, but found the lightweight body blew away from the spray can! It needs weight anyway to balance the chassis and aid pick-up and traction, so I added some lead. The "Swiss rolls" are slid into the boiler, and the flat pieces into the small side tanks, wiped with a little contact adhesive to hold them in place. As you see from the video this is enough to aid good running. 

Chassis problems fixed, I can now continue the build of this dinky little loco. 

Sunday 16 July 2023

Reviving the Haig - Part 2

Today I decided to investigate the running problem. The chassis seemed to run OK out of the chassis, but when I put it under load (holding it back) the worm started slipping on the gear. On closer inspection I realised the motor (and mount was twisting to the side, and could slip off the gear. After a little thought, I moved the motor over with another piece of 1mm plastic to the side of it. I also superglued the brass strip to the plastic packing beneath it, which is a tight fit between the "springs" on the tops of the frames so should help to prevent twist, and having noticed if the bolt was tightened too much there was a short, I stuck Sellotape on the underside of the brass as I suspect it can touch the springs. 

That improved things slightly and the loco ran up and down OK, but again if run under load the motor started slipping. This time I noticed that the motor could lift off the brass mounting plate. It's stuck with contact adhesive which remains a little rubbery, and it may not be helped by the motor which does run quite warm, so allowing just enough "give" for the gear to slip. 


After some more thought I figured the motor needed to be physically held down, and decided the easiest way was with a wire that could be tensioned. I drilled a hole in the brass each side of the motor and looped a wire through, twisting the ends together. I tried a copper wire but it snapped, then found a steel wire in my useful-wire-bits tin which could handle the strain, the ends were twisted with pliers until the motor was held down tightly. Of course the wire over the motor required some of the lead in the boiler to be ground away for the body to sit flat, and the twisted end needed to bent over and tucked carefully into the body when fitting the chassis, but it seems to work.

Running is still not quite as smooth as I'd like, there's a little hesitation at times and it can be prone to the odd stall which is odd given the 6-wheel pick-up all seems to work fine and I can't feel any binding in the chassis, although after a little more lubrication and when warmed up it seems acceptable. Perhaps a flywheel will help if I can find one to fit (needs to be 10mm diameter, 3mm deep, and 1.5mm shaft). 


Saturday 15 July 2023

Reviving the Haig

 The Haig is in a bit of a sorry state. The body looks tatty, and appears to have had the cab rear fixed after a break, I'm sure this can be tidied up in due course. 


It looked a little nose-down to me too, an extra piece of plastic packing under the smokebox sorted that. Of course then the bolt which holds the chassis to the body - which was barely making a couple of turns into the nut anyway - was now too short. Fortunately I found another of the same thread (well it fitted the captive nut), but too long - so that had to be cut down with the dremel.

The plastic body was very light, although it did have a piece of lead under the read half of the boiler. I fitted a "Swiss roll" of roofing lead into the smokebox, and managed to slot pieces into the side tanks, the left side tank had only small gap at the bottom which I opened out slightly and "posted" in slices of lead wiped with contact adhesive. 

I fixed the motor to the brass mount with contact adhesive, which holds it securely enough, and wired it to the chassis frames. The brass motor mount is held in place by the bolt at the front, and a wire "finger" that slots below a lip on the right chassis next to the worm gear - this stops the motor rising up, at least in theory. 

So, does it work? Yes, but... it's a bit jerky, and the worm must be climbing the gear and pushing the motor up as it really grinds going forwards (smoother backwards). Sometimes it even stops and spins the motor. So much for that wire finger, I wonder if the brass can twist? It may not help that the drive is a little crude and has a fair amount of friction, even after a little lubrication, although there is no binding. I need to rethink that motor mount...

Saturday 8 July 2023

Bargain bin Kerr Stuart

At the SWING show a few weeks ago one of the traders was selling some second hand 009, including some interesting "projects". I restrained myself to three...


In the centre is a Wickham Trolley etched kit. I doubt it is practical to motorise in 009, I'm thinking it will be an interesting scenic item for Hexworthy. 

On the right is what appears to be a 3D print with (I think) a Meridian chassis. Other than a broken wire, one of the layshaft worms isn't meshing with the axle, yet there's no obvious scope for adjustment. For £5, this is worth a play, 

Most interesting is the loco on the left. It's a Kerr Stuart Haig class I believe, I had assumed a scratch-build at first glance, on closer inspection I recognise the work of Paul Windle. The chassis is an adapted Bachmann, it looks like Paul removed the motor from the rear overhang and mounted it backwards over the wheels using a brass mounting, but the motor is missing. In the box with it were two coreless motors and a Mashima, the latter with a worm already fitted. Also just £5, this is a bargain even as a static model. 


The unmotored chassis rolled, but there was a slight bind once per wheel revolution, and it was full of crud. In the end I decided to strip it, this involves removing the stub-axle wheeels, undoing a screw each side, and removing the metal sides to give access to the geartrain in the plastic. The whole lot were wiped clean of accumulated oily dirt. All the gears look good with no sign of splitting. 


The metal sides work as split-frame current pick-up, but wire wipers had been soldered on (see bottom frame) so perhaps relying on the stub axles wasn't reliable. However, there's not much space behind the wheels and I wondered if the wire was putting too much uneven pressure on the wheels. I replaced them with a strip of phosphor bronze (as seen on the upper frame), although the size of the sideframe was a challenge for my 25W iron. 

Re-assembly required the wheels to be pushed in place in line with each other, and quartered to the other side. Fortunately since the axles are gear driven, and there's a fair ammount of slop in the gears and the coupling rod, this isn't critical. Even better, now the chassis rolls without any binding, it's not super-free running but it is smooth. 

The next challenge is fitting a motor. I'll use the Mashima as it looks a good fit. 

Option 1: I guess I could stick it to the brass plate with a lump of araldite or sealant, crude but it might work. It's only held by the screw at the front though, and located by the wire under the plastic lip at the rear of the chassis - but that's how the original motor was fitted. 

Option 2: I could make up a new motor cradle, from brass or plastic, also held by the screw at the front. It would still probably rely on glue to hold the motor but perhaps could be a closer fitting shape.

Option 3: I could use the screw holes on the front of the motor to screw it to a vertical brass plate, which could itself be stuck to the chassis block via an L-shape at the bottom, perhaps also with a fold under the lip. This allows for motor removal and doesn't rely on the bolt at the front, but may need more precision  than I can manage, I don't have motor screws, and the worm is on the wrong end of the motor!

I should note that the slide bars and motion assembly is held to the top of the chassis by the brass motor mount, so whatever I do needs to hold that in place too. 

Friday 7 July 2023

Comissioning Nesta

Encouraged by the reasonably successful fitment of the Microtrains coupling to the Baldwin, I decided to see if I could improve the method with Nesta. The problem I had on the Baldwin was that the upper part of the coupling had no recess for it's retaining pip, and so the coupling flopped to one side. A bit of packing made it kinda work, but what if I could create a recess for the pip? 

Here's what I tried. The 10-thou plastic shim fits up into the coupling pocket first, and has a recess that the coupling pip (reduced in height) fits into. The two parts of the coupling fit next around the pivot point (with the spring inside them), and finally a cut-down draft-box lid forms the bottom, held in place by the Bachmann screw. Unfortunately, in practice it doesn't seem to work well. For some reason the coupling doesn't seem to self-centre, and yet it is too stiff to react to the magnet. In fact, it doesn't work as well as the compromised Baldwin coupling. I may have to try a mk3 approach, if I can think of one. 


Nonetheless I have treated Nesta to some finishing. While a delightful model it is too clean and shiny, and looked toy-like. While I had the paints out for the Baldwin I gave it a well-thinned dark grey wash, wiped off the panels, which makes a barely discernable difference to the colour but tones it down and gives and oily rag clean look. This almost ended in disaster as the enamel thinners started to lift the lining on the cabside, fortunately I recovered it and stopped quickly - I had done enough anyway. I will have to think of an alternative weathering approach for RTR locos! A light dusting with weathering powders and a coat of Dullcote matt varnish (with the motion masked off) completed the job, hopefully giving the feel of a well kept but working loco. 

The supplied name and works plates were then stuck in place with a smear of matt modge podge on the back, a little real coal dust stuck onto the fake stuff in the bunker, and the fire iron and shovel attached. The crew are by Modelu specifically for this model, and were painted at the same time as the Baldwin crew (and some other figures). They are delightfully detailed, and really suit the loco. I should have done a trial fitment before painting though as the driver needed lipo-suction to his buttocks before he could sit comfortably on the back sheet! 

If I can get the Microtrains coupling to work reliably it could see service on Loctern Quay, otherwise I may have to revert to the standard coupling and use it for passenger trains on Hexworthy. 

Sunday 2 July 2023

Farnham 009 Group Show 2023

Today I took Loctern Quay to the Farnham and District MRC 009 group open day. 


The Baldwin took on the shunter role much of the day, looking really at home. I have to say the bodged Microtrains coupling at the front didn't work perfectly, being prone to occasional uncoupling or refusing to couple up, but on the whole it worked well and ran smoothly. Big thanks to Martin Collins for helping out. 


Bridges (009) – Greg Chiltern. Some mesmerising complex trackwork including dual (009 & EM) gauge. 


This 009 layout was by Mike Le Marie of the Farnham group. 


Also by Mike Le Marie was this diorama built in a box-file using, I believe, a Scalescenes download-and-print kit.


Gideon Postlethwaite (O9) – Steven Green. A busy industrial scene. 


Melin Dolrhyd (009) – Stuart Taylor. Modelled on a location on the Welshpool & Llanfair Railway, with a watermill in the background.


Castlederg  (OOn3) – Andy Cundick. Modelled on the prototype in Ireland, which apparently did trial the Kerr Stuart 90HP diesel prototype. 


Another view of Castlederg, which really is a fine model. 


The Farnham club's modular 009 layout "Straight and narrow" was on display, ironically not straight but in a U-shape configuration. This module features a village with the railway passing down the street. 


This static model of a Cornish fishing village with narrow gauge (009) line was titled "Port Hallow Re-imagined", credited to Michael Key, and said to be part of a permament layout under construction. 

Compass Point (009) – Chris O’Donoghue. This view is of Shinglesea Halt on the extension, which also includes the famous Dective Sonny Russell's* railway carriage house, but more importantly gives an open, windswept, feel to balance the crowded clutter at Compass Point

A view from the end of Compass Point looking up the line.

*Chris is also an author and his (excellent) books feature Detective Russell and Compass Point

Saturday 1 July 2023

A dirty Baldwin

Some time ago I picked up a Bachmann Baldwin, in plain black as WHR 590. I wanted a generic, well-used workhorse, so I removed the number from the side with T-Cut, although this left the tank sides looking polished. I'd also fitted a Bachmann EZ-mate buckeye coupling in the hope it would work with the Microtrains couplings, it did in that it would couple, but automatic uncoupling didn't work so they are no use for shunting. 


It struck me that although I couldn't make space for the Microtrains draft box, the pocket for the Bachmann coupling was similar to the draft box. Indeed, the coupling does fit over the centre post, and with the spring fitted and a Microtrains draft box lid filed down to fit, the Bachmann screw fitted on. It doesn't quite work as the coupling has pips that fit into slots inside the draft box, the Bachmann pocket doesn't have these slots, so the coupling swings to the right. I added a sliver of plastic into the pocket to stop the coupling swinging too far, a fudge but surprisingly it works well enough for the coupling to both couple and uncouple - albeit delayed action uncoupling doesn't seem to work. Better than the EZ-Mate anyway (there's still an EZ-mate on the back). 


Rather than dismantle the loco (which looks complicated), and have to mask details I didn't want painted, I decided to brush paint. This may have been a mistake, especially given Humbrol don't seem to be able to make matt black enamel paint anymore. It comes out patchy, part matt and part gloss. In the end I mixed more and more dark grey into the mix and applied many thin coats, resulting in a pleasing faded black - although not my smoothest paint job. I dry-brushed some details, such as gunmetal on handles and rust on some exposed edges, and then masked the wheels and motion and cab windows and gave it a quick spray of Dullcote. 


I've been painting a lot of figures recently, including some loco crews. The back row are ModelU figures for the two quarry Hunslets and (far right) the Double Fairlie. The three smaller figures on the front row are Preiser HO scale, which are useful for fitting into cramped loco cabs. 


After a little more weathering with powders the loco is looking old, faded, and neglected, but hopefully not too decrepit. Close-up the paint finish doesn't look too good, but to the eye it isn't so bad. You can see I had to use the HO figures. A little real coal (dust) in the bunker and the supplied works plates fitted finish it off. It certainly looks at home trundling up and down Loctern Quay. 

I've also spent some time checking all the locos and wagons over Loctern Quay ready for its showing at the Farnham and District 009 group open day tomorrow, at Wrecclesham Community Centre, Greenfield Road, Farnham, Surrey GU9 8TJ. Do say hello if you are there!