Monday 13 December 2010

Cutting PCB

For my next project I intend to make the track using copper-clad sleepers. Since the sleepers will be hidden I don't really care what they look like or what size they are. However my stocks of copper-clad strip have depleted, and it is not the sort of thing you can pick up in a local model shop! It can be bought by mail order but generally comes in packs of 20' (not as one length of course!), which works out quite expensive when you consider I probably need about a quarter of that.

I managed a trip to Squires last month (the wife needed something from Bognor so I took the opportunity!) and amongst a pile of bits and bobs I got a sheet of copper-clad board for about £1.50, thinking I could cut it into strips. However it proved resistant to all known knife blades - this is tough stuff! Then it struck me - rather overkill but perhaps the power jigsaw could be used? But how to cut a small, brittle board with something as large and crude as a jigsaw?

The photo shows how. The copper-clad was screwed face-down to a piece of board (more of that PVC plastic I got for free in this case), which could be held on the bench, and support the board during cutting. In the end I put the screws into the bench too! I managed to cut a dozen strips - not very straight or even, and a bit rough, but fine for my needs - plus the last bit can be cut into larger slabs for board and cassette ends. Sledgehammer and nut? Probably! But it worked.

Posted by Picasa

Tuesday 7 December 2010

Train Set - Part 2

Although I measured out for a double track, for now I am sticking with the basic oval and siding that comes with the Thomas set. After all, for now Thomas will be the only train! The point is I will be able to add an extra track, and more sidings, later on.

First I painted the track-bed grey with a couple of tester pots from the DIY store (allowing for future track). The track was stuck down with No More Nails (I thought it might be stronger than PVA but it didn't dry clear, PVA would have been better) and pinned, althoug the track pins were reluctant to go through the ply! At the board edges I used a short length of nickel-silver flexi-track, where the rails crossed the joint I put in brass screws both sides, and then soldered the rails to them, then cut the rails. This should make the track robust at the edge and ensure precise alignment, even though it is cosmetically lacking! Each rail then had a wire soldered to it, running over the hinge post to the rail on the other side, ensuring electrical continuity. The photos should make this clear.


The Hornby controller was screwed to the board in one corner and connected up. In the siding I added a re-railer ramp with uncoupler, I'm surprised Hornby don't include these in the train set. I know they are not pretty but for a child they are very useful! A set of Hornby platforms were cut to fit the board joint and the length of the straight and stuck down with a glue gun. I used the small station building as although I have the larger one, it fouls the other end of the platform when the board is folded! I also found a signal box, this and the station came from my parent's loft ... Finally more tester-pots were used to paint the rest of the board a rather un-convincing grass green, I threw some handfuls of scatter onto the wet paint too. Frankly it hasn't worked that well but it is better than bare ply, and this is just a train set! It can all be spruced up over time.

The real test came today, my Son's 4th Birthday. Even with lots of other presents including Playmobil (which needed a surprising amount of assembly!) and Firman Sam toys (which he is mad about), he was really excited when he opened the big parcel of the train set! Then I produced the board and he set to playing trains. In fact I have spent a significant part of the day kneeling on the floor playing with him - apparently I am the Fat Controller! Clearly it has been a big hit.

So does the board work? Well yes, although I really should get some handles to make moving it about easier. As you can see though - it does fit under the bed as intended! It is really easy to unfold and plug the controller in, so can be up and running in a couple of minutes, so mission accomplished!
Posted by Picasa

Friday 3 December 2010

Let it Snow!

We woke to about 8 inches of snow yesterday morning. Since we live very close to the Channel this is most unusual, and is the most snow I have ever seen in this part of Sussex. Mind you, given the last couple of winters it seems to be getting more common! I had been meaning to get a snow shovel, but of course never got around to it. So while in the village my wife popped into the local hardware store; they had sold out, but they were selling what she described as boards of wood nailed to posts! I suspect they had been very enterprising and making their own in the timber store next door!

Well my wife though I could do that myself, so I did! The board is some of that foamed PVC I got from the marketing department at work, the handle a leftover piece of 2" square softwood. OK it is not exactly ergonomic or pretty, but it is surprisingly effective at clearing the path and drive!

Posted by Picasa

Tuesday 23 November 2010

A deviaton of gauge!

Hmm, I seem to have acquired an out-of-gauge wagon ...!

It is from KBScale, previously the Roy C Link range of industrial narrow gauge products in 0-14. Each time I walked past the KBScale stand at EXPO-NG I found it harder to resist, and ended up picking up a trial set of wagon and a length of track. This is the same kit that Phil Parker described on his blog a little while back.

The truth is that I have long admired the Roy Link range, I dusted off my Industrial Narrow Gauge Manual and found the invoice for it tucked inside ... from 1995! But 0-14 is very much a specialist scale, there is nothing ready-to-run, not even track, although KBScale make some track parts. As someone who has never made my own track (although I did make up some quarry track in 009 once, it was never operational), and uses commercial chassis, this would seem and odd choice of scale.

But there is something appealing about tiny industrial trains, skip wagons, internal combustion locos that look like they were made in a shed (and often were), a very purposeful and no-frills approach to railways. And while Nigel Lawton has shown that these can be modelled in 009, since I am clearly no watch-maker, and part of the point of modelling such an industrial railway is including the detail, to me 0-14 is the obvious scale.

So does this represent a change in modelling direction? No, probably not. But a new project? Well, watch this space ...
Posted by Picasa

Monday 15 November 2010

Train Set - Part 1

With my little boy's 4th birthday coming up we thought it would be nice to get him a train set; a Hornbly Thomas set has been obtained from the bay of e's. However it won't last long being laid on the floor, nor is it likely to get played with often if it is a lot of trouble to set up. Really the track needs to be laid on a board which can be got out when required, but we have no where to store a large enough board.

The plan I came up with is for a folding board that should fit under his bed; it is 5'6" by 4' and folded it is 2'9" by 4' by about 9" deep. The board has to be strong in order to hinge, but not too heavy. I decided to save weight by using a double-skinned design of 34mm x 18mm timber (sold for door jambs) covered in 3mm ply. Yes, 3mm ... it needs lots of bracing (as shown, about 10' of timber was used) but even so the total thickness of ply is half that traditionally used. (Hint, get ply from a local timber merchant, they'll cut it to size which saved me the bother, and meant I could fit it in the car!)

It's not exactly light, but for the size of board it is manageable, and both much lighter and stronger than traditional board designs. As the frame has ply top and bottom it is incredibly strong - it will not twist! The concern was that the 3mm ply may not be thick enough to be leaned on, hence the extra supporting blocks seen in the first photo. In fact I can kneel on the board so it should be fine! A 6mm top would be stronger but of course, heavier ...

The hinges are of the paste-table type from a local hardware store, attached to uprights in the corners of the board, other uprights act as stops. The outer edge of the board is faced in 5mm foamed PVC, which was free from the marketing department at work, offcuts of advertising boards! This fascia reinforces the hinges and stops. The pictures should make it clear.


The last picture shows what could be fitted onto the board. The train set came with (surprisingly) 3rd radius curves, a second radius oval can be fitted inside. The outer oval is positioned to allow a platform to fit on the outside on one side of the board, with a siding outside the oval on the other, obviously plenty of space inside for sidings. There is space for a short straight between the end curve and a length of flexi-track over the board joint, a 6' long board would allow a double-straight (or two points) either side of the joint but that would be too big to fit under the bed. At one end the fascia is raised to allow for a tunnel.
Posted by Picasa

Sunday 31 October 2010

EXPO NG 2010

Once again the last Saturday of October is a highlight of the narrow-gauge modeller's year, yes it is EXPO-NG time. This year I was "helping" to man the 009 society stand with the Sussex Downs group, this consists of a showcase (well, two this year), a simple roundy-roundy track to add interest, some posters and leaflets, and a couple of us "demonstrating". I took along a few coach kits and made a start, when I went to look round Phil Savage couldn't help himself and carried on (meaning some real progress was actually made!). Here he is at work, with Paul Davies pretending not to know him.


I had been really looking forward to seeing Rae Bridge, part of Ted Polet's Craigcorrie & Dunalistair line, which was one of the inspiring layouts for me in my early days of 009. Having been extensively rebuilt in recent years the model was superb, and it was great to see Ted's work first hand, as Ted is Dutch so rarely exhibits in the UK.


Another superb layout also came from the Netherlands, Henk Wust is becoming known as a master scenic modeller (previous layouts include Castle Rock) and his latest layout Punta Marina, set in an Itallian fishing village, was stunning. To be honest the trains are bit-players in Henk's layouts, for him it is the scenary that is most interesting, looking at it I could imagine being by the Med', sitting at that cafe ...


There were many other excellent layouts - I was pleased to be able to see "Sand and Gravel" built by Roy Link and exhibited by David Janes, a superb layout - but one I have been following progress on for some time now was Ryd Ddu by fellow blogger Colin Lea. This was it's first exhibition and it sounds like it was a close run thing to get it complete and working - with correct stock too - in time for the show. I watched the first train round the layout at 10.27AM. well done Colin!


One thing I did think this year is that there could have been a few more layouts. Those that were there were of the highest standard, but two or three more would have made the exhibition feel so much more. There would have been space if they were smaller layouts. I guess there were no "challenge" entries, that normally take up space. (The challenge for 2011 sounds interesting ...!) However EXPO is as much about the trade as the layouts, and trade support was excellent. All round, a great day!

Sunday 17 October 2010

Uckfield Model Railway Exhibition 2010

Really enjoyed the Uckfield show yesterday. It's a bit of a drive but last year's was good, and the list of layouts looked interesting, so made the trip - and it was well worth it. As someone who enjoys narrow-gauge and unusual layouts, I appreciated the 4 NG layouts (009, 0-16.5, 0n30, Sn3), but also models of Wantage, Hemyock, Hospital Gates which was influenced by the Whittingham Asylym railway, plus others of pre-group period. In fact, I don't recall a predictable 60's BR layout ...?

In addition everthing seemed to be running faultlessly (yes, even the 009 layout!) which is great to see. Good trade support too, only fault was that it was rather crowded on Saturday afternoon, so difficult to get good photo angles! Definately one of the best "local" shows. For more pictures click here.


Posted by Picasa

Tuesday 12 October 2010

I've always wanted a kit-car ...

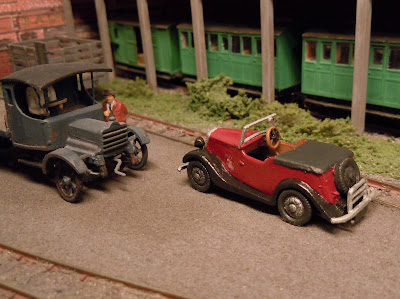
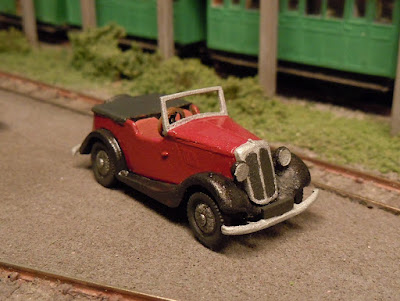
I haven't been managing much modelling recently but I have just completed this car, which has slowly taken shape on the odd evenings I've got the tools out. It's a Morris 8 Tourer from the 1930's, using a Springside kit I actually picked up at EXPONG last October!

Although these days there are hoardes of excellent, cheap, scale model cars - ready-painted, nicely detailed, and ready to park on the layout - for some reason they are all post-war models, and just seemed too new for Awngate. So I was forced to use this kit, although it was an enjoyable excercise in white metal, when you think of building a kit-car you'd think of something bigger?!

For some reason I couldn't get the whitemetal hood to fit, I suspect that the kit designer forgot that the hood overlaps the body, so some serious butchery would have been required. I decided that it would be nice to model the car open, so to hide the lack of hood and rear-seat detail I made a tonneau cover from a bit of brown envelope.


I googled for some images when it came to painting, and found I had a tin of red/maroon enamel which seemed to match the red ones nicely. It's gloss paint, which I don't normally use, but here it has given the effect of a new and well-cared for car, as it would have been in the period of the model. Also the black mudguards are slighly gloss, contrasting with the matt tonneau and wheels. The finish may not be perfect, but given the vehicle is about an inch long, I'm as happy as I'll ever be!

Posted by Picasa

Friday 1 October 2010

A short break, railways included

A few weeks ago we had a short holiday at Romney Sands Holiday Park in Kent. This was great for the kids, but even better, it just happened to have a narrow gauge (well, miniature) railway running through it! This photo was taken on the site, which also had it's own station on the Romney, Hythe & Dymchurch Railway. We made use of it!


We also managed to fit in a visit to the Kent & East Sussex Railway, which is of course Standard Gauge, but was a light railway and the headquarters of the Colonel Stevens empire. Our train didn't really have the light railway feel, but the stations retain the charm and character.

Posted by Picasa

Monday 20 September 2010

All Aboard The Railcar

The final job for the railcar was to fit some passengers. Long ago I got a bulk pack of seated people, and I can't remember where they are from - possibly Preiser. Anyway a handful were selected (we don't want it to look too crowded do we?) and promptly had their legs amputated! You may recall that the floor of the railcar is in fact at seat height, to clear the chassis. Basic painting was all that was required before gluing them in.

The trouble is that this railcar has two driving ends, so at one end there is a uniformed man seated in the driving position (by the door), at the other a uniformed man is standing by the driving position. Let's just say that one is the ticket inspector ...!


So the railcar is now complete, although I may glue the roof on with a spot of PVA.
Posted by Picasa

Thursday 16 September 2010

Worthing Exhibition Photo Update

I have got around to updating the photo's from the Worthing show on Saturday, click here to see them all.

The best bit of the show for my 3-year old boy was the Thomas train set, which he could have a go at! N-gauge this time for a change.


Saturday 11 September 2010

Worthing Exhibition

Just got back from a short family holiday (of which more to follow!), that plus a busy time at work means not much modelling progress recently. However I did get over to the Worthing Model Railway Exhibition today. A good show, probably the highest overall quality of layouts I have ever seen at that show - although last year was good too. Perhaps I am biased given that there were no less than 5 narrow-gauge layouts there, two of them in 009! Certainly a good showing for a local show. However the SG layouts were impressive too.

Last week was my Birthday which resulted in a new camera. Still a compact for convenience and practicality, but with a big zoom, but most importantly (for this blog!) image stabilisation. It does seem to work, and I'm sure you'll notice the improvement in quality of the photo's taken at model railway shows. Especially while holding onto an errant 3-year-old! So here are a selection of photos from the show, I may upload the lot if I get time.


Saturday 21 August 2010

A Gathering

This afternoon I visited a gathering of layouts and like-minded railway modellers. All the layouts (mostly Narrow Gauge) were superb, and the informal atmostphere was nice. There was a sizeable contingent of minimum-gauge models, Gn15 being particularly popular. That scale packs a lot of detail!


Some of the layouts were shown in an under-construction state, including that of fellow Sussex Downs 009 group member Phil Savage, based on the Darjeeling Himalayan railway. Even at this stage of construction, it couldn't be anywhere else could it?


Another one in the early stages of construction was the Harrogate Gas Works by another friend Steve Fulljames. I'm watching this one develop with interest.

Posted by Picasa

Sunday 15 August 2010

Couplings and things

While I haven't managed a lot of modelling time recently I have made up a number of couplings. I use Microtrains (ex-Kadee) couplings, and they generally come in packs of 10 pairs to be made up. Assembly is simple enough, although it does involve some very small and easily excitable springs ... I tend to make them up a pair at a time and work through a batch to make up several pairs. When in the rhythm a pair only takes about 10 minutes.

It can take a little longer to fit them to rolling stock though. It is not too hard with larger stock, and especially when building them. The three "Welshpool" wagons I built recently were on the workbench, when building them I had added plasticard behind the buffer-beams to give a flat surface around 5mm square, at the right height to fix the coupling to (I have a height gauge made from plasticard which sits on the track, when the stock is rolled up to it the coupling mounting should just pass over a tongue on the gauge). So all that was needed was a small hole for the fixing screw. With hindsight I should have mounted them slightly further out, as they are rather too close-coupled, but they don't foul on bends so they'll do!


These coaches have been in my stock boxes for years and needed conversion from the "DG" couplings I used to use. They are Parkside Dundas Vale of Rheidol coach kits, although to make them more suited to the curves and train lengths of my layout at the time (Pen-Y-Bryn) I shortened them by a door and a window at each end. They do look a touch "mainline" for Awngate, although even with the VoR brake van they do (just) fit the loop. Anyway, the DG's had been mounted on the bogies, but the Microtrains are rather tricky to mount that way. Being sprung though they work well attached to the body, so the bogies were reversed (I could have cut the coupling mount off instead!), and a plasticard mount built up behind the buffer beam. This time I got the spacing a bit better, though I have noticed there is a vacuum pipe missing from one coach. Not a big deal as come to think of it, they are missing from all my locos!

Posted by Picasa