Monday 7 August 2023

Wiltshire Group Open Day - Pewsey 2023

Last Saturday I found myself at a loose end and realised the Wiltshire 009 group were holding their open day at Pewsey. Google told me that was about 2 hours drive, but there was a long list of layouts, so I figured it was worth the trip. It was. Here are a dozen of the layouts, but I have missed out several smaller layouts...


Dithering (1:55 scale, 9mm gauge) - Christopher Payne. A new under-construction project representing a 20-inch gauge railway. 


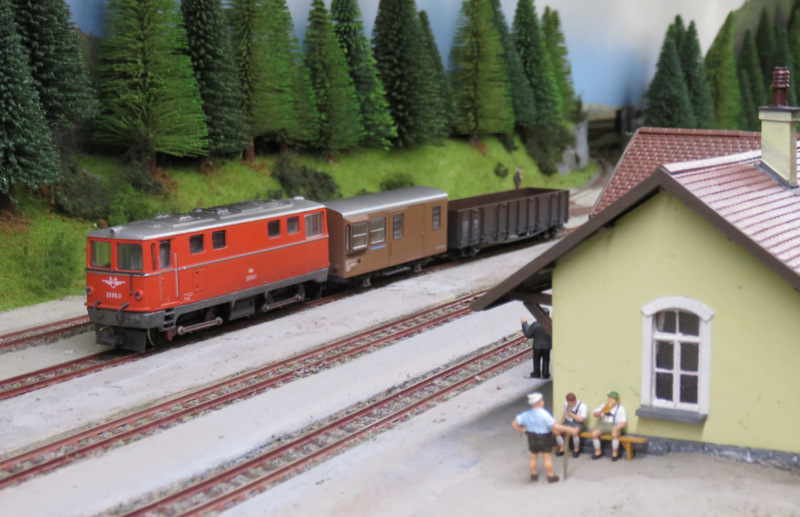
Keindorf (HOe) - Tim Tincknell. Unmistakably alpine. 


Kaninchenbau (HOe) - Iain Morrison. Unashamed alpine rabbit warren with computer controlled operation. Faultless running and always something moving. 


Newton/Goat horn (009) - Graham Kean. Atmospheric might-have-been set in Purbeck, Dorset. 


Woody Lane (009) - Steve Fackrell. 


The Yard (SM32) - John Bruce. A large scale "Inglenook" under construction with radio control. 


At the bottom of the garden (1:24) - Clive Harman. Using (I think) N-gauge as a garden line. 


Greensplat (009) - Richard Williams. Using the "caricature" 3-D print models of standard-gauge diesels shrunk to narrow gauge, designed by David Malton. 


Bryn a Felin (009) - Matthew Kean. Recognisably Welsh Highland Railway inspired. 


Tan Y Bwlch (009) - Brychan Watkins. The instantly recognisable Ffestiniog Railway station. 


Wheatstone Bridge (009) - Miles Bevan. Simple 009 layout, nicely done. I hadn't noticed the name and it's pun until later. It is hard to resist. 

Hawkridge (009) - Chris Mould. Another under construction layout in an urban setting, 

An excellent day, and great to meet people too. 

Tuesday 1 August 2023

Bagnall and Kerr Stuart detailing and ready for painting

With the chassis now sorted, I could crack on with the build of the little Narrow Planet Bagnall kit. I'd already primed the 3D printed body and cleaned up any lines (mainly the boiler and smokebox), and primed the etched parts on the fret too. I decided to fit Microtrains couplings, so cut square holes in the body print in the appropriate places, and rather than try and modify the etched buffer beams, I cut new ones from 20-thou plasticard using the etched one as a template. These and the etched tank sides and cab front and rear were superglued in place, and the chimney, dome and clack valves added too. The wire cab-side handrail was added as per the instructions.


So far all pretty straightforward, but it looked rather bland. I dug out my copy of The Rye and Camber Tramway (Laurie Cooksey) and some pictures of Polar Bear for inspiration for details. I added some wire pipework to the clack valves, probably not correct but impressionistic, plus a blower pipe on the left side, and a representation of a reversing lever on right. I made a crude impression of a lubricator from a sewing pin and a slice of wire insulation to fit behind the chimney, and a whistle from bits of plasticard and plastic rod to fit to the front of the cab. I use a piece of fine wire to make an impression of the smokebox door handle, it's not great but looked better than nothing. 


I also added some cab steps folded up from brass, Camber and Polar Bear don't have them but the slightly larger Victoria did, they should have a "waisted" vertical but by cutting skills don't run to that. The chassis slide bars didn't have a vertical support at their rear end, so I made one from 20 thou black plastic, a fiddly job! You can see I've filled any gaps with green Squadron Putty, including where the etched cab front and rear meet the body. The footplate had developed a slight curve at the front and in attempting to straighten it while fitting the front bufferbeam I broke the corner off, fortunately it superglued neatly in place and the filler hid the gap. The loco body then got another coat of primer, another rub back and filler touch-up, and a final coat of primer.


The Paul Windle Kerr-Stuart has also had some attention. The cab rear looked to have been dislodged and glued back in place, or slightly out of place. I have cleaned up the glue as much as possible, relocated the uprights and supergued them. The body was cleaned up with a damp brush, and even scraping the accumulated crud with a screwdriver, to clean it up ready for painting. The tank sides were lightly rubbed down with fine emery paper where the paint had become scuffed. 

The sanding gear operating rods were repaired. I also added some cab side handrails as they seemed to be lacking, but otherwise the detailing looked fine. It was then sent for a coat of primer, which showed up a couple of gaps needing a little filler, and some spots needing a rub-down, before a final coat of primer.

Both loco bodies are now ready for painting...