Showing posts with label buildings. Show all posts

Sunday, 19 April 2026

The Red Lion - A BRM project


Another of my projects features in the May BRM - and is even shown on the cover.


The project uses the Hornby Rose and Crown pub. You might think that a ready-to-plant building leaves little scope for modelling, but there's a lot that can be done to make a model more individual and realistic. I touched up the finish, re-branded signage as the Red Lion, and set it in surroundings including a beer garden, playground, and car park. 


For a simple project, it was a lot of fun, and shows how a little work can really enhance a ready made building. 


Saturday, 21 March 2026

Glyn Valley Tramway Loco Shed.

April's BRM magazine shows another of my projects as a step-by-step guide. This one is is a Dapol laser-cut card kit for a narrow gauge engine shed. 

The prototype for the model was the Glyn Valley Tramway engine shed at Glyn Ceiriog, and still stands and can be seen on google streetview. 


It's a fine kit that makes a nice model. A first for me was using colouring pencils on the brickwork, which has worked really well. I modified assembly to allow the roof to be removed, and sat it on some card to lift it so my Glyn Valley Tram loco fitted through the door. I suspect the prototype was measured from current ground level, which might be equivalent to what was once rail height! 


It's nice to have a building kit that is intended for narrow gauge models. It will hold 3 009 locos, and would suit layouts in many different settings.

Monday, 18 August 2025

Rail200 - buildings finished

The buildings have finally been completed, painted with Vallejo acrylics. The brickwork was painted with my usual technique of picking out a few bricks in different shades to the base red primer, then a coat of mortar colour which is then wiped off in a diagonal direction. I painted the arches, lintel and capping bricks in something approaching "engineering blue" bricks though I'm not sure I got the shade right, the result looks effective though. 

The stores building platform paving has had a few washes over the grey primer, while the "lead" roof is left in primer grey because I couldn't think of a better finish! The doors are closed - actually on double-sided tape so they could be opened up later if needed - and black paper behind the windows hides the lack of depth. The airbrush was used to put smoke stains over the entrance as though locos have lingered there. 

On the boiler house my plan for fixing the doors has actually worked, although they can't be closed because they overlap! I think I'd narrowed the doorway slightly to make the building fit the space and the door to be central to the track, though the doors will never be closed anyway. The metal chimney has come out well with a hint of rust speckles and smoke staining with the airbrush. 

The engine shed roof used the Vallejo "rust and chipping effects" I first tried earlier this year, but this time I airbrushed rather than brush-painted the chipping medium which has given a more effective patchy effect, and "chipped" off the black layer about an hour after applying it. I'm very happy with the result, still not convinced by the vent flues but they look better for being rusty!

Inside, I fitted a yellow LED under the centre brace, and the wiring for that and the front wall lamp runs down inside the far wall. The dirty whitewashed Slater's brick inner false wall works well when viewed through the open doors, while the windows have been smoked with the airbrush. Oh, and look - the doors actually close!

The canopy was airbrushed green for a neat finish then given a dirty wash to emphasise the planking, while the top was finished in a dark grey-brown. However, as can be seen, the top didn't fit snugly into the frame as it has taken on a more acute angle. I couldn't see a way to glue this down, the contact patches are far to small. 


I fitted pairs of plastic fillet plates into the underside of the ridge, spaced to sit either side of two of the roof trusses. A 1mm hole through the plates allows a pin (paperclip wire) to pass through. 

With the top of the roof in place the wire pins pass under the peak of the trusses forming a strong mechanical fixing.

As you can see, this pulls the top into place neatly. In fact, no further fixing seems necessary, but I'll fix the pins with a blob of glue. 

I'm very pleased with how the station has come out, it has just the right blend of a grand facility of humble construction. It's well kept, but since locos run through it the ends and inside of the canopy and the roof glazing are smoke stained. 

Like the engine shed, a thin inner wall tidies up the back of the windows in case of a look under the canopy. The finials are rather vulnerable, one has been knocked off and refixed twice already!

Sunday, 17 August 2025

Rail200 - lighting-up time

The last week or so, I've been working on getting the buildings completed so I can move on with the scenic work. However, this wasn't helped by a small diversion... I thought the platform looked a bit bare - it needs lamps! Cue some internet searching for something suitable, I didn't think the traditional gas lamps used on Hexworthy would look right. I found these swan-neck lamps from TrainSave (no I'd never heard of them!) on ebay, that looked perfect for the inter-war period.


They were easily fitted through holes drilled in the platform, the wires will need to go through holes in the baseboard and be connected up later. They use 12V bulbs, though I tested them on 9v which works well. 


With lamps on the open part of the platform, I had to do something under the canopy. I had some SMLEDs (I'd used them under the canopy on Hexworthy), but as the canopy is removable I couldn't fix them to the canopy. Instead, I superglued them to brackets made of scrap brass etch fret and stuck them to the wall.


With the station lit, the other buildings needed some lights too. I found these nice wall lamps from Model Railway Scenery - a 3 pack at a bargain price - perfect for the buildings around the yard. They use an SMLED, and are simply poked through a hole drilled in the wall with a dab of superglue from behind.


The weighbridge hut was already built, so I drilled a hole in the base behind the door (away from the window), and made up an SMLED stuck to another piece of scrap brass etch. This will poke up from below the baseboard (I hope, if the holes line up!).

The very fine wires that come attached to SMLEDs are impossible to secure into terminal blocks, and very difficult to poke through holes in the baseboard. I cut short lengths of single-core wire, stripped of insulation, and soldered them onto the already stripped ends of the wires. These will act like "needles" to thread them through the baseboard, then folded double should fix securely into terminal blocks. However, the priority is to install the buildings, wiring up and powering up will follow later!

Saturday, 2 August 2025

Little jobs

With a couple of exhibitions last month, progress with the Rail200 challenge has been interrupted, but I have continued with the buildings when time allowed. There were some final additions to make.


I've had a Ratio boiler house kit in the stash for a long time, from a long forgotten project, so I thought I'd use the nice metal chimney on my boiler house. The base in the kit is stone, so I cut one from Wills brick but cut out the ash doors and fitted them into the brickwork. 


The base is sized to maximise chimney height within the limit. Really, a much taller (and more grand) chimney would be more appropriate, but won't fit, and I figured a chimney makes it look less like a goods shed. Perhaps it's for an auxiliary boiler? 


The Ratio boiler house also provided a sprue with "sleepers", which I used to make a small coaling stage just outside the engine shed. There were just enough sleepers! More Wills brick forms a low retaining wall around it. 


The inside of the rear wall of the engine shed will be visible, so I cut an inner wall from thinner Slater's brick to fit after installing the windows.


The engine shed and boiler house will use doors from the Wills engine shed, I thought for a while about how to fit them. The instructions suggested making wire loops as hinges, which sounds fiddly. I decided to drill 0.7mm holes in the top and bottom edge of the door, with a vertical wire to fit a hole in a lip behind the lintel and an L-shape wire at the bottom to fit in a hole in the side of the doorway. In theory, this will allow then to open and close - but if they can be fixed open I'll be happy. 


Floors for the buildings were cut from grey card, which I find an easy way to represent concrete. Paper templates were used, cut to the building shape then pressed onto the rails to mark their position.


Here's the boiler house floor in place with a 14mm wide strip between the rails. The underside of the edge of the outer pieces is chamfered slightly to sit low on the chairs, the surface needs to be below the rail top.


Finally, at Chatham I was looking for pre-nationalisation general purpose wagons for the layout. I thought the one in the Mainline box was a good deal, until I found another stand with 4 loose wagons for £10. They might need some touching-up, three are without coupling but I'd be changing them anyway, one even has compensation. The wagons will have to wait for attention though, painting of the buildings is now well underway and there is a lot to do to get the layout looking finished.

Saturday, 12 July 2025

Rail200 - platform and canopy

Operation will be more interesting with passenger trains to bring staff and visitors to the hospital, so a suitable "station" was needed. Now, Whittingham hospital had a somewhat grand station with a substantial train shed, and Calderstones hospital had a temporary wooden station with canopy for the mainline ambulance trains during WW1. I thought my layout might be more interesting if the platform had a canopy, but something rather more humble. After a bit of browsing what was available, I thought the best starting point was the venerable Kitmaster/Dapol/Airfix platform canopy kit. The mouldings are dated 1959 so it has been around a while, but other than a little flash it's still a perfectly good kit.


Rather than build as intended with two girders under the middle part of the frame, I used one under the far edge (which required removing and moving the downward brackets), the near edge simply has a strip of plastic as it will sit on a brick wall.


The roof itself is as per the instructions, except I filled in the end half-panels with plain plastic sheet as this looks better, and can hide the end of the glazing better.


The four pillars in the kit are intended for platform mounting, but I need to support the far edge of the canopy from the ground beyond the track, and one pillar for each of the five roof trusses seemed logical. For strength I decided to use brass, and happened to have tube in stock in two sizes that fit one inside the other, plus a slightly larger plastic tube. I made them up with the larger section forming a wider base, topped with a slice of the wider plastic tube and with another short section of plastic tube below, leaving about 12mm of the thinner brass tube to fit into holes in the baseboard. Short lengths of the plastic tube were also cut and glued under the girder under the canopy, forming sockets for the pillars to fit into.


1.5mm holes were drilled into the baseboard after careful measuring. I realised I needed to make the pillars removable - I'll need to remove the canopy to relay the track and insert a point later - yet all would have to be firmly fixed in place. I found paperclip wire was a tight fit into the tube, so inserted a length in each (they get progressively longer thinking this might make them easier to fit into place one at a time). The idea is the soft iron wire can be bent over under the baseboard holding the pillars in place. 3mm lengths of the plastic tube were cut and inserted into the foamboard making a solid spacer to the ply, and fixed in place surrounded by PVA glue.


For the near side I made up a brick wall with more of the Wills arched windows in the style of the other buildings, I decided three looked better than two. Although the wall was simple enough to build it proved complicated since every dimension seemed to depend on another - the width of the canopy, height of the wall, width of the platform, clearances to the train and gap to the pillars... 


The canopy would also need to be fixed to the wall and yet removable when needed. The plastic strip sits on top of the wall, I added another strip at 90 degrees which protrudes down the inside of the wall locating it side to side. A couple of holes were then drilled through the inner strip and the brick wall and paperclip wire "pins" pushed in to secure the roof down. I'm hoping these can be held in place with a blob of glue or some tape, allowing them to be pulled out when needed. 


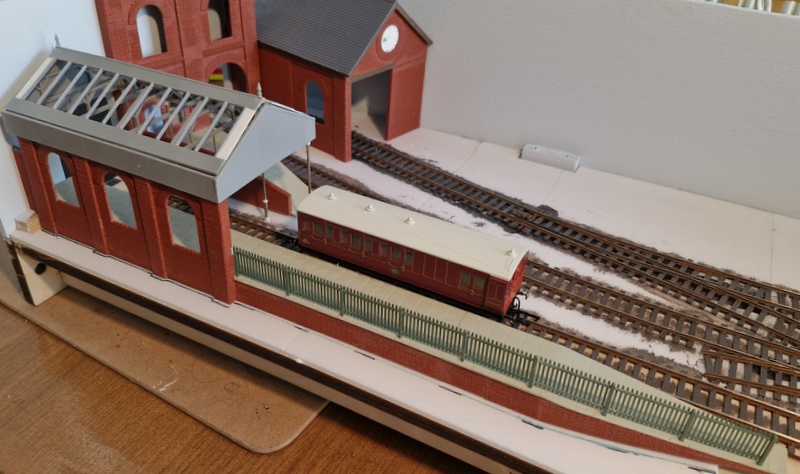
Once I'd got all the dimensions sorted the rest of the platform was made up from more Wills sheets. The Ratio fencing (including sloped section) was found in the bits box and fitted, this leaves the view a bit more open than a brick wall would have (and there's plenty of brick!). The platform is deliberately narrow, but at a scale 10' wide (or about 9' inside the fence) it's plenty wide enough for the expected traffic, and as you can see it can hold a couple of 4 or 6 wheel coaches and a loco. The canopy seems to fit in well, it's not too large, looks more interesting than an open platform, and is effective at hiding the hole in the sky at the left end.

A view from the yard side that won't normally be seen, which is a shame as it looks rather good from this side! This has taken somewhat longer than I'd thought, interrupted by a family holiday and the Pevensey show, but I think the result was worth it. 

Tuesday, 17 June 2025

Rail200 - hospital buildings

More progress with the buildings. Having completed the engine shed, at the other end of the layout I wanted to represent the hospital utility buildings, a stores/goods inwards and a boiler house/bunker. The cereal-packet mock-ups have helped check the overall size and placement, and decide the key dimensions. 


As with the engine shed, Wills building sheets are the main material including more from the Craftsman engine shed kit, although brickwork and arched windows are from extra packs. I hadn't realised the Craftsman kit had stretcher bond brickwork, but the additional pack of arched windows and extra brickwork I'd bought were English bond. No, I don't suppose anyone will notice, but I'll try and stick to the same bond for any building!

The usual techniques are used - score and snap straight cuts, drill and fretsaw out windows and curves, and use a big file to square or chamfer ends. Not forgetting to nick the courses into the exposed edges at windows and raised brickwork.


Thanks to the mock-up, it wasn't too hard to mark and cut out the pieces like a jigsaw.


With the parts assembled, including raised brick trim and arches, the façade starts to take on the character of a Victorian municipal building. I've also added a goods platform to the front. The upstairs windows used those in the arched windows set, the ground floor has doors made from planked plastic and a window from a Dornplas set.


The height restriction left little choice for the roof. No space for any kind of pitched slate roof, but a flat roof didn't seem right. I had just enough space for a very shallow pitch metal covered roof, lead perhaps, which was simply made from plastic sheet, microstrip seams, and rod ridge. Brick capping comes from the Wills building details set. Note the off-cuts bracing the corners and the black plastic floor to hold the shape. 


In place on the layout, showing how the door is just large enough for a railway wagon, with the goods platform outside. Next up, the boiler house, which thanks to the location against the backscene, only has two walls...


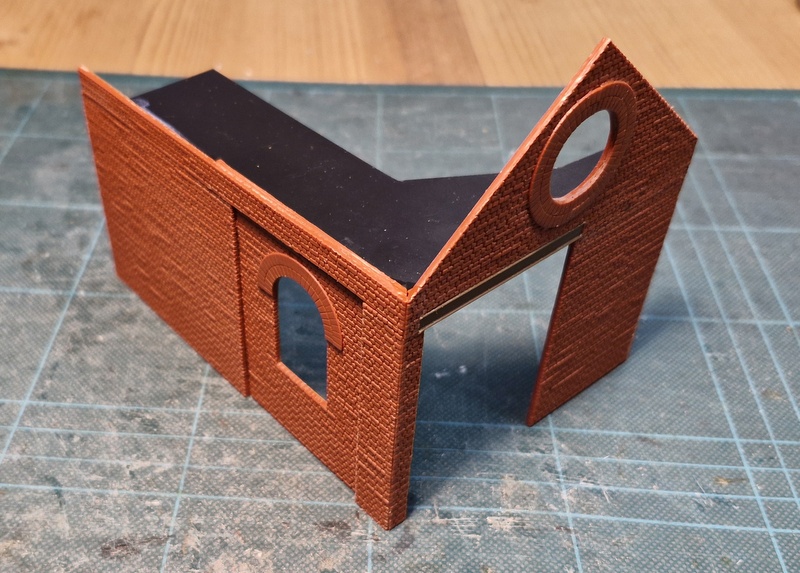
There's another arched window, a big door to use the Craftsman engine shed doors, and to add a bit of interest, a circular vent in the gable. You'd think just 2 walls makes it easy, but there's so little holding it together at the corner it was quite tricky to assemble, and there's not much holding it square!


The roof would have been really difficult without the mock-up, which I could take measurements from. The result is a reasonably neat fit against the backscene. Balancing it on the two walls is a bit tricky...


Together on the layout the buildings have different shapes and sizes to make them more interesting, but share a common style. I'm pleased with how the buildings have progressed so far, they can absorb a lot of time and will be a key aspect of the layout, using the Wills sheets and arched windows has enabled reasonably rapid progress. A few details remain (downpipes, fitting of doors) and of course they have all yet to be painted. 

Thursday, 29 May 2025

Rail200 - Buildings in progress

In my trip to Gaugemaster to get the track for the layout, I also picked up the Wills double road engine shed kit. Well, it's called a "Craftsman kit", what you get is a pile of sheet material and some plans... really it's more of a "scratch-aid" kit. 


From another perspective, it's quite good value when you look at the quantity of Wills building materials you get. Those arched windows with the (almost) cut-out walls are nice, and there are useful details such as shed doors. I don't want to build a double-road saw-tooth roof engine shed, but the materials can be used for different buildings in a similar style...


So I built an engine shed. Single-road and with a pitched roof, but the side walls use the arched window openings and the same panelled wall as the kit, I used the plans as a guide for dimensions. The kit windows and doors will be fitted after painting. The pitched roof with off-set door is a nod to the shed at Whittingham hospital.


I opted for a corrugated iron roof rather than the slates in the kit, partly because the Whittingham shed had a replacement roof in wiggly tin, and partly because it will add a bit of variation between potentially similar building styles. The vent chimneys are from the kit, although they are provided as essentially a strip of plastic with some faint cut marks so it wouldn't have been much more work to scratch build them. 


The far end wall is just a sheet of black plastic as it will be against the backscene. The rear wall is slightly longer than the front, and the roof ends at a slight angle to meet the backscene. 


Here it is in place on the layout. The offset door minimises the wiggle needed in the track on approach, while allowing space for a workbench. Ending against the backscene suggests that it could be longer, and the track could pass through into a fiddle yard in due course. The shed is about ready for painting, perhaps it could do with gutters and downpipes and I've yet to work out how to fit the doors. 


At the other end of the layout, cereal packet engineering has been adopted to plan the buildings. In the corner will be a boiler house or power house, with a siding into it for coal wagons. While it will be a similar style to the engine shed, I plan to change the details so it doesn't look like another engine shed. To the left of it I imagine part of the hospital buildings, or perhaps an outbuilding, used for "goods inwards", storage, or a workshop, it will have a small unloading platform in front of it as well as a siding entering it. It might end up looking like a generic industrial building, and it's difficult to do much given the constrained width and height. In the foreground is the placeholder for the small platform for staff and visitors, I'm still not quite sure what this will look like. 

A top view shows how the buildings will frame the scene and create the "courtyard" effect, yet not crowd the scene or hide too much track. I'm still seeking inspiration for the middle background, other than rising ground and a few trees.