Showing posts with label Petite Properties. Show all posts

Monday, 30 December 2019

Loctern Quay Terrace

The last building for Loctern Quay is another Petite Properties kit - this one is "Station Road Terrace". As usual the laser-cut MDF shell goes together quickly and accurately, which I then fitted to a 5mm foam-core base to increase the depth to help plating into scenery. I then covered it with brick-paper, this one is from Scalescenes, note the brickpaper was cut away around the door openings. The detail parts are attached to a piece of card with blu-tack, partially assembled where appropriate but kept separate where helpful for painting.


For this one I used the supplied roof parts, although I trimmed a little off both the width and the depth to make it a better fit. I had fitted the chimneys to the walls rather than sticking them on the roof, so the roof was cut to fit around them.


The short rear part of the roof (being a low-relief model) is attached with off-cuts of card and foam-core, while barge-boards are cut from card (none being included in this kit) and fitted to the outside of the ends.


Now I omitted to take photos of the intervening steps, so here's the completed model after the details were painted and fitted.


A few notes on the details:
  • The door openings were painted the same stone colour as the surroundings, and the window lintels and cills
  • Doors, porches, and frames were painted separately. Curtains are coloured paper, and the inside of the building is painted black
  • Inside the porches were floored with checker tiles and lined with ceramic tiles to waist height, using textures from the internet
  • The roof was made from York Modelmaking slates, which were then painted picking out individual slates before being given a grey wash to harmonise and fill the gaps (I should have painted the roof base black first, but fortunately it isn't visible). 
  • The ridge is a strip of micro-strip, covered with a strip of newspaper margin coloured grey with a felt tip pen, to represent a lead ridge. The lead flashing around the chimneys is made in the same way
  • The gutter is a strip of 40-thou black plasticard with the front lower corner rounded, simple but very effective. Down-pipes are 40 thou micro-rod with the brackets represented by small strips of plastic. 

I'm pretty pleased with the result, which looks pretty good even in this cruel close-up photo.

Despite the distractions of Christmas and the general busy-ness of this month I've also been working on completing the other buildings, but I'll update on those in another post.

Friday, 15 November 2019

Building a Petite Street - Part 2

Here's two kits prepared for painting, I stick all the small detail parts on a piece of card with blue-tack which makes handling them easier. Leaving the parts separate until after painting makes painting easier, and allows signage to be added to the shop as seen later. On this model I've used whitemetal chimney pots from Dart Castings set in plasticard bases, and here already primed.


The small cottage has a roof made from Wills tiles, and the foam-core "foundation" can be clearly seen. I've also added supports for down-pipes, but not yet covered the walls. The porch roof was covered with a single ply of tissue before being assembled, while the door frame was so fragile it is tacked to pieces of card with tiny spots of contact adhesive.

The other building is a 3-storey shop, prepared in the same way. This also has a tiled roof, with barge-boards from plastic set into the edges. This one has the chimney pots made from the tube supplied in the kit, which is tricky to cut straight but works OK.


The tall shop got a coating of fine sand to represent render, while the cottage got a layer of talcum powder which should look a bit like rough plaster. After this they were given a quick waft of primer before painting.


So here they are after painting and assembly, though there are some details still to make such as gutters, down-pipes, curtains, and possibly flashing, and I've yet to paint the insides black or fix the backs or roofs.

This building looked like a pub to me, so it's become the Hog's Head, with signage printed out and trapped between the layers. I've tried a 2-tone shop front, not sure how successful it worked though. The roof was painted lots of shades of grey-blue and given a dark wash, but was still a little shiny, two coats of Dullcote didn't help (probably too cold in the garage this week) so weathering powder has been used. It's come out a little dark and hidden most of the colours, but it will do.


The cottage has come out well, I'm pleased with the finish of the walls, helped with a very thin brown wash drawn into streaks as it dried. The door frame in this kit fits into the door opening, reducing the apparent depth, I think it works well and I'd like to see that on more kits.


I'm pleased with the finish of the shop too, although it took three coats until I got the colour looking right (after the first couple I realised it had come out magnolia...), then a well thinned brown wash was applied which really brought it to life. Again the shop front was given a 2-tone look with a print-out, which also gave an interior. Hopefully it has the look of a mundane shop in a back-street of an unremarkable industrial town.


Here's the line-up, along with my first kit, showing the range of roof heights, wall and roof finishes that hopefully add interest without looking out of place together.


While I had the paints out the York Modelmaking slates on the bookshop were painted random shades of blue and grey, as I thought they were just too plain. They then got a thin dark grey wash to tone them and increase the shadows. Compared to the same slates on the roof of Hexworthy's station building I think they look much better.


Building a Petite Street - Part 1

More Petite Properties kits on the workbench, this time to form the street at the back of the challenge layout. The terrace houses on the left will come later, for now I'm building the other three as a batch.


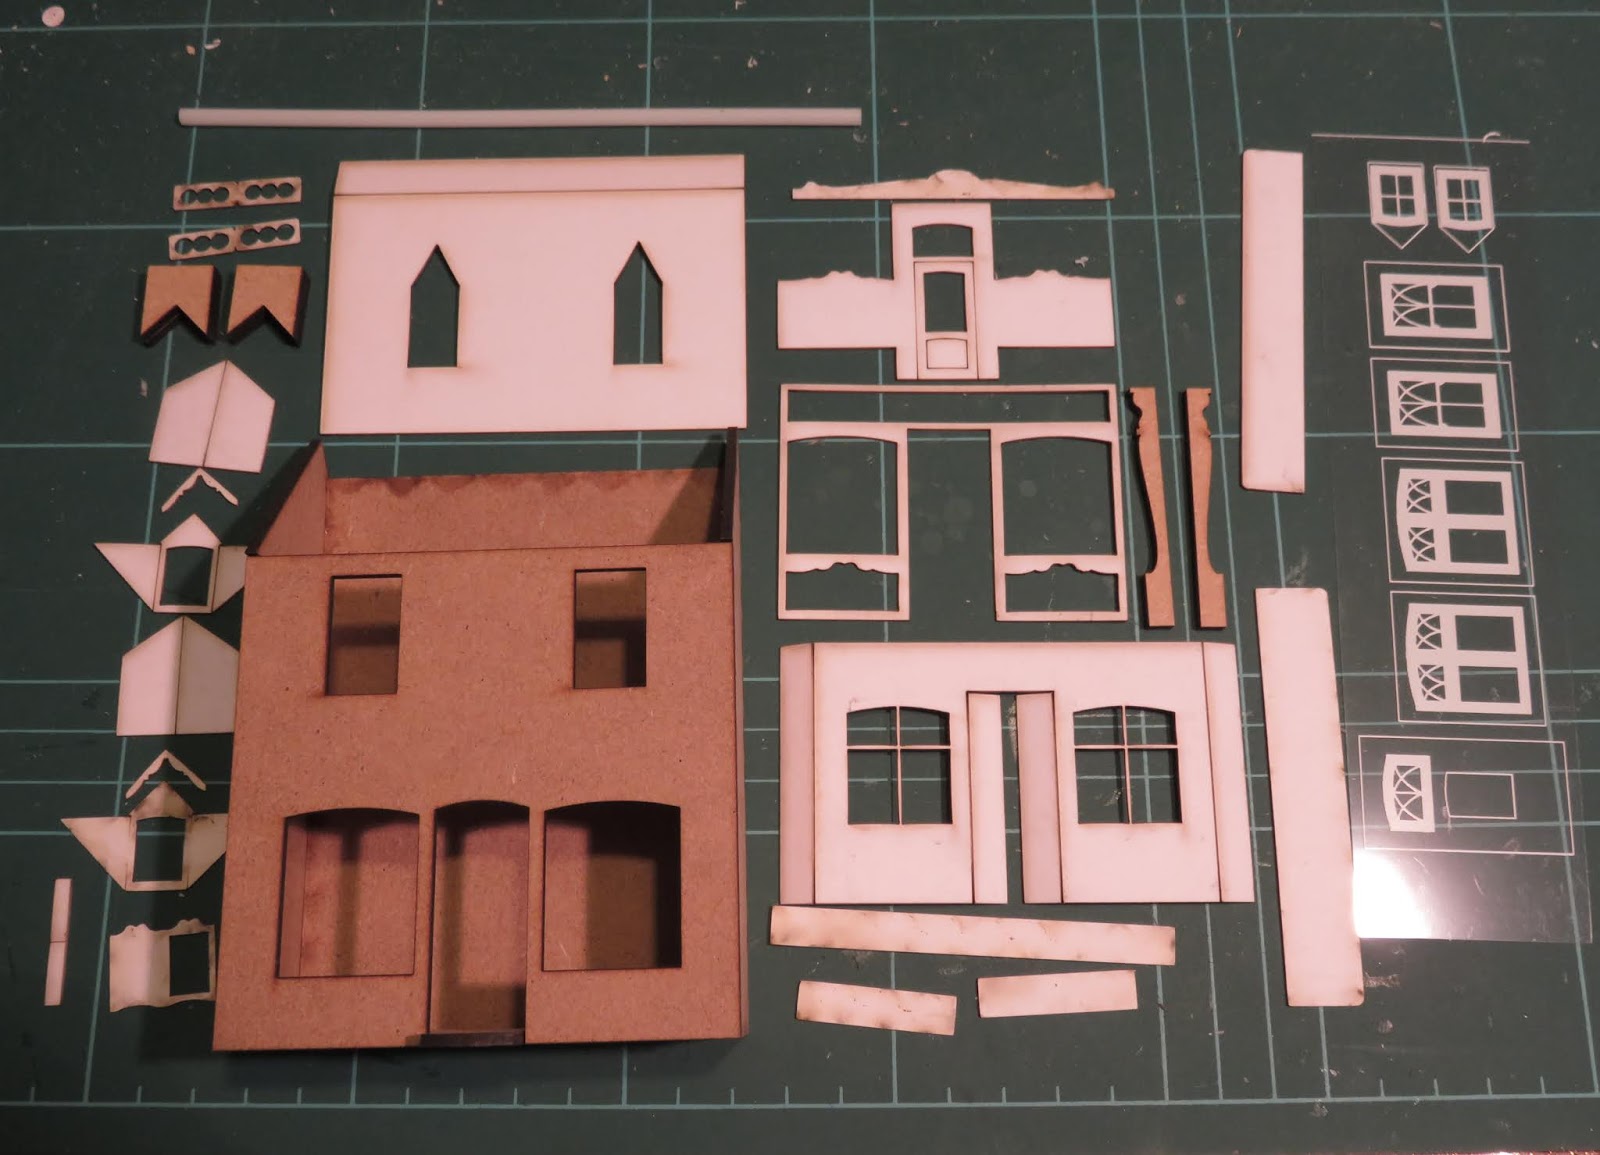
Here's the parts of one of the kits laid out - the walls (here already stuck together) and chimney from MDF, detail parts and roof from card, plus printed clear windows, and tube for the chimney pots.


It doesn't take long to stick the laser cut walls together to see how they look.


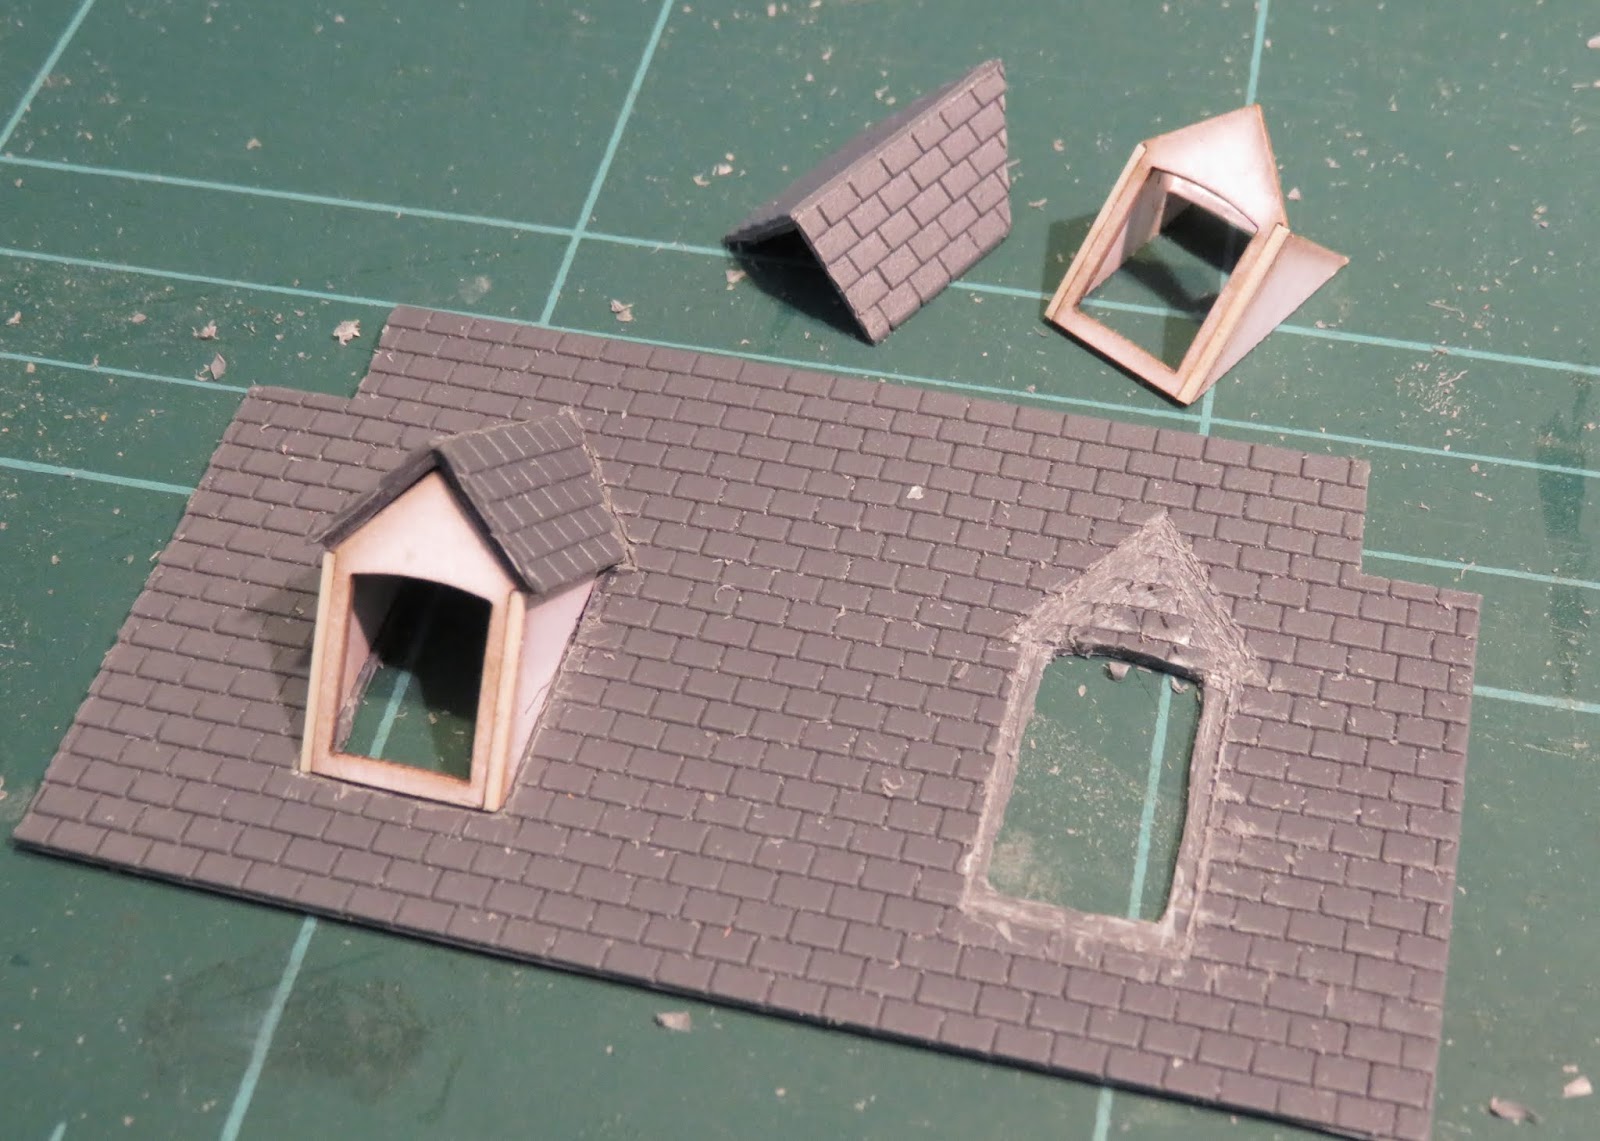
I decided to replace the card roof with one made from Wills plastic slate, which turned out to be pretty tricky because of the dormers. I used the card as a template, except that I reduce the overhangs, and make a cut-out for the chimneys which I stick to the top of the walls - rather than onto the roof as intended. The edges of the plastic are rebated to allow the barge boards to sit just under the slates. The card sides of the dormers were used, with a strip of microstrip filling the corner of the fold.


Surprisingly I got the new roof pieces to fit well. Ridge tiles use L-section plastruct notched every 4mm.


This one has walls covered in brickpaper, in this case from Scalescenes. Before covering I added a piece of 5mm foam-core board under the floor to allow the building to be set into the landscape later - I wish I'd thought of this for the earlier models. The shop front is assembled, but without framing and not yet attached as it and the other small details are to be painted separately.


Friday, 20 September 2019

Buildings progress

Last time I posted about the "Brown & Sons" warehouse it had the brick paper applied. Having increased the depth the supplied card roof wasn't going to fit, so I made a new removable roof from black plasticard on triangular formers, with new barge-boards too. I then realised the roof formers fouled the back - which is of course in the centre of the roof-line - so had to make a new back too.


I thought the large slates by York Modelmaking would work well, and I had some left over from Hexworthy station. Although pre-cut and self-adhesive it is quite time consuming to apply. Having learned from the station I fitted the barge-boards first and fitted the slates over them. Finally I could add the painted stone details, doors and windows. The interior is painted black, I'm not planning interior details, though I might get around to fitting gutters.


So here is the line-up of buildings so far, the bookshop I made earlier in the year plus the three new warehouses.


I've been planning the other buildings, despite the small size this layout needs a lot of them. I've been making simple card mock-ups, such as this warehouse - I thought a barn-style building with a curved roof would be interesting, but it took three attempts to get the size and shape looking right.


Unlike Goldilocks, I decided the middle size looks "just right" in-situ. Just need to build it properly now.


Not just that, but I've just taken delivery of four more Petite Properties kits...!


Tuesday, 13 August 2019

Paker's Lock Up and Harper's Yard

I thought these two small low-relief warehouse kits from Petite Properties would work well at the end of the challenge layout. I assembled the laser-cut parts with tape to see how they fitted.


I'd originally planned the taller Parker's Lock Up at the rear, with Harper's Yard at the end, but the low doorways of the latter didn't work with the track running into the building.


Swapped around the taller doorway of Parker's is ideally sized for 009 stock, but note that I've reversed the parts so the big door is to the left of the personnel door to suit the track plan - easy to do at this stage. Harper's works just as well alongside the rear track.


As Parker's would be at an angle to the back-scene I fitted an extension to one side wall cut from stiff card, which was very simply fitted to the back wall as shown. A similar wall extension was also fitted to Harper's. Also the assembly of Parker's was modified as the instructions suggest fixing the sides to the rear, then fitting the front, but this makes the fitting of brick-paper more difficult. I fitted the sides and floor to the front, assembling dry to the rear wall to ensure it would fit, then fitted the brick-paper to the front and sides. Having the rear removable at this stage makes dealing with the window and door openings easier.


Once the brick-paper was fitted the building was given a spray of Testors Dullcote to ensure a matt finish. The doors and lintels were painted separately and fitted later. I didn't use the cills in the kit, adding brick cills from the brick-paper sheet instead. A new roof was made from Wills slates, cut to fit the angle with the back-scene, and with barge-boards from plasticard - those in the kit are not long enough to reach the ends of the roof. The ridge is L section plastic with lines scored every 4mm. If the big doors look wonky here it's because they are loose, they will be fixed open on the layout.


Harper's Yard also got a new main roof from Wills, this time tiles, with the ridge from L-section plastic with microstrip ridges added every 5mm, and new plastic barge-boards. The lean-to has a corrugated roof from Slaters sheet over the card roof and barge-board from the kit. The lintels and cills were fixed in place, then painted. 


After the experiments I settled on sand for the pebble-dash render. The walls were coated with PVA glue spread evenly, and sprayed with a water mist to keep it soft, then the sand sprinkled on. I have to admit it took 4 coats of paint - the first was patchy, the second came out green thanks to a Humbrol tin that didn't match the colour of the lid, the next had shiny patches and the final wash didn't get rid of them all. So I dusted the surface with a pale grey weathering powder and sealed with a coat of Testors Dullcote, and perhaps by accident, I was happy with the result!


Both buildings had the insides painted black before the doors and windows were fitted. The corrugated iron roof has lead flashing from newspaper coloured grey with a sharpie pen.

Sunday, 4 August 2019

Brown & Sons

My plan with the challenge layout is to frame the scene with buildings. Making model buildings takes a lot of time, but I was impressed with how easily the Petite Properties kit I recently built went together, using brick paper, and gave a good looking model. So I will be using a few more kits from the Petite Properties range on this layout, and have started by ordering three different warehouses.


The warehouses are close to the tracks so it is important to see how they fit before proceeding too far. I've started with Brown & Sons, which will hide the exit to the traverser. The laser-cut MDF parts fit together accurately, and are assembled with PVA.


The problem is the kit has a solid back and floor, but I need the building to cover the traverser when it is furthest forward. It wasn't hard to cut away the floor and part of the back wall with a piercing saw, so that there is space in the ground floor to clear the trains.


The building shell is placed on the layout to check clearances and how it looks. Although a low-relief building I have used the waste part cut from the back to make the upper part of the left-hand wall appear to be full depth.


Another view showing how the exit track might be disguised. I decided to raise the warehouse slightly to improve clearance for the trains, and as there will be a track in front of it and I wanted the floor close to rail height. A layer of mounting board was fixed under the walls, and a strip under the door lintel to lower the door height the same amount. Another layer of mounting board provides a floor to the doorway. It may get another layer of card below the scenery if required.


The shell is then covered with brickpaper over an even layer of PVA. This was printed from one of those from Wordsworth Model Railway, though I noticed when applying it the bond isn't correct for an older building. Shhh. There are some odd lines through this print too, but I don't think they will be noticeable. The window openings are cut out and folded back around the openings, but the arched tops will be stone.


The detailing parts from the kit are laid out ready for painting - stuck to a piece of card with double sided tape so I don't loose them! There are stone trim strips but only for the front of the building, I cut pieces for the end walls using part of the roof - I'll be making a new roof - and scored them to represent stone blocks. I took the opportunity to part open one of the doors too.


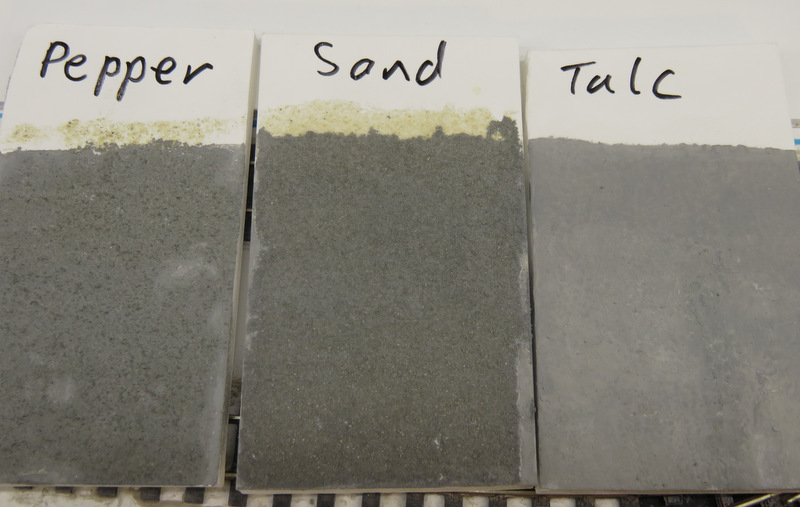
So that one is ready for the paint shop, and needs a roof making. I'd like some of the buildings to have a rendered finish, so have been experimenting with techniques to represent it using pieces of foam-board. As you can see I've tried pepper, sand, and talcum powder sprinkled onto PVA glue.


To compare them better they've been given a coat of grey paint (though a grey-brown would bee better). Each has a slightly different texture, I'd be interested any any thoughts...


Friday, 24 May 2019

A Petite Property

I came across the Petite Properties stand at Alexandra Palace, and was impressed with their products. Actually I'd heard of them and seen the website already, although I've not seen many built up on layouts, but looking at the range on their stand I was struck with their potential. Petite Properties come from the dolls-house hobby but have found a ready marked in model railways for their laser-cut building kits, with a range of non-railway buildings (houses, shops, etc.) and including the popular low-relief format. Anyway, although I didn't have an immediate need for one, I picked up "No 12 Station Road", a small shop in low relief, to see what it was like.


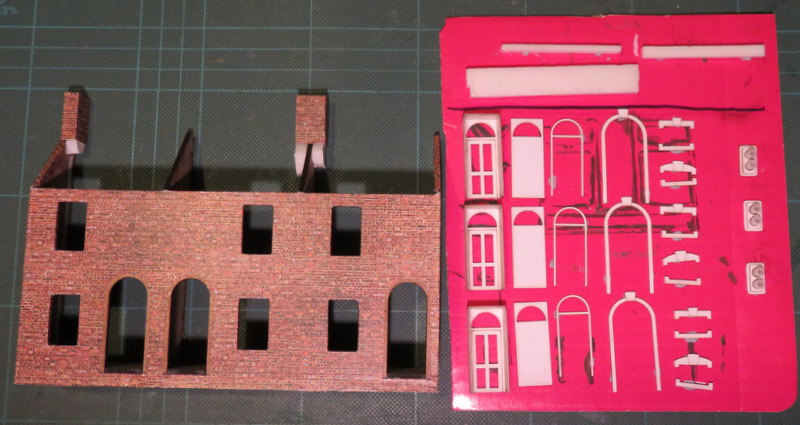
Here's the contents. I've already assembled the main walls which are cut from 2mm MDF - the sides, front, and floor. The fit is so precise no cleaning up was required, and the back panel is a tight fit. There's also the chimney pieces, and the rest of the kit is laser-cut card for the roof, window frames, lintel, and other details like the shop-front, the printed clear plastic windows, and a length of tube to make chimney pots. The instructions are clear and comprehensive, although I didn't follow the order of assembly prescribed, thinking instead about the covering of the walls and painting. Wall and roof finishes are not included in these kits, allowing you to finish them as you like, I suppose that means they are a sort of partial or scratch-aid kit?


One thing I really didn't like is the chimney, which is designed to stick on top of the roof. Well firstly that tends to look like it's just stuck on top, and secondly chimneys are usually built up a gable wall where there is one. So I stuck the chimney to the top of, and flush with, the gable wall, reinforcing it from underneath with an off-cut of foam-core. Incidentally I used Micro Krystal Klear glazing glue for much of the kit, it's essentially a very sticky clear PVA with a quick grab and I had a pot on my workbench.

Moving the chimney meant trimming the roof around it, but as well as that I trimmed about 2mm from the depth of the roof and 3mm from one side as it seemed to me it overhung far too much. I then added the barge-boards to the outer edges of the roof, flush with the top.


I decided on a brick finish, I used a brick-paper downloaded from Wordsworth Model Railways, which I think are rather good, and they are free. I printed it on a laser printer which looks good, but a bit shiny. The shop front was assembled and along with the window frames, and barge-boards, were painted a deep red-maroon, I also painted the wall corners within and behind the shop front. To get rid of the shiny brick and any traces of gloss in the paint I sprayed the lot with matt varnish - Testors Dullcote in this case - this must be done before glazing is fitted.

The roof was covered in York Model Making slates, I had some left over from Hexworthy's station building, and I think they work very well in this scale. Such a small simple roof was easy to cover. Learning from the station I ran the slates over the barge-boards - trimming excess off with a sharp knife afterwards, and overhanging the bottom edge of the roof slightly.


Before final assembly I found some photos online of bookshop interiors, which I printed out along with a sign - it took me a couple of attempts to match the colour to the paint - but I'm very pleased with the result. It was simply stuck to the back of the shop front before it was stuck to the building, while the bookshop interior photos were stuck to the window display (which fits behind the shop window), and the back wall of the shop. The chimney pots were cut to length - a little fiddly to cut square and equal length - and stuck to the top of the chimney and painted. Assembly of the windows and door is straightforward, but worried that the upper window might look through to the downstairs, I formed a paper "blank" to go behind it and coloured it black.


So here's the final, assembled building. You will see that as well as the interior photos, I've added a couple more details not in the kit. The gutter is simply a strip of 40-thou plastic just wide enough to protrude from below the slates, and with the front lower edge sanded to a curve to look like a gutter. Good cheat eh? The down-pipe is 40-thou plastic rod with the end bent, and a few tiny microstrip brackets stuck on, and stuck to the gutter with solvent. Painted matt black it adds realism. I also decided to add flashing around the chimney, which was simply paper coloured with a grey Sharpie pen (borrowed from the kids), then cut to shape and stuck around the chimney. The stepped flashing up the side was a little fiddly to cut. You might also notice the curtains - more paper and Sharpie pen!


I'm really pleased with the finished shop. It's a small building, just 55mm wide, the door is 25mm high so looks OK as an old building. The matt-varnished brick looks great, and in this scale is probably more realistic than embossed plastic. The shop front has nice relief, although the windows sit a little deep they look good. I'm glad I moved the chimney and cut down the roof as I think it looks much better for it, while the added details bring it to life for not a lot of effort. Maybe it could use a little subtle weathering, though I'm not sure how best to treat the paper roof slates.


You can't see much inside but there's enough to give an impression. There's a hole in the bottom for lighting cables, and the back is still loose for now (but a tight enough fit to stay put) so they could be fitted later. Extra marks if you recognise the name.

So I am very impressed with this little kit. Yes it needs wall and roof finishing; you could used embossed plastic (Slaters) on the walls or even just paint, replace the rood with a Wills plastic sheet, and adapt it to whatever finish you like. So it's not a complete kit and the finish is down to the builder, but it's not hard to do and I think many will like that flexibility. It also benefits from a little thought in assembly and added details. I think the chimney could be better designed integrated into the gable, the roof less overhang, and thinner MDF would make the windows less deep, but these are minor points. So I can see me building some more of these little kits.