Saturday 30 September 2023

Rebuilding the "ultimate" fiddle yard

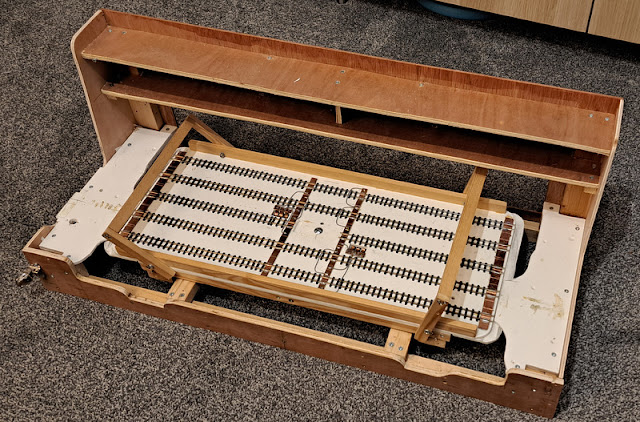
Last year I adapted the fiddle yard for Hexworthy to suit its new location, but that has limited capacity and is only intended for home use. You may remember the sliding and rotating fiddle yard built for Awngate, the plan was to use that for Hexworthy too. Of course, it wasn't that simple... Hexworthy has a deeper baseboard, originally overcome by adding battens under the fiddle yard, but that wasn't an elegant solution. Also, when revising the home fiddle yard I'd changed from using split hinges to dowels and catches for board joins. Also, the wiper contacts with microswitches hadn't proved a robust and reliable way to power and align the tracks, and since then I'd come up with a better solution. So, a significant rebuild was needed...


The existing fiddle yard was dismantled, parts of the frame were reused but the plywood ends, front, and rear were cut from offcuts in the garage to suit the deeper board. This took a bit of thinking as rather than building a baseboard and then fitting it with a fiddle yard, I was building the existing fiddle yard elements into a new frame - so had to take great care to get the surface height correct. 


The rotating deck (top) is unchanged but the lower sliding part was trimmed. The larger of the trimmed material was attached under the ends of the top rotating deck forming a protruding lip to pass under the edge of the fixed part of the deck.  Lower cross-beams were added underneath for the runners. The rotating deck is then bolted to the lower sliding deck as before. 


The fixed decks at the end were attached ensuring the height matched the scenic baseboards, and overhanging the protruding lip from the rotating board. The rotating and sliding assembly was then attached via ball-bearing drawer runners to two cross-members, packing under the ends of the cross-members being used to level and match the height. Surprisingly, I managed to get the height matched and a free moving traverser. Previously double-stacked runners had been used to allow the deck to move either forward or backward far enough to rotate, but here I've simply used a single set of runners so the deck must be pushed back to rotate, the fixed deck being cut away to facilitate that within the limit of the runner span. The shelves were recovered from the first incarnation.


Another tricky job was fitting the dowels in exactly right place to get the baseboard aligned and connected to the main baseboard. Again, using a wood template, I got there in the end. The fixed end decks are recovered from the old fiddle yard but still needed trimming as the end plywood was thinner! Nothing seemed simple here. 


Despite the back-to-front build I managed to get the fiddle yard constructed to fit to the Hexworthy baseboard, with a deck that slides to align tracks then slides right out to allow the deck to rotate. The rotating deck with end-gates that also lock the rotating deck to the sliding deck is pretty much unchanged, but most of the rest of what is seen here has been modified or reconstructed. Yes I do seem to over-complicate things! Next up will be the latching and electrical system.

Wednesday 20 September 2023

009 Society 50th Anniversary Exhibition - Statfold Barn

Last weekend the 009 Society celebrated its 50th anniversary with an exhibition held at the Statfold Barn Railway. Actually, "exhibition" feels a rather inadequate description.  It was my first visit to Statfold, which is a privately owned narrow gauge railway and collection.


The railway is nice, but the collection of narrow gauge locos in the roundhouse is astonishing...


Not just a collection - I understand that most if not all of these locos are in full working order with boiler certificate. 


There are more locos out of use. There was even one with my name on it!


The roundhouse was the perfect venue for the anniversary dinner on the Saturday night, a real celebration. There was a great atmosphere all weekend.


Well, back to the exhibiton, which had about 50 invited layouts from most of the area groups plus a few extra layouts brought by their owners on one or both days, and trade support including Peco/Kato and Bachmann. The Saturday was only for 009 Society members, and felt like a giant member's day, although with over 900 visiting members (on top of those exhibiting) it was busier than most member's days I've been to. It was great to see old friends and meet new people, including some forum members I'd never met in person. The Sunday was open to the public, and felt slightly quieter but still busy most of the day. 


I took Loctern Quay, and my son was due to take Slugworth & Co., but unfortunately was ill and unable to come. So, I ended up with two layouts. As you'll see below the Sussex Downs group was quite stretched, so I was thankful of help from Will Booth and Harry Mantheakis on the Sunday allowing me to have a better look around (and even a ride on the train). Both layouts performed well, although I was thankful for the continuous circuit of Slugwoth and confess that most of the weekend I just left a train circulating, periodically changing the train. 


Also from the Sussex Downs group were two other layouts - one was Llandecwyn by Martin Collins. 


The other was Kurseong by John Crane, a model of the real station on the Darjeeling Himalayan railway, which was deservedly voted "most appealing layout" by the society members visiting on the Saturday. 

I have uploaded a collection of photos of many of the layouts here, although not a complete record of all the layouts at the show, partly due to limited time and I focused mainly on layouts I've not seen before or rarely see, and partly because some of my photos didn't come out wheel (possibly because I rushed). You will see that the overall standard of the layouts was very good. 

The Society had comissioned a special anniversay limited edition van from Peco. Of course I had to get one, and by the time the show opened on the Saturday morning it was out of the box and running on Slugworth, where it looked at home. In fact it ran around Slugworth pretty much all day so I estimate it must have covered around 2 real miles or so already. 

The 50th celebrations were great fun, well organised, and memorable. Roll on 60 years...?

Monday 11 September 2023

No crossed wires

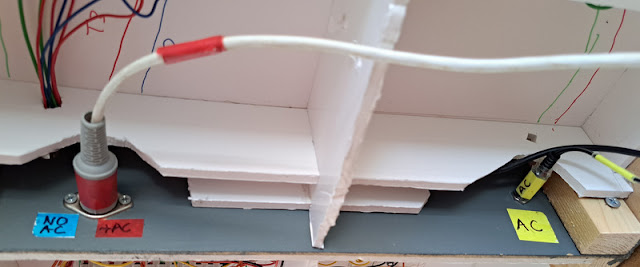
As noted, the wall-wart 16V AC transformers have a very similar plug to the 12V DC power supplies used for the LED lighting. Clearly plugging in the wrong power supply could be bad (for the lights), so clear labelling is needed. 


I already colour code my controller (5-pin DIN) plugs red, and the power-box leads (6-pin DIN) blue. As previously explained, Slugworth can now run either from the power-box with the controller plugged into that, and the blue 6-pin DIN plugged into the layout, or with the controller plugged into the layout and a 16V AC supply connected. Here the 6-pin socket is coded blue (no AC) or red (with AC), with the controller plug (red) in place, and the 16V plug and socket coded yellow and labelled AC. 


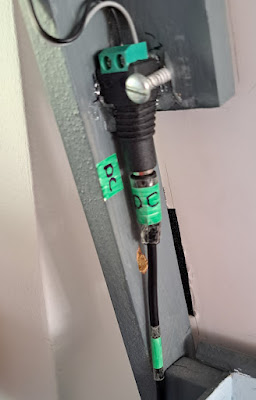
The LED lighting plug and socket on the other hand is coded green and labelled DC. No confusion there. 


The AC supply into the "mini power-pack" for Loctern Quay is also coded yellow, the transformers being interchangable between layouts. 


And the Loctern Quay lighting supply is coded green. Simples!

Friday 8 September 2023

Blanche

For my birthday recently my wife got me a very nice present...


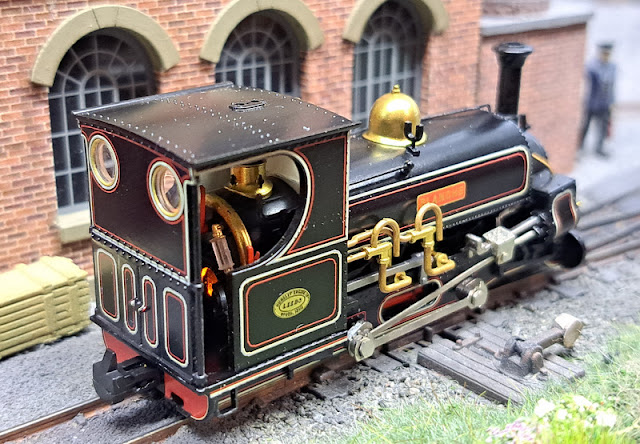
Blanche is a "mainline" class Hunslet 040ST from Penrhyn quarry, and this superb model is by Bachmann. It has a high level of fine detail, and a crisp finish including delicate lining. The prototype's outside frames and unusual inclined cylinders with con-rods inside the coupling rods give this model real character and elegance. 


The cab interior is detailed too, and if you look closely you can see a glow in the firebox, this provides a flickering light in the cab as the loco moves. There are also etched plates in the box to be be fitted. As with recent Bachmann models the running is every bit as good as the looks too, smooth and controllable down to a crawl, and being a little heavier than recent Bachmann offerings it should be quite capable. 

While I have pictured the loco on Loctern Quay, it's a little large (long overhangs) for Loctern and of course has the wrong couplings, I've found it difficult to fit Microtrains couplings to Bachmann locos. It will earn it's keep on Hexworthy in due course where it's fine lining will suit preservation era passenger trains. No doubt it will get some subtle weathering nonetheless, along with a crew of course. 

Tuesday 5 September 2023

Rethinking power supplies - Slugworth simplification

A while back I discovered that a simple Hornby "wall-wart" transformer could be used to power my layouts, a much neater and more compact solution than an open-frame transformer mounted in a home-made power box (see below). So I thought it worth getting another. This one is a Hornby C912 rather than the C990, it's rated 16V AC at 14VA which I make to be 875mA, so pretty much the same as the C990 which is rated 800 mA at 16V AC. Either type can be bought on ebay for less than £10. 

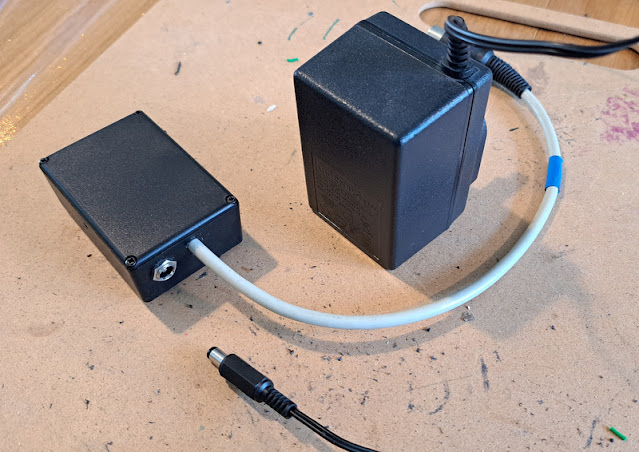
When I made the "micro" power pack I'd just hard-wired the power lead in, but it seemed neater to fit a plug and socket, and allow the transformer to be interchangable - not least as I like to have a spare at exhibitions. The transformer comes with a 2.5mm (inner) x 5.5mm (outer diameter) power connector, so I used a matching socket from Squires, and refitted a matching plug to the existing transformer. 

Now the folllowing gets a bit involved! There is a risk with these connectors in that the LED layout lighting uses the same/similar type for 12V DC. In fact, the 12V transformers seem to use 2.1x5.5 plugs which strangely fit 2.5x5.5 sockets, very confusing. I think if I adopt 2.1x5.5 sockets for the lighting they will still work with the 12V DC lighting supplies, but while the AC supply 2.5x5.5 plug will fit the socket the inner contact will not be made. This all seems a bit odd! In any case, some clear labelling may be needed. 

The convenience of the wall-wart transfromers has made me rethink my power box strategy. The original design provided not just 16V AC to both controller and layout, and so 12V DC from the controller, but also a high-frequency track cleaner, and a capacitor discharge unit (CDU) for points, all fed to the layout via a 6-pin DIN plug. The idea was that it kept all the complex and relatively expensive components together in a box that can power any of my layouts, rather than having to add them to each layout. 


Now, I no longer use a high-frequency track cleaner, modern motors don't like them and anyway the use of graphite on the rails has made them redundant. I've also found that the points on a small layout can be driven via a simple CDU made of 3 components in a choc-block connector, as provided in the mini power box seen above. However, some layouts - such as Slugworth - use manual points control and don't even need the CDU, so the mini power box is now simply a junction box. Clearly, it can be eliminated altogether...

So Slugworth has been modified by the addition of a 16V AC input socket for the transformer. This is wired into the 6-pin DIN socket. Now a 5-pin DIN controller plug will fit a 6-pin DIN socket, and fortuitously when I first wired my power box leads I matched the controller 12V DC and 16V AC pins between the 5 and 6 pin connectors (although for the controller the 16V flows in, from the power box it flows out). So here the controller can plug into the 6-pin socket and both it and the auxilliary 16V AC supply (e.g. for lighting) are powered from the plug-in wall-wart transformer, with no external junction or power pack needed. 

Of course, as the existing wiring is unchanged the power box can still be used with the controller plugged into that, and no separate transformer is plugged into the layout. This seems a bit complex but hopefully the diagram makes sense.

I did add a thermal trip to the 16V AC supply, I expect these sealed transformers have one built in but better safe than sorry. This trips at 1.6A which may be a bit high, but if there is a short it should trip. 


This view underside of Slugworth shows the existing socket (left) with the controller plugged in, and on the right the new power socket for the 16V AC transformer wired to both the controller socket and to the lighting power circuitry. Of course this is how many people already wire up their layouts, but the approach I've used maintains "backward compatibility" for the existing power box to be used instead, or as a back-up. 

This simple modification could be made to any of my smaller layouts to eliminate the need for a separate power box (and another lead), and just use a cheap wall-wart transformer. Layouts that need a CDU for point control could have the simple circuit added on-board too, although for now the micro power box used on Loctern Quay does that job. 

Sunday 3 September 2023

Bagnall and Kerr Stuart completed

Both the Narrow Planet little Bagnall kit and the Paul Windle Kerr Stuart refurbishment are now finished. I decided to break out the airbrush using Vallejo mid green, of course I had to clean the airbrush before use as my previous clean clearly wasn't good enough. I struggled to get a good finish to start with so the first coat was perhaps a little orange-peely, but in the end got a reasonable finish. 


Black was also Vallejo acrylic but brush painted, the red buffer beams used cheap artists acrylic - a terrible idea, couldn't get a good finish, will keep those for scenic work only I think! Detail painting was with enamels as I have a bigger selection of colours. A well-thinned enamel wash was used for weathering, aiming for an oily clean finish that could reflect a well used but cared for loco in industrial use or even preservation, neither prisine nor decreptit, supported by some subtle weathering powder for coal dust and ash. Finally, a coat of Testors Dullcote toned the lot down. The Bagnall cylinders looka little shiny not having been Dullcoted. 


I'd wondered how to fix the Bagnall to its chassis, then noticed the keeper plate protrudes past the rear of the chassis block and had a screw hole, presumably to fix the original body. Of course, this keeper plate blocked the hole I needed to screw the coupling in, and the hole in the keeper plate was in the wrong place. A few moments with a burr in the dremel opened the hole out rearwards along with a countersink, allowing the Microtrains screw to pass through the keeper plate, body, coupling, and into the body again, securing them all together. 


The loco is tiny, so the crew were recuited from the HO scale Faller truck drivers pack - and still don't really fit, although a cab full of motor is forcing them half out the doorways anyway. The drinks can roof is suitably thin and doesn't look like a replacement, but I can see paint wearing off the brass steps pretty soon! A little coal in the bunker and glazing in the window and she is ready to go. 


A superb slow runner, she looks right at home on Loctern Quay where I expect she'll take up shunter duties, today I've been "testing" it including for reliable coupling operation. 


The Kerr Stuart Haig crew are from the Dapol recruitment agency. Not sure where the bits on the side tanks came from, amazing what shows up in a photograph. In the flesh, the new paint job has really tidied up the tatty body, and I think the green looks better than the black. 


Once warm the running is fair, but not as good as the looks sadly, with both surging related to the motor mount, and a tendency to stall which may be failings in the pick-ups or the wobbly wheels due to the stub axles. I expect it will see duty on Slugworth and perhaps Hexworthy but not Loctern Quay, which is why I didn't bother to change the couplings. Maybe one day I'll have a brainwave of how to improve the motor mount and pick-ups, but for £5 and a little work I'm pretty pleased!