Tuesday 24 December 2013

Happy Christmas!

It is time to wish all readers and friends a Happy Christmas! Yes Santa is on his way, and if you don't believe me check out NORAD, apparently Rudolph's nose is hot enough to be tracked by their missile-tracking equipment!

It seems customary to post a wintry railway or model scene, but I don't have one. So instead here are the results of my kids' Playmobil advent calendars! My daughter's is at least trying to be in the spirit of Christmas, with Santa and an Angel feeding the forest animals. I don't recall which Gospel that was in, so not sure the relevance to advent...


... but my son's haunted pirate island scene is even further from Christmas!


Aah well, we've enjoyed their School and Sunday School nativity plays, so hopefully they understand Christmas is about more than Santa and Pirates.

Friday 20 December 2013

Woodwork - but NOT Baseboards!

The last month has been rather manic, with the house move and sorting all our stuff into the new house (the garage is still full of boxes waiting to be emptied!), plus the kids have moved school, and we have had the preparations for Christmas. Work has been busy too. So no modelling to report.

However I have had a spot of woodwork to do. The house doesn't need work but we did decorate my daughter's bedroom. She had been in a toddler bed but we wanted her to have a proper bed, the trouble is the room is 6' 3" across - enough space for a mattress but not for a bed-frame, and to put a bed along the room would make it feel much smaller. Undaunted I bought a raised bed-frame (second-hand, it is less daunting to modify when cheap!) and set to with the saw...


I ended up removing about 2 inches from the length of the frame, this meant all the joints needed to be re-made at one end. Fortunately they were just a peg and bolt arrangement, but I did need to buy a 10mm drill bit for the pegs! I confess my hand-drilling was not square or accurate but with a bit of wiggling I got it all to fit together. 


Assembly was tricky as the bolts fit from the outside of the frame, but the proximity of the walls (and no space to bring the bed in assembled) meant that the order of assembly had to be carefully planned! The lengths were bolted together first then the end cross-pieces. The rails from the foot of the bed were removed to allow the mattress to overhang to the wall, and one was refitted lower down to retain rigidity. Finally a couple of metal corner brackets were added to keep it all square (in case my home-made joints were not rigid enough!)


The end result is a bed where we want it, that seems solid enough (and is free-standing from the walls), and one very happy little girl. (You may notice the room has also been decorated to her choice of colours). So it seems my experience making model railway baseboards has come in useful with a spot of home carpentry!

Saturday 23 November 2013

Moving!

There will be a slight interruption to modelling proceedings...


...Hopefully normal service will be restored before too long!

Friday 15 November 2013

Starting the Tram Loco

I decided the mounts that came with the chassis could be used, I selected those intended for the Billard as being the most suitable. Soldering them on was a little tricky, this would be easier before fitting the running gear to the chassis. The motor end bracket needed trimming to clear the rubber band drive.

 
The tram body etch is typical of Worsley Works, neat but basic and without instructions! I still find getting four sides square and aligned and soldered together a big challenge, but after an evening of fiddling I've got it as good as I am going to. Hopefully any remaining gaps can be filled and any misalignment put down to "character".

 
As yet I haven't fitted the roof, I need to find a suitable chimney first, and it might be better to leave fitting it until after sorting out the floor and interior. The etch includes multiple pieces to make up the distinctive U-shape buffer-beams of the Wantage Tramway prototype, however:
1) I can't make out how they are supposed to go together, and
2) being rather wide to suit the standard gauge prototype's buffers, I don't think they will suit a narrow gauge loco.
I think I will make up buffer-beams and side skirts from plasticard, the Wantage loco spent most of its life without side skirts but I will need them to hide the small wheels.

 
If you didn't know this was supposed to be a standard gauge loco you would never guess, it is tiny! At 27mm wide it is admittedly slightly wider than most 009 stock, but well within the variations of narrow gauge and as seen here, it looks at home with my Parkside "GVT style" coaches. I've bent the chassis mounts so the height looks about right, though I have yet to find a way to attach the chassis to the body.

 
So far a promising start, though it might be a while before it progresses much further, due to the impending house move!
Posted by Picasa

Sunday 10 November 2013

Brighton Show 2013

Yesterday I popped over to the Brighton MRC show, a typical local club show in a rather cramped venue but not far to go and usually worth a visit. It was good to see a good Narrow Gauge presence. Here is Raven's Rock by Tony Hill in O-16.5, based on Dinorwic slate quarry scene it is impressive and detailed, really capturing the feel of the Welsh slate quarries.


Fairleigh Down in O9 by Jason & Mason Pendrey is a very different theme, inspired by MOD arms depots. It featured computer-controlled DCC trains, automated bunker doors, and a radio-control tank.


This 009 layout wasn't listed in the program, but I think it might have been by Phil Gardner, is a nicely done "Rabbit Warren". This type of layout has long been subjected to ridicule but I think it's great, popular with non-enthusiast show visitors and not too serious!

 
This layout also shows the new Peco RTR coach can take some seriously tight curves, I don't know how tight they are but that can't be more than 9" radius I reckon!

 
Not NG (except in the Great Western sense) but with some superb buildings was Woodstowe by David Cox in 00 scale.

 
There were a few other good layouts too, some I had seen before but most not, so an enjoyable show.
Posted by Picasa

Tuesday 5 November 2013

A collection of projects

Since we are expecting to move house soon I had cleared away all my modelling materials and most of my tools into boxes, I even finished Thakeham 3 weeks before EXPO to allow time for this. But as is the way with house moves it seems we are still some way from the big day, so a box was reopened and some projects dug out.

 
Bottom left is another Egger coach grabbed at EXPO so I can increase my rake to three, or run a second mixed train (Awngate only fits two bogie coaches).

Above that is a Wantage Tram etch, along with a Halling chassis (top left) I got to go in it. However the Halling doesn't fit as it is too long, a shame as they are superb runners, so I have other thoughts developing to use that. Meanwhile I picked up a Meridian MPD18 chassis kit at the Convention.

Bottom right is an impulse buy from EXPO-NG, a WW1 Simplex should fit Awngate nicely. My son wants me to build the full armoured version but I'm leaning towards protected. This was bought with the MPD18 chassis to fit - but this time a Mk2 version despite being bought just a month later than the first I bought, hence the different packaging!

So there is plenty to get on with. The coach is probably the easiest having done two already, and the Simplex if a "proper" kit so should be reasonably straightforward, but I'm keen to start the tram loco to have something a bit different for Awngate, even though it may be the most complex project here.

So here is the MPD18 Mk1 chassis! It proved fairly quick to put together, though being tiny it is rather fiddly. The etch fits together very cleanly, I'm not convinced by the motor mount but it seems to work. I'd rather have larger wheels, these are just wagon or pony-truck wheels and I think they'll struggle to pick up power well. The axle is small too,

 
A couple of tips to anyone building one:
- Two brass tube sleeves are supplied to allow the worm gears to fit the smaller diameter axles. The instructions suggest drilling holes through the sleeve tubes to allow the superglue in to attach them to the axle, this sounded fiddly so I simply cut across the tube with a razor saw until a hole appeared.
- The pick-up on the insulated side is supposed to be fitted under the chassis by gapping the tiny PCB and soldering the upper half behind the lower part of the chassis side. I found this impossible, it would have been easier before assembling the running gear into the chassis. But then I realised I didn't need to bother as it could be superglued to the outside of the chassis and work just as well!

 
Considering it's tiny size and it is the first 009 chassis I have ever built (other than a Salford Models Hudson diesel which I failed to get working as a teenager) I'm rather pleased. It seems to work - but only with a finger on it, as it is too light to pick-up power! I need to add more weight to properly test it.
Posted by Picasa

Sunday 3 November 2013

EXPO-NG 2013 - The other layouts!

There were lots of other good layouts at EXPO-NG too, I mean the invited layouts! One I had been looking forward to seeing was Nottery Quay (009) by Chris O'Donoghue, as this featured in the 009 News in my early days of 009 modelling. It is still a brilliant little layout and a classic example of getting atmosphere into a small model, and despite appearances it is definitely Not Rye.


The other end of the same layout is Shell Bay, the opposite extreme in that instead of a busy harbour scene it is a desolate sand dune, with an amazing sense of space in a very small area.


Minibury Abbas by Chris Krupa is another 009 layout than inspired me in my early modelling days, so much so that I pinched the track plan for my layout Boxton, which was designed to fit a caravan locker but built to take to university. It was nice to see the layout again and great to see it looks and runs as well as I remembered!


Grindley Brook (009) by Tim Ellis is a layout I have followed on the NGRM Forum, Tim not only clearly has a great skill with the scenic work but also builds superb model locos, far too many for the layout so there was a display cabinet full too.


Tim certainly has an eye for detail, it's hard to believe the scene below is in a space less than 6" x 12".


Also on display was another of Tim's models, this workshop in O9 represents that of a miniature pleasure railway. This is the level of detail often seen in Gn15 layouts.


On a completely different note this model in 7mm scale by Bernard Junk (gauge unspecified... I suppose it counts as Narrow)  is of Le monorail Lartigue. Yes the French prototype for this monorail did actually exist, and a better known similar system using the same principle also existed in Ireland. And yes, this model actually worked - how I have no idea, but with a significant wobble as it went!


I could go on and on, because there were many superb layouts, but I will leave you with a link to the full set my photos - click the link below. Enjoy!
EXPO-NG 2013

Friday 1 November 2013

EXPO 2013: The Dave Brewer Challenge

This year's challenge at EXPO NG marked 30 years of Expo Narrow Gauge, 40 years of Meridian Models and 45 years of the Greenwich & District Narrow Gauge Railway Society. The rules stipulated the layout must be triangular with sides in the ratio 30:40:45, up to a maximum of 1.8x those numbers in cm. This makes for an unusual and challenging layout to design. You've seen enough of my entry so here are the other entries - there were 5 in total, which is less than most recent layout challenges and I think reflects the difficulty with the triangular constraints.


I'll start with the winning model, Windrush Wharf in 009 by Richard Holder, featuring a canal and warehouse, yet also providing a surprisingly rural and detailed scene. The track plan is the old-favourite inglenook, albeit well disguised, making for interesting shunting, while putting the backscene around the two shorter sides allows it to fill a corner. The over-bridge suggests more of the line is off-stage and allowing it to be added to a larger layout.


South Calene Palm Oil Plantation in HOe (I didn't get the builder's name) was much smaller model in an original setting, I do like the palm trees. Operation was more limited though, passing wagons between the two tracks via the working turntable (probably as tedious as Thakeham!).


A Cut above the rest in 009 by David Bumstead is a fictional lawnmower factory. The track-plan is original and interesting, with sector plates in each corner. Good use has been made of Metcalf card kits and the track is inset into a cobbled yard made from DAS - as I did with Landswood Park. I think a little weathering and more details - particularly to give the railway a sense of purpose - would add a lot to this model, but  given the clever design and tidy construction you'd never guess it was built by a teenager!


Finally this original interpretation attracted a lot of attention... Again I didn't get the builder's name, or the scale (I guess it is 1:1), and no it wasn't real cheese. But it is nice to have some humour at an exhibition, I bet it stumped the rivet counters!

Monday 28 October 2013

Thakeham on show!

EXPO-NG proved to be an excellent show, as usual. I'll post some pictures of the layouts in due course, but first an update on how Thakeham performed!

Set-up didn't take too long, the simple stand and light made a big difference, finished with a name-board and simple information display. Operation was from the right-side so I grabbed the end of the table of challenge entries, and pulled up a chair! That left time for a quick look round and a visit to the 009 Society sales stand before the show opened...


My 6-year-old boy was insistent that he wanted to come and help! I wasn't sure how helpful he'd be, but in fact he proved quite competent at operating - when he wasn't too excited! Here he is loading the wagons, a somewhat fiddly job.


I was helped by the Sussex Downs group; Simon Wilson, Phil Savage, and Mark Holland all did turns at operating that gave me comfort (and sanity-restoring) breaks and so I managed to see a lot of the show in short stints, so thanks to all. Mind you they were only to quick to give the controller back when I returned! Here's Phil at the controls while viewers wonder where the sand loads went.


To my relief and surprise the layout performed very well. There were a few incidents of loads sticking in the wagons resulting in derailments when unloaded, traced to an oversize load, plus one occasion of the loads jamming in the chute (gravity failure). We learned that if the rod was not pulled right back hard the loads may not be pushed off the magnet. And the act of loading up quickly took practice! However the unloading generally worked smoothly and attracted interest. The Hudson performed smoothly all day, as did the Lister when given a run in the afternoon, but the O&K had an occasional sticky moment in one direction which I shall have to investigate.


I may not have won the challenge this year but I am still very pleased with the layout: it's my first ever (almost) prototype model, it looks good and works well. It attracted lots of nice comments which is very encouraging, so thanks if you were one of those that made them! There were even some potential show invites so there may yet be more to come from this little triangle.

Thursday 24 October 2013

Making an Exhibition of Thakeham

What's this hinged piece of wood with dowels sticking out? An agricultural tool? Implement of Torture? No, just a support for the layout.

 
Three blocks of wood are glued under the layout with 12mm holes drilled to take the dowels, the support is opened out and slotted in place. This raises the layout about 6" above the table, to something like kitchen worktop height, a much more comfortable viewing height while still being operational from a chair.

 
I printed out a name-board and stuck it to a piece of foam-core board, which is attached to the top of the layout back-scene with some Velcro. If permanently attached it would get damaged, and the layout wouldn't fit in the car boot!

 
I've also made up a brief information panel with some photos using the foam-core display board I'd made for Landswood Park. With these simple refinements, and the angle-poise type florescent light attached as previously described, the layout is ready to be shown. I have even spent a couple of evenings test-running it to make sure it works as well as it should - well, at least it does before it leaves the house...

 
There is plenty more I could have done but a challenge like this is time-bound. In fact I completed the layout a couple of weeks ago, as we will shortly be moving house and, amongst other jobs, I have had to pack away my modelling kit. It would have been nice to add a few more details, make more concrete products, do better trees, paint or varnish the fascia ... but I have achieved what I set out to and I am happy with the result.

If you can get along to EXPO Narrow Gauge on Saturday do say hello, I believe the challenge layouts will be on Stand 5 in the main hall. If you can't, I'll post more pictures soon.
Posted by Picasa

Monday 21 October 2013

Remote Unloading

With loads that can be popped into the wagons while hidden under the hopper, I need a way to unload them at the other end of the line - inside the tipping shed. Of course the other end of the line is the far corner of the board - OK, it's only about 3 feet away, but out of reach from the operating position, so how can I do it remotely? You might be expecting something clever, mechanised, automated, finely engineered ... you may be disappointed!

I made up a lever with a cross-bar from offcuts of plastic sprue and plasticard, with a neodymium magnet at each end of the cross-bar. This was meant as a mock-up ahead of making something stronger from bits of rail and copperclad board, but it worked fine as it was! The lever is mounted into the centre of a couple of chutes made of plastic, pivoted on a paper-clip wire, and has a length of steel wire fixed to the bottom end, a coating of graphite lubricant for Kadee couplings keeps it all moving smoothly.

 
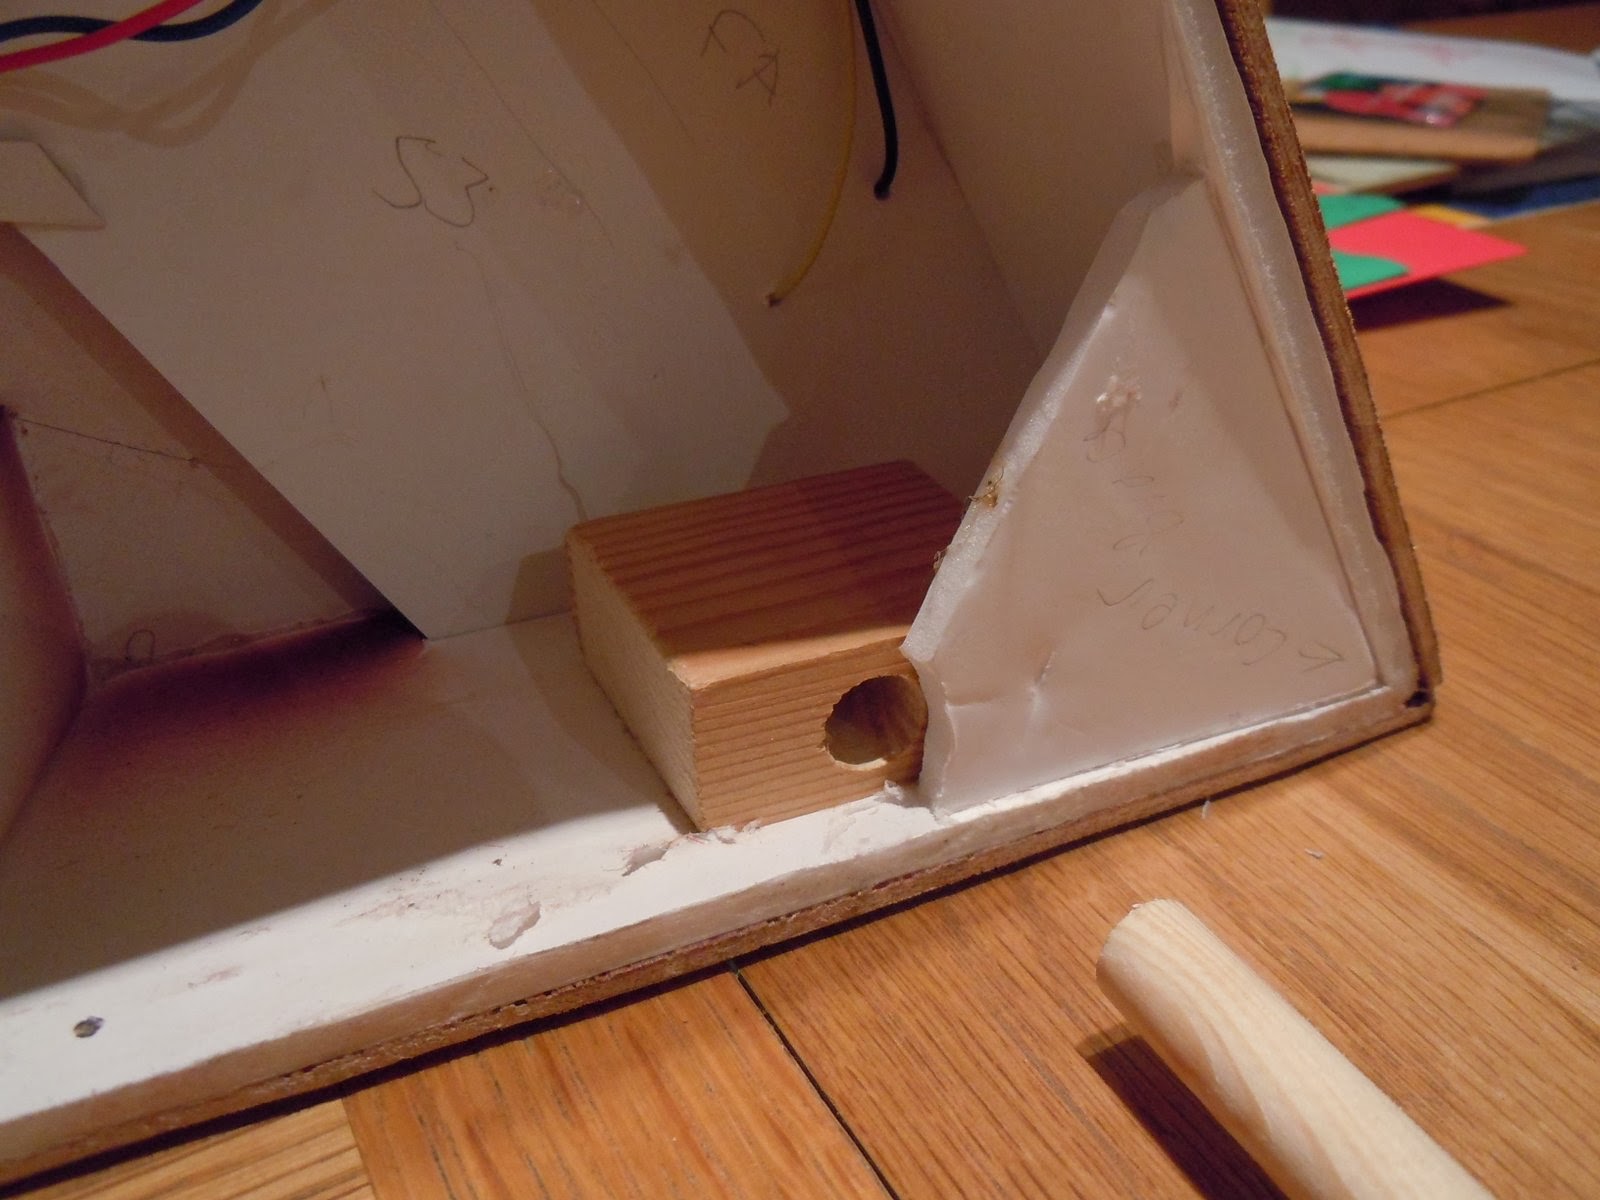
This chute contraption is mounted into the board next to the track inside the tipping shed. From below you can see the steel wire-in-tube curving round to meet a wooden dowel, to which it is attached using an electrical choc-block connector, the screw is an end stop to limit movement. The dowel runs across the board to poke through the fascia next to the switch panel, the off-cut of MDF seen here is a more solid mounting than the foamboard.

 
Having considered gears and levers and even motors, I settled on this as the easiest method, and amazingly it works! About an inch of travel of the operating rod moves the lever through a little over 90 degrees.

 
So this is the view from behind the back-scene as a train enters the tipping shed, note the essential "buffer stop" (every millimetre of this layout counts so the loco is run against the stop). On the left is the chute and the lever is about half-way down through its arc towards the wagons.

 
Looking from above (shed roof removed), once the lever has touched the tops of the wagon loads when pulled up brings them with it - remember the small magnets set in their top? When the lever reaches the top of its travel the cross-bar recesses into the "hoods", which push the loads off the magnets, whereupon they drop down the chutes.

 
All that is then required is to collect them in a tub, and repeat... I made up 5 pairs of wagon loads, so the process can run for a good, er, 5 minutes. Fortunately I can reach the tub to retrieve them from the operating position!

 
Posted by Picasa