Sunday 26 January 2020

Adding colour to the ground

With the deadline for the 009 Society challenge layout just a few weeks away the pressure is on to get some scenery created, the last week or so has been quite productive despite the lack of posts.


The polystyrene land-forms have been covered with kitchen roll torn up and stuck in place with plenty of dilute PVA glue - this creates a strong shell.


The buildings have been trial fitted again, requiring some trimming of the edges of the clay to get a good snug fit, and their "levels" checked adjusting with card under the foundations to get thresholds at a sensible height to the street. Holes were drilled along the quay for the bollards, and I couldn't resist checking the fit of the sunken barge - now in primer - and an "old" boiler resin casting I'm thinking of using as a water tower. I've also primed and sprayed black the Langley etch of drains and manhole covers, and cut recesses into the clay where they are to be sited.


Along the terrace walls and steps have been made, though as yet no capping stones or railings, and the "pizza base" foam embossed with pathway paving. You can also see a fence trial-fitted along the front.


The next big job is to paint the cobbles, getting this right is important to the whole look of the area. I found some craft acrylic and started with a mid brown-grey colour, worked into all the cracks.


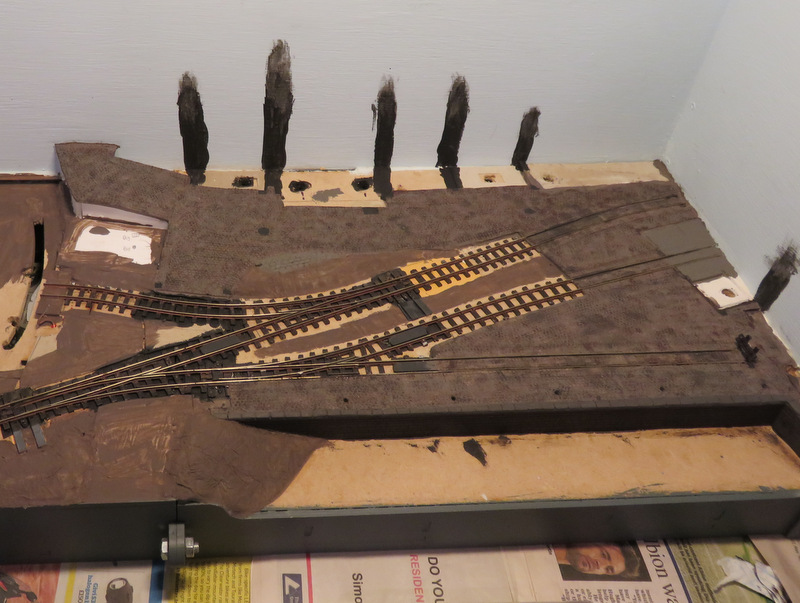
Next I added variations to the base colour - darker, more grey, and even a little redder - stippled onto the surface with a small sponge. This was quite effective, but looked a little blotchy, and perhaps too brown. In case you are wondering, the black "stripes" up the sky are to form shadows between the buildings, and the holes under them are in case I ever want to fit lighting. The quayside wall has had a coat of darker brown, and the capping stones a dark grey.


Once that was all dry I reverted to enamels. Two shades of grey were applied dabbing on with a piece of kitchen roll, aiming to give the tops of the cobbles a greyish finish.


Finally I finished with a very thinned brown wash allowing it to flow into all the crevices, and dabbing any excess off the surface - though it is too thin to cover the surfaces, only adding colour where it collects in the crevices. The quayside got a dark greenish-black wash too.


I'm happy that the result is quite close to what I was aiming for, these pictures of Tatton Park farm (which inspired my Landswood Park Farm layout) were useful reference.


Now, back to the landscape...


...which has had a coat of brown filler. I mix powdered interior filler with various colours of powder paint before adding water to a thick paste, this is applied with spreader or cheap brush to cover the kitchen roll and polystyrene.

Next up, a number of details need painting and fitting, along with the buildings, in preparation for ballasting and greenery.

Monday 13 January 2020

Sett in my ways

A large part of the area of this little layout needs to be roadways and quayside, which to look the part should be cobbles or setts. From past experience my favourite approach to this is to use DAS clay, and emboss the setts or cobbles, which I used (in 7mm scale) for Landswood Park Farm. It is, admittedly, rather tedious to do - but as I found with Slugworth fettling plastic sheet to be a neat fit to the rails and rebated for the sleepers is also tedious. The way the clay fills the gaps between the sleepers without a large void in the flangeway looks much more realistic, and the embossing can be adapted to suit the geography.


A handy tip I learned from a fellow Sussex Downs 009 group member was this trick for rolling out the clay to a consistent thickness. I used an offcut of melamine covered shelf, with a couple of strips of 2mm card stuck down, but any smooth surface and thickness of spacer to suit would do. A simple knife for cutting the clay and a ruler for when a straight edge is useful, while a damp cloth keeps the clay usable for longer.


As seen in the last post the ground is built up to sleeper height with 2mm card, so 2mm of clay brings the height up to a little under 1mm below rail height. To prevent undulations over the sleepers small lumps of clay are pushed in between them, inside and outside the rails - this can be rough, as seen at the rear of the picture. I lay the clay on a layer of PVA, I don't know if it is necessary but figure it won't do any harm. The embossing is done with simple home made tools...


... here are the tools, as you can see no expense spared!

  • On the left a piece of 20-thou plastic allows straight lines of various lengths to be embossed. 
  • The black piece has two notches for the rails, dragged along the track at about 45 degrees it ensures the clay either side of and between the rails is just below rail height
  • The thin black piece is critical - it's 40-thou or 1mm thick, and has another piece set about 1.5mm back from the end - it is simply used to open out the flangeways, by running it along the inside edge of the rail with lip on the rail (it just bumps along the rail spikes ensuring the gap is deep enough)
  • The cobbles are embossed with 2mm plastic tube, with the end chamfered inwards to give a sharper edge and a more rounded impression. One tool has a cluster of 7, one a line of 3, or the other end can be used for a single cobble (but that would be very slow!)
  • The square(ish) sett moulds were made from 20-thou plastic with a thinned edge, and 10 thou microstrip 2mm wide. Each set is about 2.2 x 2mm, again a large cluster of 9 and 3 in a row were made - partly dictated by the size of microstrip and partly because 3 fits neatly between the rails (about 7mm)


Embossing is then a case of ensuring the clay is level and below rail height, opening up the flangeways, and imprinting the desired pattern with the mould tools. I went for setts around and between the rails, and cobbles (presumably cheaper) elsewhere, The impression doesn't need to be deep at all, and the moulds can overlap previous impressions to help align them or fill awkward spots. In places things aren't perfect, but overall the impression works well. Quayside edging and kerb stones are made to suit. These buildings were simply pressed firmly into the clay to create a small foundation.


An overall view with the embossing complete, the quayside and the road across the back. The rest of the track will be ballasted, and the lane off towards the front will be gravel (sand) for variety. It was tedious, but not as bad as I feared - I think it took about 7 hours over two days, plus a couple of evenings to make the tools.

Hmm, that's a lot of cobbles to paint!


A close-up of the road. The clay can be laid to any gradient including compound slopes as here, while imperfections in the embossing and small bumps add to the realism I think. There's no pavement so I've added a line of setts along the edges, really this should be a gully for drainage but I didn't manage that level of detail!


Finally, a few final areas of landscape have appeared - the river-bank at the end of the quay, and a slope at the back of the fiddle yard. So now very little ground remains level apart from the quayside, the track, and the areas where buildings stand.


I have collected some details to add, both by Langley; some drains and manhole covers which I need to set into the clay, and some bollards for the quayside. These are in two forms - cast round bollards that look like they could tie up an ocean liner, and some well-worn wooden posts. At the moment I'm not sure which I like best.

Sunday 12 January 2020

Loctern Quay - Ground works underway

Slow progress the last week or so, but with the buildings completed the focus has shifted back to the layout, preparing the ground levels ready for scenery.


At the left hand end, the terrace will be raised slightly on a base made of foam-core board, thick card, and a foam pizza base. The steps are cut from 2mm card. There will be walls alongside the steps and supporting a path, but these will be fitted after scenery.


The roadway was cut from card a little while back, but is now stuck in pace on packing and formers to raise it up, and a small bank fitted in front of it from pizza base foam. Level crossing timbers are cut from black plasticard but (as can be seen from the one out of place) not yet stuck down. This is a daft place for a crossing, the points, many angles, curves and check-rails made it tricky to fit the plastic, but it does help scenically and using paper templates helped. Using black plastic means any bits missed in painting, or caught when track cleaning, are not obvious - although the plastic is set below rail level.  Point levers are also being fitted to extended timbers made from plastic.


At the right-hand end the quayside has had 2mm card fitted around the tracks to bring the level up to the sleeper tops, in readiness for the clay that will form the surface. I've also fitted a buffer stop.


You might have spotted the quayside itself has gained a stone face. I could have gone for brick but wasn't sure how printed paper would survive whatever I end up using for water, and didn't want to use embossed brick as it might contrast too much with the buildings. Also, it's not unusual to see riverside walls built from stone even in areas of predominantly brick buildings, so I thought it would be a nice contrast. After some discussion on the NGRM forum of the best stone to use I chose Wills dressed stonework, which I think fits well. To match the courses the three pieces were each cut from the bottom of separate sheets.

I've also got a partially sunken barge resin moulding from Anyscale models, which I think sets the location as a riverside quay which has fallen out of use. It needs cleaning up and painting but will I think add a little interest at the front. I will have to figure out how I'm doing the water soon...

Wednesday 1 January 2020

Buildings completed!

As a new year begins I've been considering where my 009 challenge entry is at. I only started it in August, but the deadline is the end of March, and the layout has an exhibition a couple of weeks before then, so I only have about 10 weeks to finish it! The baseboards, track, wiring, and lighting are complete, but buildings take a lot of layout-building time, so my aim was to finish them by the end of the year - which I have managed, just!


I last showed the wriggly tin-shed in raw plasticard, it is now painted. It was given a coat of red primer, then given rusty colour washes. It was then dampened and salt sprinkled on, before being sprayed black (when dry). Some final washes, dry brushing, and weathering powders completed the look.


The cluster of buildings at the other end of the street have also been finished. The plain card building looks OK once painted and weathered. Details such as gutters, down-pipes, flashing, and curtains have been added as for the terrace houses seen in the last post.


This cluster of buildings works well seen from the far end of the layout too, though the road exit is not so hidden from here.


The rest of the street have had final details in the same way, which along with blacking out the insides, has helped bring them to life. The shops have also had a plinth added along the front under the shop fronts which should help them be set neatly into the scenery.


Finally a look the other way showing the factory and the terrace obscuring the fiddle yard. The next job is to start building up the scenery, there's not much of it but subtle variations in height and tight spaces means it isn't simple.