Tuesday 23 December 2008

Measuring for Cassettes, and a Name for the Layout

The Christmas rush has meant little time for progress on the layout, but I have started making more cassettes for the fiddle yard. These are to the same design as those I made for Pen-Y-Bryn Quarry, where I made 3 loco cassettes 9cm long, 3 train casettes 21cm long, and one at 30cm long. The fiddle yard on this layout allows for longer trains (40, perhaps 42cm long) and the station loop will just allow a train of 30cm to be run-round.

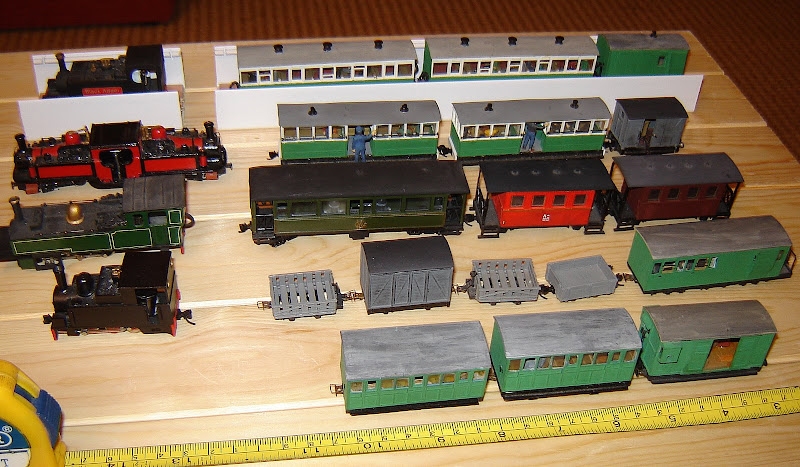
The picture shows some of my stock out being measured. That reminds me I have a fair bit of work to do to get the stock ready for the exhibition! Some of it still has DG couplings rather than the Microtrains couplers I now use, and some of it is overdue a visit to the paint-shop, never mind the usual fettling to get things running properly! In addition I have a few wagon and coach kits to build! But back to the point, I plan on making a couple more 30cm train cassettes, a couple more loco cassettes 0f 9cm, and perhaps one of 12cm. I know that small loco's are required for this layout, but maybe I'll run my Double Fairlie or L&B Manning Wardle sometimes, just for fun! Anyway having 3 full length trains, 5 or 6 loco's, and a shorter train or railcar, available in the fiddle-yard should be plenty for this layout!


I recently took the layout along to the Sussex Downs 009 group clubnight, where folks gave much encouragement. It even ran pretty well, which is amazing because usually the gremlins appear as soon as spectators do! However I was pressed to give a name for the layout, after all it can't be the "Alcove Layout" in the Exhibition guide! So I have come up with the name "Awngate" - it's an anagram of "Wantage", which of course was the inspiration for the station plan and building.

So, that's all for now, a Merry Christmas to all!

Saturday 29 November 2008

A lorry but not much else!

The pace of progress has slowed down somewhat over the last few weeks, I can't believe it's a month since I last posted. However, earlier in the month I did put together a lorry for the yard. It's a P & D Marsh whitemetal kit for a 1911 Daimler lorry that a friend gave me a little while back. This layout will be set in the 1930's so that makes the truck pretty old, but that then with fewer motor vehicles around they would have been kept going longer, so it should make a good smal-town coal-merchant's truck.

It was quite a fiddly kit to put together and it got a bit wonky in the process, but it looks OK and if anyone asks it's had a hard life! The cab roof is not fixed yet, but it's ready for painting.


The last picture doesn't show any progress, just Toby shunting trucks. It's nice being able to run trains on the layout, being in the dining room means it's there when I feel like it, or more likely when my son want's to see Daddy's Trains. It also means I can see all those jobs that still need doing!
Posted by Picasa

Thursday 30 October 2008

A Model Railway Corner

First a picture of the layout in it's surroundings. This layout has been built to live in the dining room and fit as part of the furniture, which I think it does well, though the Ply could do with staining to match. However the recent change has been that I have acquired the shelves above for my railway books (well, mostly). With the bureau cupboard storing my modelling bench, toolbox, and some materials, it is virtually a model-railway corner!

The reason behind the reorganisation is that we are expecting a second child in April - and that of course means the spare bedroom will be required! There will be more sorting out, decorating and DIY to come I'm sure! It also means that the deadline for the Sussex Downs members day (7th March) is more important, as after that I'm likely to have less modelling time for a while ...

The second picture shows the advantage of having the layout so accessable, that working on it is so easy, even just an hour or two at a time. Here the layout is slid forward and the lighting beam removed, to make it easy to work on. I've recently formed the gravel and cinders yard areas made from layers of sand and painted them with acrylics, then formed the the contours of the small parts of land not rail, buildings or yard, with polyfilla/powder paint and newspapers over the polystyrene. As shown in the photo the first layer of grass scatter has been applied too, so the scenery is really progressing.

Posted by Picasa

Saturday 25 October 2008

EXPO-NG 2008

I had a great day out at EXPO-NG today. This year I was not exhibiting a competition entry, or any other layout or stand for that matter! So I could enjoy the show. Some superb layouts as always, and plenty of 009 layouts. You can see all my photos here

It was good to meet some friends too, and see the competition entries for the 40x25 challenge. I didn't hear who won, but there were some original ideas as always.
I picked up a few odds and ends, but I didn't spend too much money. Well, apart from one thing that is! I put a deposit down on a Paul Windle Hunslet 0-6-0. The down-side is that Paul is so busy that I will have to wait until next May before I see it! In the meantime, here's a picture of the "demo" model:

Posted by Picasa

Friday 10 October 2008

Backscene and factory yard


As the picture above shows, the factory and yard is largely complete now. The Metcalfe buildings have had a fair bit of work (painting visible card at the corners etc.) but they do look good, I think. The wall and yard gate are made using the extra brick-paper and doors supplied with the kits, the gate-posts are styrene and painted to match. A gate across the siding will be fitted at some point.

Mike Beard pointed out that the cobbles should run parallel to the tracks, however being a cramped and oddly-shaped site this would have been very fiddly to arrange, plus the track is not quite straight. However the cobbles are parallel to the buildings and those between the rails parallel to the rails, I think it looks OK. And I took great care to ensure the surface is just below the rail tops - even outside the rails! They were painted grey with enamels and then given a couple of washes of green/black acrylic, wiped away to represent dirt between the setts.


Both pictures show the completed backscene, using Townscene backgrounds. Some of the foreground buildings are mounted on card and stand slightly proud of the backscene proper. Any edges are blackened. They do seem to blend well with the buildings as I had hoped, although the town is looking larger and more important than I had envisaged!
Posted by Picasa

Sunday 14 September 2008

Let there be light!

I've just had a week off from work, and although having a small toddler to look after and some family days out (I continued his education with a trip to the Bluebell Line) I have managed to find some time to work on the layout, and make progress on several fronts.

The most obvious is the lighting. This consists of two 30W tungsten strip-lights inide the pelmet, as shown in the photo. The ply wasn't thick enough to screw in to, so I stuck them in place with a hot-glue gun. The tin foil (pre-crinkled to diffuse the light) reflects the light and prevents the wood getting too hot. I left the lights on for several hours and the ply was just warm to the touch. They are wired to an in-line connector so the mains lead can be removed, then to one 3-amp fused plug.

The lighting may be simple, but is very effective as the picture below shows. Tungsten light gives the impression of a bright, sunny day, but that matches the blue sky! Othe progress that can be seen is that the ground contours have been built-up, at the back using card to raise the houses and yard areas, and with expanded polystyrene at the front of the layout. I also carved drainage ditches into the cork beside the track. Although essentially a flat area, the subtle changes in level are important to avoid the flat-board look!

On Saturday I went to the Worthing MRC show in Lancing. You can see some pictures here: http://picasaweb.google.co.uk/campbellsonline/2008_09_Lancing#
There were some good layouts, some average and a few looked unfinished. Trade support was the usual Hornby and toy cars etc., no Squires this year, but I did manage to pick up some odds and ends - chimney pots for the station, some second-hand books, and another Townscene backscene. This has some house and shop-fronts that will enable the backscene to come together, so that is my next job.

Posted by Picasa

Sunday 7 September 2008

One year on!

So, here I am exactly a year on since I started this Blog, and just over a year since I cut the first sod (wood) on this layout. Despite the distractions of family life, and other commitments I have (like going to work), progress has been reasonably good. The photo's below show that the track is laid, painted, ballasted, wired and working (you'll have to take my word on that, bar one or two gremlins). Also the sky is in place and I expect to have some roofscape shortly, the main buildings are all but complete (except the engine shed), and I've just started cutting Wills granite setts for the factory yard. I expect the inset track will be fiddly!
So how much remains to be done? Well other than finishing the structures and backscene, the scenic ground cover is the obvious thing. Gravel in the yard and by the goods shed, a slight grassy rise to the house-backs, over-grown waste ground to the front of the layout. Also walls, fences, gates, etc. Then it's down to the details - packing cases, a crane in the yard, lamps, road vehicles, people! In addition I still need to fit the lights into the facia, stain/varnish the plywood, make up further fiddle-yard cassettes, and possibly even make legs to support the layout for exhibitions.
While the layout is being built for home use it has been designed with exhibitions in mind, and indeed has already recieved it's first invitation. Well, OK, it is the Sussex Downs group members' day (7th March next year - hope to see you there!) but nonetheless it gives me a deadline. After 2 previous attempts at the EXPO-NG challenges I said I'd never build to a deadline (ha!), but at least it concentrates effort! Actually the layout should be fairly complete by then, even if lacking in some details. I'll also need to find time to service / paint / build some stock too!

Posted by Picasa
Now, as for the blog, well it has been rather enjoyable posting the occasional updates on progress, plus a few other topics. I try to do at least one update a month, and that is another factor in encouraging progress! It seems that the blog has had nearly 3000 different hits since I started tracking it, so obviously there are a few of you out there taking an interest! (I don't think it's my Dad looking at it 10 times a day!) so thanks for your interest, and your comments. Though I am still waiting for inspiration for a name for the layout, so give me your ideas please!

Wednesday 27 August 2008

Experiments with magnets for uncoupling the microtrains couplings have not come to a conclusion yet. I have found that the cupboard latch magnets from Homebase are weaker than those from B&Q, so I need to pop to B&Q at some point! I also need to see if I can widen or extend some of the oblong holes in the ply baseboard under the track - not an easy job now the track is laid!

I recently bought some tiny (2mm diameter x 2mm long) Neodymium magnets off the web (www.first4magnets.com). These are very powerful for their size - but not powerful enough! I hoped to place them in the ballast between the sleepers but the field is not strong enough. Bigger magnets would work I'm sure but would be harder to hide, plus the postage rather prohibits experimenation.

Still I have made some progress by painting the rail sides - I'll need to give the sleepers and ballast a wash of dirty brown too, but I will have to touch up some of the ballast first. Now I just need to clean the rail head!

I have also made a start on planning the townscape on the backscene. I have some Townscene town-scape prints which need cutting around the skyline and pasting onto the sky. The photo below shows them mocked-up (not properly trimmed!) to see what works. I'm not sure how best to stick them on, avoiding bubbles as I had with the sky. Pritt-stick, wallpaper paste, or spray adhesive?

Posted by Picasa

Wednesday 30 July 2008

Holiday Snaps

The last post rather gave the impression that I spent 6 weeks wiring up the layout! Actually it probably took around 10 evenings of work, between 1-3 hours at a time. Still a fair ammount of time I guess, but at least the layout is small enough to be up-ended on a small table in the lounge and worked on sociably / in front of telly.


There have been other distractions in the meantime, not least a weeks holiday in Wales back in June. We took rides on the Ffestiniog (of which I am a member and used to volunteer many years back), and the Padarn at Dinorwic, we also took a trip up the Great Orme by cable tram, though as you can see from the photos I managed to snap a few other lines in passing.


Posted by Picasa

Thursday 24 July 2008

Wiring Complete


Well, finally the wiring was completed last week. There were a few teething problems, the main one being that I had forgotten to cut the copperclad on the sleepers at the baseboard edge! Other than that a point motor going the wrong direction, and a couple of forgotten wires, were easily fixed!


At the baseboard joint I didn't want to have to have a plug and socket - apart from the extra hassle there simply isn't space, the way the main board slides snugly into the alcove. So I soldered to the ends of the final extra-wide sleeper a couple of brass squares, the ends folded down and the inner corners folded up to a Vee. On the fiddle yard I soldered brass wires to the copperclad sleepers to make contact with the brass plates when the boards come together, the way the board slots into place makes this work surprisingly well.

Also on the fiddle-yard I soldered brass sheet strips to the cassette-end of the lead track, this makes contact with the copperclad strips accross the ends of the cassettes.
So all works well? No, not quite. Test running has shown that while the Microtrains couplings flick over as they pass over the burried magnets, they don't actually uncouple when coupled up! I've used these magnets under the track fine on Pen-Y-Bryn Quarry, but not here. I'm not sure why, perhaps the granite ballast is too dense? I've chipped some away but little improvement. Maybe the Homebase magnets are weaker than the B&Q ones? I don't know how to address this problem yet ...
Posted by Picasa

Monday 14 July 2008

A Day Out at the Amberley Gala

Last Saturday we had a family day out at the Amberley Museum. It was the Gala Weekend, so there was loads going on - two engines in steam plus loads of I/C engines, inluding 10 working Listers. My 19 month old boy loved it, especially the buses (I'm still educating him!)


I didn't get many pictures of the trains - as I was too busy holding on to an excited little boy - but I did get some pictures of the model railway show, they are on my photopic site:

http://campbell-modelrailway.fotopic.net/c1544943.htmlmodelrailway.fotopic.net/c1544943.html


If you are intersted, the Amberley website is http://www.amberleymuseum.co.uk/ - and my friend Steve got a good set of pictures which you can find here: http://www.flickr.com/photos/fairlightworks/sets/72157606139230217/

Progress on the layout is being made - I have just about finished the wiring and had a loco move under it's own steam (electricity) the other day. Update soon.

Posted by Picasa

Tuesday 10 June 2008

Starting the 'lectrix


The first photo shows the fitting of the point motors and uncoupling magnets for the micro-trains couplers I use. For these the magnetic field has to be accross the track, and I have found that a pair of cupboard-catch magnets works well. They are available in bulk from B&Q or Homebase etc., and are easily dismantled to get the magnets out. These are stuck together and glued into an oblong hole I cut into the baseboard before laying the track (the holes were covered in paper and the track layed over the top).


The point motors are SEEP - with a built-in accessory switch I will use for the point frog polarity. I simply glue these to the underside of the board using Bostik, ensuring the operating rod is through the tie bar, the travel of the point motor is parallel to the tie bar and that the range of travel is cental to the point motor (important for the switch to operate). Here I have stuck the point motors to pieces of thin corrugated card stuck to the board, partly as the plywood was uneven where it had been drilled, and partly hoping to reduce noise - we shall see!


The second picture is the control panel I have just made. For such a small layout it is suprising how complex the wiring is! There are 7 point motor switches (silver), 4 main track feeds and 3 further isolating sections (with coloured caps to match the diagram). I was concerned that I would not fit them all in the space I had cut out of the front of the baseboard - but fortunately they just fit. The panel is an offcut of metal sheet from the scrap bin at work, drilled on a pillar drill in a lunchtime! The diagram is drawn on a computer (Word, nothing fancy) and printed out, stuck to the metal with Bostik. Finally a layer of clear plastic (the bubble pack from a Wills kit) is laid over the top, and the switch holes cut out with a scalpel.


I wanted the panel to be recessed into the cut-out in the baseboard, and it will be held there with a couple of M4 bolts, however access behind the cut-out is very difficult because of the board bracing! Still, it will look good.


Now I have started the actual wiring, so the next update should be when that is finished. I won't have much time in the next couple of weeks though, so progress may be slow!

Friday 23 May 2008

Track laid!

Finally I have laid the rest of the track! So what, you might think, nearly 9 months after starting this layout I have laid some track. Well for various reasons it seemed better to have the major buildings defined first, and anyway finding the time to do noisy jobs like cutting track without waking the baby isn't easy!


The first picture shows the fiddle-yard entry track. This was laid from the station entry point, accross the board joint and the "cassette terminal" in one piece. Strategic placement of copper-clad strip between the sleepers stuck down with Bostick (some track pins may follow) should keep things solid. Once everything is stuck and soldered in place I cut the rails at the board and cassette joins with a slitting disc in a mini drill. I'll explain the cassette fiddle yard another time but it is the same design I used on Pen-Y-Bryn Quarry.


The rest of the track was stuck down onto a layer of PVA glue, with track pins to hold it where required (later removed). "N"-gauge granite ballast was sprinkled on to give an initial covering, later further ballast was added to the sleeper tops and diluted PVA dripped on with a pipette in the usual way. Actually it's the first time I've ballasted this way, most of my layouts have featured the track buried in ash/mud etc. rather than ballast!


After vacuuming off the excess and picking any ballast away from the rails, points, sleeper tops etc, the result is below. One point had stopped working - to my horror - but it turned out the spring had popped out of the slot in the tie-bar, with a bit of work I got it back together.


The ballast and rails will need painting, not sure how to tackle that yet, but first I need to install point motors and start wiring. I'd best make sure it all works before going any further!


This last picture shows the wrinkles in the backscene around the corners, fortunately I think I will be able to hide them behind buildings.

Posted by Picasa

Tuesday 13 May 2008

Backscene and Buildings progress

I haven't managed to publish any updates about progress on the layout for a couple of months, and with family and other comittments, and keeping the wife happy by sorting out the garden, there hasn't been a lot of time for model making. However there has been some progress ...
Last weekend I had a second go at sorting out the backscene. I had cut fillets of foamcore board and fitted them into the corners as shown, then fixed two layers of lining paper to form the continuous curved backscene. I stuck it in place using a spray-on impact adhesive from Bostik, which worked fine until I gave it a coat of white emulsion, as an undercoat to painting the sky. Then the paper shrank and wrinkled, and the glue came unstuck!
So I got a roll of sky-paper from Townscene (advert in RM). I ripped off the lining paper and cut and stuck a new piece in place, this time using wallpaper paste. Then I stuck the sky-paper to that, also using wallpaper paste.
Once the glue has dried and the bubles and wrinkles straightened out, it doesn't look too bad. However the sky-paper is very thin, and despite my best efforts some creases crept in whilst fitting it in place around the ends. I'm hoping I can hide the worst when I fit the cut-outs of buildings for the skyline.
The pictures also show the buildings progressing. The station and goods-shed is now painted, and pretty well complete. I have recently been putting together some Metcalf card kits for warehouses and house-backs, these are the first card-kits I have used in 15 years or so, and I was sceptical. However they are not at all bad, I've taken care to paint the visible edges of the card to match the brickwork. They may not stand too close a scrutiny but they will look fine from normal viewing distances, and most importantly will allow me to complete the layout in reasonable time!

The buildings need some finishing, and when I get chance I will finish laying the tracks, then we should really see some progress!

Monday 7 April 2008

Narrow Gauge in a Farmyard


Just got back from a weekend visiting my folks in Cheshire, while there we took the kids to Tatton Park farm to see the animals. It didn't take me long to notice rails inset into the cobbles around the farmyard! It seems as though there was hand-operated tramway for moving animal feed around the yard, though it is no longer in use there was a wagon in one of the sheds. The gauge was about 2 foot or slightly over, and the track plan was basically a "Y" leading from a shed, down a hill and to both sides of the yard. There was also a line accross the "Y" forming a triangle, which came out of another shed and crossed at a wagon turn-table without rails - essentially a metal disc.
Now this may not have that much modelling potential as it is, but combine the idea with the Lincolnshire Potato Railways, or some of the estate lines, and you could imagine the farmyard line being part of a larger line serving a large estate or farm. As well as flat or open wagons for animal feed, there could be skips for mucking out, coal wagons for the boilers and traction engines, plus general goods, timber, fertiliser and produce! Motive power would probably be open-cab lightweight petrol or diesels, such as a Lister, O&K, Hudson-hunslet or one of those Fordson tractor conversions. Of course a Ruston or Simplex would do too.
I think this could make an interesting micro-layout - probably in a larger scale to allow for the small locos and wagons, perhaps O-14? The farm buildings could frame the scene, with sheds for the wagons to go into, and the line continuing through the gate-house arch to the "rest of the estate". The trackplan would probably need a loop and a couple of extra sidings to make it interesting!
Posted by Picasa

Sunday 30 March 2008

Narrow Gauge South

On Saturday I went to Narrow Gauge South near Winchester. I only had time for a brief visit but it was enough to see the superb range of over 30 layouts on show. Highlights for me were the infamous (to 009 modellers at least) Dovey Valley (pictured) - dating back many years and famous from "The Two Ronnies" sketch - and also the new layout from John Thorne "Purbeck". Some of my pictures didn't come out to well but the better ones are published here. The Sussex Downs group were out in force and Mark Holland was showing his layout "Temark Valley", his first ever layout, highly detailed and full of character. Mark is currently working on a new layout based on Welshpool, I can't wait to see it.

UPDATE: Steve Fulljames has published more photos on his site - well worth a look


Work on my layout has been progressing, I have painted the station buildings and am putting together a Metcalf Models factory. I will publish some photos shortly.

Posted by Picasa