Sunday, 2 July 2023

Farnham 009 Group Show 2023

Today I took Loctern Quay to the Farnham and District MRC 009 group open day. 


The Baldwin took on the shunter role much of the day, looking really at home. I have to say the bodged Microtrains coupling at the front didn't work perfectly, being prone to occasional uncoupling or refusing to couple up, but on the whole it worked well and ran smoothly. Big thanks to Martin Collins for helping out. 


Bridges (009) – Greg Chiltern. Some mesmerising complex trackwork including dual (009 & EM) gauge. 


This 009 layout was by Mike Le Marie of the Farnham group. 


Also by Mike Le Marie was this diorama built in a box-file using, I believe, a Scalescenes download-and-print kit.


Gideon Postlethwaite (O9) – Steven Green. A busy industrial scene. 


Melin Dolrhyd (009) – Stuart Taylor. Modelled on a location on the Welshpool & Llanfair Railway, with a watermill in the background.


Castlederg  (OOn3) – Andy Cundick. Modelled on the prototype in Ireland, which apparently did trial the Kerr Stuart 90HP diesel prototype. 


Another view of Castlederg, which really is a fine model. 


The Farnham club's modular 009 layout "Straight and narrow" was on display, ironically not straight but in a U-shape configuration. This module features a village with the railway passing down the street. 


This static model of a Cornish fishing village with narrow gauge (009) line was titled "Port Hallow Re-imagined", credited to Michael Key, and said to be part of a permament layout under construction. 

Compass Point (009) – Chris O’Donoghue. This view is of Shinglesea Halt on the extension, which also includes the famous Dective Sonny Russell's* railway carriage house, but more importantly gives an open, windswept, feel to balance the crowded clutter at Compass Point

A view from the end of Compass Point looking up the line.

*Chris is also an author and his (excellent) books feature Detective Russell and Compass Point

Saturday, 1 July 2023

A dirty Baldwin

Some time ago I picked up a Bachmann Baldwin, in plain black as WHR 590. I wanted a generic, well-used workhorse, so I removed the number from the side with T-Cut, although this left the tank sides looking polished. I'd also fitted a Bachmann EZ-mate buckeye coupling in the hope it would work with the Microtrains couplings, it did in that it would couple, but automatic uncoupling didn't work so they are no use for shunting. 


It struck me that although I couldn't make space for the Microtrains draft box, the pocket for the Bachmann coupling was similar to the draft box. Indeed, the coupling does fit over the centre post, and with the spring fitted and a Microtrains draft box lid filed down to fit, the Bachmann screw fitted on. It doesn't quite work as the coupling has pips that fit into slots inside the draft box, the Bachmann pocket doesn't have these slots, so the coupling swings to the right. I added a sliver of plastic into the pocket to stop the coupling swinging too far, a fudge but surprisingly it works well enough for the coupling to both couple and uncouple - albeit delayed action uncoupling doesn't seem to work. Better than the EZ-Mate anyway (there's still an EZ-mate on the back). 


Rather than dismantle the loco (which looks complicated), and have to mask details I didn't want painted, I decided to brush paint. This may have been a mistake, especially given Humbrol don't seem to be able to make matt black enamel paint anymore. It comes out patchy, part matt and part gloss. In the end I mixed more and more dark grey into the mix and applied many thin coats, resulting in a pleasing faded black - although not my smoothest paint job. I dry-brushed some details, such as gunmetal on handles and rust on some exposed edges, and then masked the wheels and motion and cab windows and gave it a quick spray of Dullcote. 


I've been painting a lot of figures recently, including some loco crews. The back row are ModelU figures for the two quarry Hunslets and (far right) the Double Fairlie. The three smaller figures on the front row are Preiser HO scale, which are useful for fitting into cramped loco cabs. 


After a little more weathering with powders the loco is looking old, faded, and neglected, but hopefully not too decrepit. Close-up the paint finish doesn't look too good, but to the eye it isn't so bad. You can see I had to use the HO figures. A little real coal (dust) in the bunker and the supplied works plates fitted finish it off. It certainly looks at home trundling up and down Loctern Quay. 

I've also spent some time checking all the locos and wagons over Loctern Quay ready for its showing at the Farnham and District 009 group open day tomorrow, at Wrecclesham Community Centre, Greenfield Road, Farnham, Surrey GU9 8TJ. Do say hello if you are there!

Friday, 16 June 2023

Controller testing

The Sussex Downs group recently passed on most of the Upsands Downs and Everleight Railway to a new owner, including some of the venerable hand-held controllers. It was observed that we could do with some new controllers to ensure we have sufficient for the new layout, and perhaps to give better performance. However, the choice isn't clear, with increasing ready-to-run options and modern N-gauge chassis being used with small modern motors, and many of them using coreless motors, as well as models using traditional motors, any new controller has to be able to deal with a wide range of mechanisms. So, I took along my collection of controllers to try out. 


Here's the under construction club layout which allows a continuous run, but has 12-inch radius curves on 1 in 30 gradients, so makes a reasonably demanding test track. 


Some of the locos used included a modern RTR Bachmann (the Baldwin), an old US N-gauge Bachmann "Brick" Plymouth chassis (under the tram loco), a Fleischmann Picolo (under the green tank), and the ancient Minitrix 0-6-0 (under the saddle tank). We also tested a Backwoods Darjeeling loco, which I think has a Mashima motor, and a Conway Castle using the newest Kato 110 chassis with a coreless motor. I think the Baldwin may also use a coreless, the rest are traditional motor types and some are quite crude by today's standards. We ran the locos alone, without a train, in this quick test. 

The subject of suitable controllers for coreless motors is often met with some confusion and potentially misleading information, even by loco and controller manufacturers, who usually state "feedback controllers are not suitable for coreless motors". I'm no expert so have tried to understand it through reading, and the answer really is not that simple. The key points as I see it are:
  • Feedback and pulsed controllers are not (quite) the same thing. A pulse controller may not have feedback, but a feedback controller is usually a pulsed type (as it monitors the back EMF "feedback" between pulses). 
  • The main coreless motor concern is overheating, since there's no iron core to dissapate heat, and the resin bonding the coils can (in theory) be damaged. Smaller "cored" motors can also be affected. Pulsed controllers are more prone to heating (than pure variable DC), and this is not limited to feedback controllers. An old non-feedback controller with a pulsed output (H&M Clipper?) could be damaging, while some feedback types are not - depending on the heating effect of the pulses. 
  • The other potential issue is that the feedback is not tuned to the low-inertia of coreless motors (or even small, low-inertia cored motors) leading to surging or jerky running. This is related feedback controllers only, and depends on the controller and the motor. This is why some controllers have switched feedback.
So, pulsed controllers are bad right? Well, the problem is pulsed controll (or PWM) is the best way to regulate motors. Giving full voltage overcomes the "stiction" (friction, magnetic resistance/cogging) in the motor, and in our case, any resistance in the pickup/wheel/rail interface, gear train friction, variable friction from motion, etc... so pulsed control allows for fine control at low speeds. DCC chips use pulsed control, as do most motor drives in other applications. 

So, how to have pulsed control without overheating? So far as I can tell, the factors are...
  • Peak voltage - some controllers actually peak at 16V or more!
  • Frequency - most controllers operate at 100Hz (rectified AC). Higher frequencies reduce heating apparently, but can cause noise. DCC chips operate at >20kHz (beyond the range of human hearing, does it bother dogs?). (I tried a Minitrains controller once which also operated at 20kHz, but it didn't seem to work well/smoothly with any motors except Minitrains - I don't know why)
  • Pulse shape - for reasons of complex physics I don't really follow, the sharper or more "peaky" the wave-form, the more heating is induced
So, coreless-friendly controllers aim to address one or more of these issues. For those who are interested, reading for more details:


Of course the club layouts use a different plug and wiring standard to my own layouts, so the first job was to make up an adaptor! Not very neat but it did the job. 
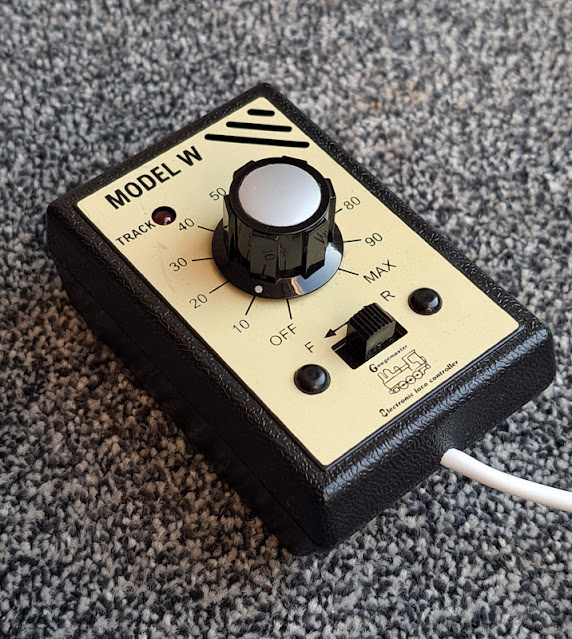

Gaugemaster W - pure DC control, rectified with variable voltage, which minimises motor heating. 
In our tests it works well enough with all motors, giving smooth running, but lacks reliable low-speed control. Locos could sometimes start with a jerk or stop abruptly, with no pulses to keep the motor kicking over, and some motors don't maintain a steady speed - they had to be "driven". 
The case is a little bulky and I don't like the slide switch as it's not kind to thumbs (horrible for shunting). 
This is a good, safe controller for coreless and smaller motors, and is ideal for continuous runs, but not in my view the best choice for low speeds such as shunting. 

(Gaugemaster used to also offer the HH - a traditional feedback pulsed controller. It had a very peaky high-peak voltage waveform which offered good low speed running for older motors, but really heats them up.  Not suitable for coreless then... in fact, they don't sell it any more. I had one in my early days of 009 modelling, but sold it when I got AMR controllers.)
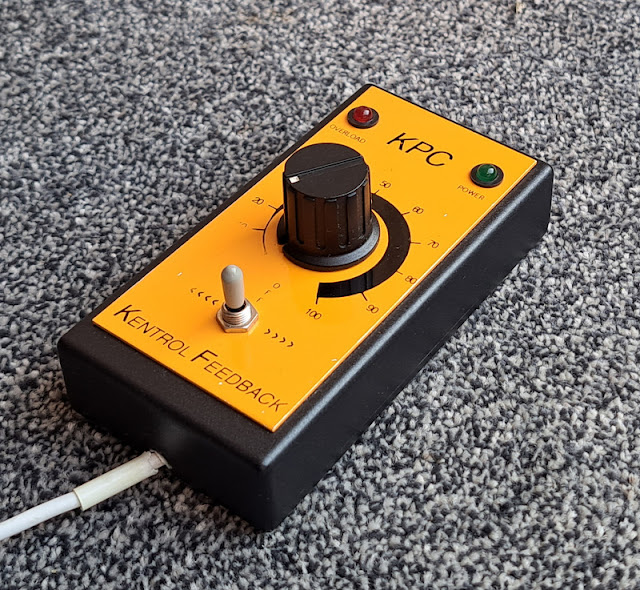
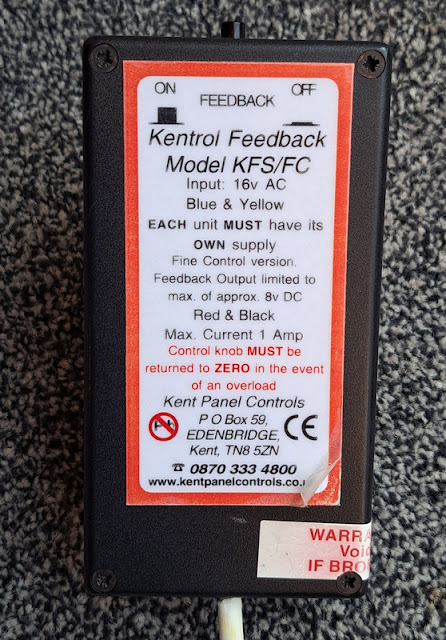

KPC - This is a pulsed feedback controller, but with a less peaky waveform and lower peak voltage than the HH. Mine is a "fine-control" model with switched feedback, and seems much kinder to motors than the HH used to be. I've used mine with coreless motors (feedback switched off/down - not sure if it is actually off or just reduced) and they seem to run fine, although my layouts don't exactly allow sustained running. I presume the switch just stops (or reduces) the feed-back regulation of voltage (or pulse width) in response to the back-EMF so it doesn't over-react to coreless motors with low inertia - the output is still pulsed so there may be some risk of motor heating. 
In our tests it gave excellent smooth control, including low speed and starting and stopping, thanks to its pulsed output. Locos maintained a steady speed. With feedback on locos run more slowly but some coreless motors surged or vary speed, switching the feedback off worked with all motors. My other KPC has a broken feedback switch, so I have left it in the "off" position. 
The slim case and toggle switch mean it fits neatly in the hand and is nice to use single-handed for shunting.
This is my favourite all-round controller, although probably not advisable to use it for sustained running of coreless motors just in case. Sadly no longer available*, it is surprising (and telling) how many exhibition layouts I notice are using KPC controllers!
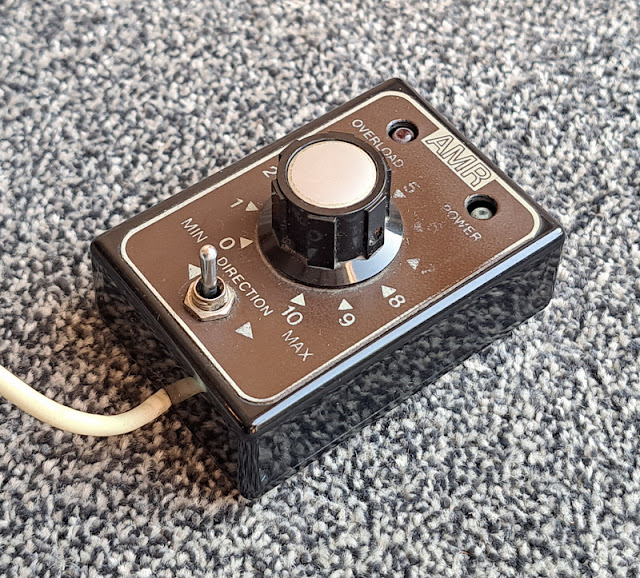

AMR - This is a also pulsed feedback controller. Some years ago I saw several controllers compared with an oscilloscope, and the AMR and the similar Trax controller (which I don't have) have a very similar output to the KPC (with feedback on), and with similar characteristics. Interestingly, Nigel Lawton recommends one as being suited to the coreless motors he sells (http://www.nigellawton009.com/TraxFC1.html), alhough Trax themselves say it is not suited to coreless motors! In reality, I reckon that like the KPC, the AMR and Trax would be fine to use with coreless motors for short periods as Nigel says, but sustained low speed running may cause motor heating. 
Since the behaviour is generally similar to the KPC (good low speed control and steady speed) but without the feedback switch, we didn't do extensive tests at the club. 
It has really nice ergonomics with it's dinky case and toggle switch for easy shunting and one handed operation. Sadly long out of production, although the similar (in size and performance) Trax is available. 
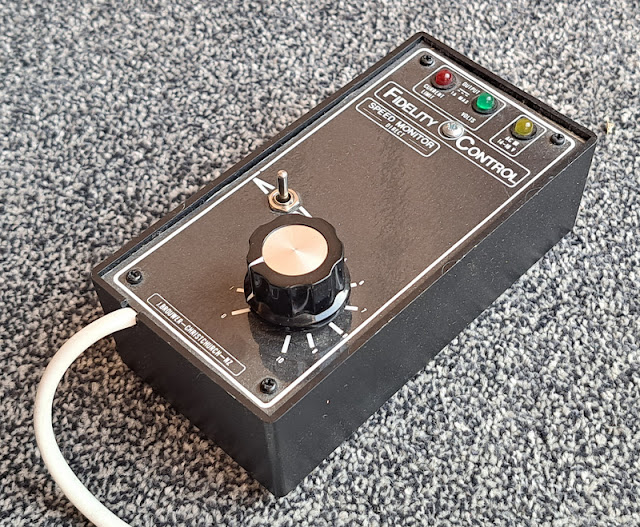

Fidelity - this is a rare one, hand-made in New Zealand! As I understand it, the pulsed output varies in amplitude as well as pulse width and has a waveform designed to minimise heating, to be suitable for cored and coreless motors. It does use feedback, I'm not sure the technicalities but it's more advanced than traditional controllers. It was also available with simulation (inertia and braking) but mine does not have this. 
In our tests it worked very well with good low speed control and speed control. It was at least as good as the KPC, and of course is safe for all motors without needing to switch anything.
The case is large and clumsy, and while it has a toggle direction switch it isn't really possible to use one-handed. 
So perhaps the ideal controller - the only real issue apart from the ergonomics is that it too is no longer available!

Conclusion? Well, the W is a safe option for all motors, but a feedback pulsed controller (of which the Trax is the only one currently available) gives better low-speed control albeit with the possible risk of overheating coreless motors. The ideal would be a Fidelity in a smaller more ergonomic case! I'd settle for the KPC being available again*. With the range and complexity of DCC systems now on the market and considering what must be possible with modern electronics, it is surprising no manufacturers have looked again at the analogue controller market.

*I'm aware All Components are listing a KPC-like controller, I believe using the original KPC circuitry, but there's little information and they don't list the fine-control switched-feedback model. 

Thursday, 8 June 2023

A spot of caravanning

Hexworthy is modelled in the preservation era, and I want the scene to be recognisable as a modern era preserved railway that might be running steam engines rather than a period layout with some modern anachronisms. One characteristic feature of many preserved railway station yards is an old caravan that has seen better days, used as accomodation for volunteers. I got an old Oxford Diecast caravan, and I want it to look old as though it has been there many years. 


First I gave the shiny white glossy finish a rub down with a fibreglass pencil to reduce the shine and allow the weathering to stick. Some details were touched in with paint - gunmetal on the steps, hinges, handles, hitch, and jockey wheel, matt black-grey on rubber parts, and subtle dry-brushing of rust colours in some places like wheels and hitch (but caravan bodies are aluminium). The first weathering coat is a well diluted dirty brown, streaked with a brush dampened with thinners, worked into joins and cracks, and stippled on the roof. A further coat of dirty green was used to add traces of mould. It's intentioally a pretty heavy weathering. 


The carvan would have its legs down, but the model didn't have any, so I added some. Small holes were drilled in each corner of the floor, staples cut and bent to make the angled legs, and superglued into the holes. There should be secondary arms forming a triangle back to the body but I figured they wouldn't be visible from normal angles. Small "wood" blocks were cut from plasticard and superglued to the bottom of the legs. 

To fix the caravan in place, fine wire was looped around the axle behind each wheel and twisted together. Two holes were puched through the scenery, polystyrene and foam-core base, the twisted wires coated with glue (well I used matt Modge Podge) and pushed into the holes. The blocks under the legs and the bottom of the wheels also had a dab of matt modge-podge as it was pushed into place. 

Here's the caravan in place under the trees and surrounded by undergrowth, which explains its dirty and slightly mouldy state. It sits in a corner of the station site past the end of what would once have been the goods yard but is now part car-park, and part playground, I guess the caravan was put there before the playground was built. It's accessed through a gate at the end of the playground. I chose not to fit lighting partly as I want it to appear empty but possibly still occasionally used, it could do with a little clutter around it though. Still, it does add a little visual interest at this end of the station. 

Thursday, 1 June 2023

More lighting and a kiosk

Some time (years) ago I'd picked up this ice cream kiosk fitted with lighting, thinking it would add some colour and light to the car park at Hexworthy. When I eventually got it out of its box and applied power to the leads nothing happenned - no light at all.


Of course I dismantled the kiosk but the problem wasn't a dodgy lead, so I presume something is amis inside the strip of 3 LEDs. Still, now it's in pieces it wasn't hard to fit a replacement light, I chose a white LED, which gives a cold white rather like flourescant lighting. 


The new LED was fitted in a top corner where it wouldn't be seen through the open hatch and the wire run out through the existing hole. While it was apart, I painted the interior and the plasticky and featureless person that had been crudely stuck in - no real detail is needed - and the visible parts of the chassis. 


The kiosk was reassembled and given light weathering using a dirty wash, adding shadow to panel gaps and very slight streaking in places, plus a dirty roof. I also added fine wire lengths looped around the axles behind the wheels and twisted together. 


The wire tails behind the wheels are to hold the relatively heavy die-cast model in place, glue on the wheels wouldn't be adequate. Small holes were punched through the ground just inside each wheel, and a larger hole for the lighting wires. The twisted holding wires were coated with matt medium before being pushed down through the holes. On the right, the playground was lifted out so I could reach the wires underneath, the lighting wires being passed through to the relevant terminal block. 


The kiosk in place next to the playground, the roof is grubby but the sides have only slight streaking as though kept cleaning. 


The last lighting job was to fit the platform lamps. These are Gaugemaster/DCC Concepts, but I found the green a little bright, so I painted them a darker, more muted shade. 

The fitting of the platform lamps was left until now so they are not knocked when working on other scenics. Two are easily visible, the third is the far end of the station near the water tower. 


At dusk the lighting is quite effective and atmospheric, the station area being well lit by the under-canopy lights as well as the platform lights, and the ice cream kiosk casting a stark light across the car park. In the far distance, the glowing phone box is tricky to spot. The station cafe (old goods shed) will need some interior detail!

Sunday, 21 May 2023

SWING taking a bow

On Saturday I took a short trip to the SWING industrial and narrow gauge show. This has been a favourite show of mine for many years, with few NG specialist shows in this corner of Britain, but sadly this event looks like being the last. If so, it went out on a high with some excellent layouts and the usual freindly atmostphere. This year I wasn't there with or helping with a layout, so just a visitor, and it was nice to have opportunity to take time to see the layouts and chat.  


Shellsea Harbour (OO) - Giles Barnabe. It was nice to see this attractive little layout featuring a light-railway terminus again, not having been out for several years. 


Much Meddling (009) - Chris O’Donoghue. Whimsical Emett-inspired fun, with amusing cameos and a few well-known fictional characters, not to mention ludicrous trains (like a submarine railcar!). 


Rainbow Rock (Gn15) - Charlie FoxWilson. Chris was out-Emetted by Charlie's huge Emett themed layout, the photo shows only about 1/3 of it. 


Bunkers Lane (O9) - Bill Flude. Bill's new Leighton Buzzard inspired layout, which I saw briefly at Alexandra Palace, feels like a rail gala on a summer's day. 


Launceston Steam Railway (009) - Richard Holder. I love that this layout reminds me of the real Launceston, and so holiday trips on the steam railway, every time I see it. The train is modelled on the real lineside vegitation clearing train the railway uses, including the raised platform wagon. 


Kaninchenbau (009) - Iain Morrison. This Alpine layout is unashamedly a rabbit warren (apparently that's what it's German name translates as), with lines appearing at different levels. When a train enters a tunnel you never know where it's going to come out. With 5 trains running apparently at random but always with something moving it is puzzling how this can happen, but of course...


...it is computer controlled. Now DCC and fancy control systems aren't really my thing, but I did spend much of my professional life controlling hardware with computers. This set-up is impressive, this screen over the layout showing the schematic plan and the trains being controlled. I won't pretend I understand what it means or how it works, but it was fascinating to watch!


 The Worm (009) - Ian Corps, Southampton Model Railway Society.


Manor End (O) - Martin Brimson. This surprisingly compact O-scale layout had an inglenook shunting puzzle plus a diesel depot on its lower level, and a single-line terminus for a DMU on a shuttle on the top level, making for a lot of railway action. What I particularly liked was the use of fridge type magnets holding photos of the wagons which could be stuck on a metal strip on the fascia to set out the train to be made. A neat alternative to the laminated cards I use on Loctern Quay. I do thing it needs more variety of wagons though!

Arun Quay (O) - Gordon and Maggie Gravett. Only the second time I've seen this layout, it was nice to soak in the incredible atmosphere and realism. A simple concept (small shunting yard) it is brilliantly executed, the track plan is just interesting enough, the location is unmistakably Sussex (for those who know the area) even though it is ficticious, and the detail and colour pallette are understated and consistent. This was the layout I most wished I could build!

Wednesday, 10 May 2023

Ouse Valley Viaduct

Today I visited what has become a bit of a local landmark - the Ouse Valley Viaduct. Actually my wife has been keen to visit this since she saw pictures of its distinctive piers, and since we were in the area we made a detour. 


This viaduct on the London-Brighton line was built in 1839-42, early in the railway building boom, and is built in an elegant and ornate style. Its features include limestone capping and parapets, with little "pagodas" at the ends, and of course the oval cut-outs in the piers. 


It is these that have become so instagram-able in recent years, and looking through the length of the viaduct is quite surreal. This feature helps make the viaduct look slender and elegant. 


I was fascinated by the variety of brickwork - I presume due to repairs over the years, rather than the orginal bricklayers all using their own favourite bricks?


I was also interested in the detailing of the arches and parapets, the weathering, and the odd bush...


Check out the little pagodas at the ends of the parapets. The class 37 "tractor" made a nice change from the stream of EMUs, though I'm not sure what it's doing there without a train!