Friday, 30 December 2022

Playing around with swings

Hexworthy represents the terminus of a preserved railway, and should have the facilities of one, which often include a kids' playground. I had left space and a removable base for this at the end of the car park behind the station. After looking at what was available I settled on this plastic kit marketed by Gaugemaster as OO, although it's actually a Faller HO scale kit. To be fair, there's little visible difference in the size of the play equipment. 


Now the thing is I thought a static playground would look a bit dull. This might be a daft idea, but I wanted movement in the playground. I was inspired by the book "Industrial and mechanised modelling" by Dave Rowe in which a number of animated layout features are described, including a swing hung from a tree branch. 

I started with the swing, partly because it looked tricky. I replaced the top bar with one cut from plastic tube into which a brass tube fitted perfectly, and was able to rotate within it. I had thought of using a brass outer tube too but I had to cut slots in it for the swing "ropes" which would be much more difficult in brass, and because plastic could be attached to the supports with solvent. 


I cut grooves across the brass tube so I could drill them for the "ropes", which are 0.5mm wire and soldered into the tube (it's easier to drill in a groove than the outside of a cylinder). The end of the tube had a piece of brass fret with a hole in one end soldered on as a crank. The brass tube slots into the plastic tube and is able to rotate with the swing ropes moving through an arc via the lateral slots. A small piece of microstrip across one of the lateral slots prevents the assembly coming back out. Similar wire "ropes" for the static swing (one moving is enough!) were glued into holes in the plastic tube, the wires and crank were blackened and swing seats were then added from plasticard. 


The swing supports are from the kit and assembled with the replacement top bar, the moving swing is operated by the crank on the end of the top bar. The easiest way to fix the uprights rigidly was to glue to a plastic base with solvent, the base is attached to the wooden playground base with contact adhesive. Another brass tube is superglued up the rear support through which passes a blackened springy steel wire, after a flexible arc this passes through the hole in the crank. Moving this wire up and down through the tube moves the swing, the arc and springiness of the wire (it might be a guitar string or left over from wire-in-tube point control) allows for the crank hole movement being an arc rather than linear. 

I had toyed with the idea of using servos driven by a Raspberry Pi, Pico, or similar microprocessor. This approach would have great potential here and might simplify the drive, but would be a whole new area of learning for me and could become a bit of a rabbit hole. Plus, I had a couple of cheap motors with gearboxes and a load of gears and shafts - the gears left over from motorising the turntable on Southon Yard. So, here we have a crank arrangement to turn the rotary motion from the motor (seen far left) into sinusoidal linear motion of the operating wire. 


The brass arm is pivoted (right) and has a slot made from a loop of 1mm brass wire (left), a track pin moving in a circular motion (attached off-centre to the gear - the teeth are not used) moves the slotted arm up and down. After some experimentation the thinner arm branching off is used to move the wire, the arm has three holes and the wire has a couple of bends to allow adjustment with pliers. 


The drive unit is simply made from lengths of timber, quite small section, and designed to fit below the playground sub-base. Here it is seen inverted, the motor is glued in place with a couple of screws to stop any twist, and hangs down into the baseboard void. The arm driving the swing is on the far end. There are gears on the inner of the left side which step down the speed to the crank. With the motors running on 3V the output shaft rotates in 2 seconds, so the gears step down 2:1 for the swing to take 4 seconds, which is what Dave Rowe had calculated for his swing, and seems about right.

My Dremel in its drill stand came in very useful in making the mechanism. I clamped the two pieces of wood together and drilled 2mm holes in two corners. Cut-down shafts were fitted in these ensuring the wood stayed aligned while I drilled the other carefully marked-out holes, the drill stand ensuring they were straight and parallel. The wood pieces were then spaced apart using longer shafts through the corner holes, holes for rotating shafts were opened out slightly. The two wood pieces spaced apart ensure shafts stay aligned and parallel when rotating, allow reducing gears between them, and as will be seen in the next instalment, allow drive to another item a little distance from the swing. 

Amazingly, it seems to work...

To be continued...

Sunday, 25 December 2022

A Christmas Victory

My Christmas present this year is a Victory class 060T, a first ready-to-run model from Planet Industrials. 

It's a chunky tank engine, not a small loco but compact and powerful looking, with nice proportions and simple lines. The model is very fine, and surprisingly heavy. 

The tidy lines of the loco means it is modest in apparent detail, but look closer and there are lamp irons, brakes and rigging, sprung buffers, and peering into the cab a fully detailed back-head and controls are present and painted too. It is even supplied with a leaflet explaining the origins of the class and where the 12 locos built served. 

The couplings are a little droopy, but nothing a tightening of a screw won't fix by the look of it, and as an industrial loco it will need a little weathering as well as coal in the (empty) bunker and a crew. However, the more pressing issue for me is the lack of a layout to run it on. I'm sure I'll get around to addressing that some day. 

Happy Christmas, and I hope Santa brought you something nice too!

Friday, 23 December 2022

Quarry Hunslets

 A few years ago - I've forgotten how many - Bachmann announced they would be making models of the little Hunslet saddle tanks that once worked the slate quarries of Wales, and many of which survive working on preserved lines around the UK. Of course, I wanted one, but the wait has been a long one. In the meantime other models have come - The Ffestiniog England, and Bachmann's own Double Fairlie - but the quarry Hunslets were still elusive. I even put some money aside following the sale of Awngate. Then a couple of weeks ago there were sightings of the first - Britomart must have got the faster boat from China, along with some surprise larger Penrhyn/Ffestiniog Hunslets. Finally, yesterday I saw Gaugemaster had some in stock, so today I went over to have a look. You see, I really couldn't decide between the more practical cabbed version, or the appealingly detailed cabless version...


...so I ended up getting one of each. For me, this is rather extravagant, but they are lovely and will look nice on any 009 layout. 


Dorothea has a cab making her more practical for preservation use, and in green will match many of my other locos, although the ones I built are not beautifully lined like this. The prototype now works on the Launceston railway, not so far from Hexworthy. 


Nesta is without cab, showing off the delightful detail of the back-head, and looks rather distinctive in lined Penrhyn black. The prototype Nesta works on the Bala Lake Railway. 


There is a seam along the cylinders, the couplings could do with replacing with something more discreet, and some gentle weathering would add to the realism (don't worry, they will stay pretty clean), but otherwise they look great and run well too.

Saturday, 10 December 2022

Modelling the water

Having experimented with techniques it was time to make a start on the river and stream. I'd chosen to use Modge Podge as it seemed to work well, but would require lots of layers, and a suitable brown tint. 


This time I mixed the acrylic paint in a separate jar, a thin watery mix of a colour to match the river in the photos. The paint was added to the Modge Podge (in the yogurt pot) to give it a slight tint and to thin it slightly, maybe 20-30% water/paint in the Modge Podge. The other vital substance is IPA (alcohol) in the spray bottle. 


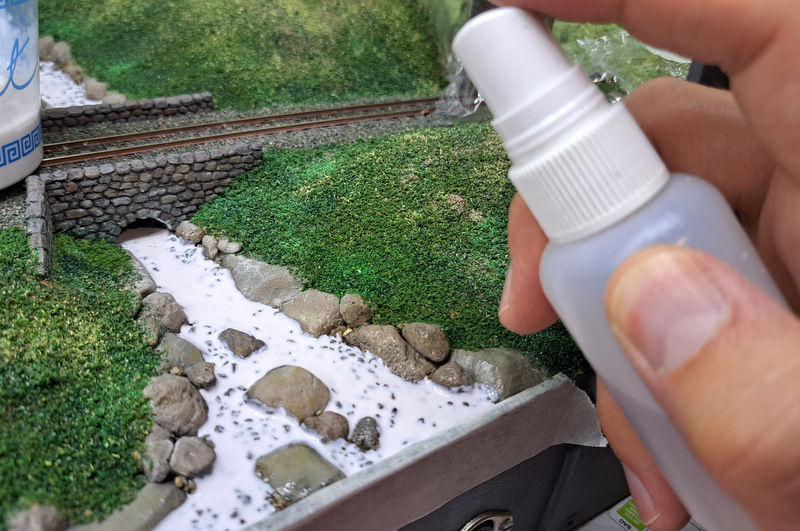
The first layer was applied with a pipette, this could be relatively thick (about 1.5mm to cover the stones, although it will be thinner once dry) since it can dry from both sides, the scenery absorbing the moisture from below. However, there is a slight problem...


It looks like someone put bubble-bath in the river!


Fortunately a couple of sprays of the IPA kills the bubbles. The yogurt pot was then covered with cling film and it was left 2-3 days. 


Many coats followed, applied more thinly (0.5mm or so) with a brush, and using a toothpick to push the edges of the "puddle" up to and between the rocks. It can't be applied too thick or it doesn't dry clear, there are a few places where there is a slight cloudiness, though it isn't particularly noticeable. 

Every couple of coats I added more Modge Podge to the yogurt pot, and occasionally a little more paint, but though adding more Modge Podge (and possibly a little evaporation despite the cling-film) gradually the mix got thicker and the colour a little weaker. 


I lost count of the coats having added a couple a week over several weeks, but it must be at least 10. By now the mixture is thick enough to leave some texture like a burbling stream - well that's what I hope. 

So now I think the stream is just about deep enough, and looks pretty good. The colour and opacity seem about right to me, and the surface texture realistic. 


The river along the river bank could maybe do with a little extra depth.

I'm thinking of using the Deluxe Materials Aqua Magic as a final layer as the experiments suggested it might have a slightly more gloss finish, and I have it anyway. First though I'm wondering if more texture/ripples should be added. 

Monday, 14 November 2022

Experiments in modelling water

I have modelled Hexworthy on the bank of the river Dart, and so not only is there a little bit of river along the front to model, but I have added a stream across the scene too. Having modelled the river bed I need a method to model the water. 

As can be seen the waters of the Dart are clear so the bottom can be seen where shallow, but stained brown (I presume because of peat). 

I've not actually modelled this sort of water for many years (except the deeper river basin of Loctern Quay), and back then gloss varnish was the accepted medium. Now, there are a number of water products available from the trade, most either 2-part resin or the type that needs heating, both seem a bit of a faff though may be best for deeper water. I only need around 4mm of depth, and of course to get that deep brown tint. I decided that some experimentation was called for before attempting the water on the layout. 


A couple of thick sheets of expanded polystyrene foam from some packaged were shaped to give several stream-shaped grooves, with the ends capped with card. To replicate the scenic base used on the layout these were covered in the same brown tile grout, with a scattering of the stones/talus, and even a little acrylic paint in a similar way to the stream/river bed on the layout. I wanted to check if the "water" product reacted with any of the materials used. The result looked like some kind of strange chocolate pudding...


First up was gloss Modge Podge, an acrylic medium as used over a painted base for Loctern Quay. I started applying neat as I had then, and then tried diluting a little. 


Two of the trials used Modge Podge, here the one on the left used it neat or slightly diluted, the one on the right used it diluted and poured deeper, maybe 1.5mm or so. Diluted allows for a smoother less textured surface, but otherwise the result is similar - since more water evaporated from the dilute pour the actual depth achieved with each coat was probably similar.


I then tried colouring the Modge Podge with brown acrylic paint. This is very hard to get right since the Modge Podge is white, like PVA glue, and adding paint just discolours the mix but gives no hint as to what the final colour or opacity will be. As you can see, the colour is a bit too chocolaty and the result too opaque. Also, some bubbles have appeared in the mix. Not quite what I was looking for. 


The third trial resorted to the age-old technique of using polyurethane gloss varnish. Here's the result of three or four coats I think. The colour looks about right, the opacity looks good too - though possibly too dark in the deeper section. However, it has crept up the banks leaving a depression in the middle of the stream which looks odd as it reflects the light, and is a little too "runny" collecting at the bottom of the stream. As my stream flows down towards the river at the front this could be a problem. 


The fourth trial was the only one which used a special commercially available product for modelling water, Aqua Magic by Deluxe Materials. This doesn't need heating or mixing and is said to be suitable for shallow water, so seemed like the most suitable of the options. As per the instructions I first painted a thin layer to seal the stream bed, then poured a thicker layer, about 1.5 mm or so, enough to cover the stones. I also mixed paint into the product to tint it. The result certainly looks wet, but not only did I get the paint tint too strong but it seems to have changed shade - it wasn't that orange when I mixed it. It has also shrunk back a lot - the stones still protrude after two coats. Getting a moderate depth of say 4mm would take a lot of the product, and it really isn't cheap.

So of the four experiments with three products, which seemed best? Well the Aqua Magic would work well and looks the most "wet" but it seems tricky to get the colour tint right, and it would work out expensive as one bottle wouldn't be nearly enough. The varnish looks OK but I don't like the concave surface and creep up the banks, and it is a bit dark. The Modge Podge also looks challenging to get the colour tint the right strength, but the shade didn't change, it didn't creep up the sides, has a suitably uneven surface for a stream, the shrinkage wasn't as much as the Aqua Magic (unless diluted), and it's a lot cheaper. It can produce bubbles but I have found a solution to that. 

So one final experiment was carried out with Modge Podge again. Rather than mix the paint directly into the Modge Podge (which is white when wet) I mixed it separately with water then used that to dilute the Modge Podge. Here the tint is a bit weak but much better than the earlier experiments. I also tried a deeper pour, but as you can see from the opaque areas this hasn't worked.  Finally, a thin coat of Aqua Magic enhances the glossiness. With those lessons learned I think I have a way forward.

Sunday, 6 November 2022

A new fiddle yard for Hexworthy part 2 - making it work

Almost a month after I started the new fiddle yard for Hexworthy I got a free Saturday to get it working. Actually, it isn't entirely new.


The deck seen here is from the old fiddle yard, although it took some thinking to work out how I could use it with the same geometry with the pivot moved about 8" towards the front of the layout. The previous yard had tapered towards the wall, this one has to slew away from it to clear the pillar. The pivot had to move right to the edge of the board and as you can see, it's a tight fit to get the full movement. 


However, to allow the movement across all tracks and run into the same entry track to the layout without a sharp S-bend in the transition I found the front siding of the sector plate had to be repositioned. I managed to lift the track and its PCB end sleeper with a knife blade (having been glued with Bostick), and prise the brass pin out of its hole. A new hole was drilled about 10mm closer to the next track, the pin pushed in, and the track glued down with a slight curve ensuring the rails were in line with the pivot where they met the edge. 


Under the board I managed to refit the latching mechanism, after a bit of thinking. Here's how it works:
  • In the curved slot the white arc is the lip under the sector plate, with the three brass pins protruding (the right hand one having moved holes)
  • The wooden arm is pivoted at the bolt on the left, and on the right carries the aluminium latch, which has a gently curved edge with a notch at its centre. The aluminium is connected to the red wire so it carries power to the pin it touches. 
  • On the arm the white foamboard piece presses on the soap-dispenser spring attached to the block of wood, the foamboard allows some adjustment of tension in case ever needed
  • The plastic "T" shaped piece is a leftover from the fitting of our kitchen. I have no idea what it was intended to do, but it proved useful here as a stop to limit travel of the arm. A block of wood could do the same, although currently the spring tension is such that the arm stops just short. 

From above the sprung arm and its aluminium latch can just be seen, with the notch central to the track. Of course, I positioned the arm/latch first, then positioned the track to align to the sector plate tracks when latched. The transition track is on a piece of foamboard (both recovered and cut down from the previous fiddle yard), which allowed the track-bed height to be adjusted, in fact a 10-thou piece of plasticard was inserted at the sector plate end. 


Power connection to the layout is via an audio RCA cable. Previously I'd put sockets on both boards and used a "jumper" cable, but here I figured a tethered cable was less likely to get lost, so a few inches was cut from the end of an old cable. The grey block of wood is just there to ensure nothing rolls off the front track when pulled fully forward. Previously I'd fitted a lever to allow the latch to be disengaged to move the sector plate, experience found this wasn't really necessary so here I didn't bother, there's a little resistance to overcome but the plate can simply be pushed between positions. 

The good news is it all seems to work and fit. The new catches allow the fiddle yard to be attached and detached much more easily, and the self-latching sector plate works as well as before after its transplant. At some point it will get a coat of grey paint to match the layout. However, a bigger job is to rebuild the "exhibition" fiddle yard to use the catch connections, and to make it more reliable. 

Saturday, 5 November 2022

Mail by Rail

Right from the earliest days of the Liverpool and Manchester railway, the railways played an important role in carrying the mails. In Mail By Rail, Peter Johnson tells the story of two different ways the Post Office used railways to speed up the delivery of mail.


The first part of the book covers the travelling post office (TPO), the trains that didn't just carry mail but sorted it en-route and even collected and deposited sacks of mail while travelling at express speeds. This allowed mail deliveries to be speeded up so letters posted one afternoon could be delivered at the far end of the country the next morning. The TPO became famous through the 1936 promotional film and poem "The Night Mail", the Great Train Robbery of 1963, and the Hornby working TPO coach that added fun to many a train set. The book tells the story from the earliest mail sorting in a converted horse box, the development of the exchange equipment, to the network of TPOs that once covered the country, and to the end of TPOs as services transitioned to simply carrying sorted mail. It even lists the accidents involving TPOs. For the real enthusiast or historian, the TPO services are detailed and carriages listed, including for the many pre-grouping companies which ran TPO services. 


The second part of the book covers a less well known mail railway service, the private narrow gauge underground railway linking sorting centres and railway stations across North London. This was built to get around (or rather under) the London traffic - some things never change! This hidden automated railway known as "Mail Rail" operated for 80 years, carrying mail bags but not people, but now can now be visited and ridden, which is something I must get around to. 


The appendices include more detailed information about the Mail Rail system, including technical details and the rolling stock. I can't see it being an attractive model subject, but I found it fascinating. 

The book has an unusual subject - well, two unusual subjects that are linked - but it is an interesting area of history, since neither TPOs nor Mail Rail are in operation today. No doubt part of the appeal is that their operations were largely hidden from public view, occurring in the dead of night or deep underground, yet they provided a very ordinary public service.