The fine weather last weekend gave me an opportunity to do a woodwork task, the lighting rig for Hexworthy. For something apparently simple it turned out to be quite fiddly, and with other distractions I had to finish it off today. I'm quite pleased with the result, framing the layout neatly, with a curved front that matches the convex fascia of the layout - that being one of the compleixties!
It is simply two pieces of 3mm ply in an L shape, which makes it surprisingly rigid and hopefully will resist any tendency to warp. The curved front edge of the elongated "D" shape top piece holds the curve, the blocks of wood allow them to be screwed together, and the triangles of thicker ply hold them at 90 degrees.
I fitted wooden blocks to the top edge of the ends of the layout that sit just inside the ends of the lighting rig, which slots on top. A bolt is passed through the holes into the block, which has a fixed "tee" nut in the inner side, so the lighting pelmet is secured to the layout at both ends.
To avoid shadows at the front of the layout I wanted to have the lighting set as far forward as possible, so it can be fitted overhanging by 1.5". We'll see how well this works when I fit the lighting.
However installed on it's shelf at home the overhanging lighting pelmet might be a nuisance, so a second set of bolt holes allow it to be set back flush against the layout.
It just needs lights fitted now, though I should paint the woodwork before going much further.
Michael Campbell's blog about his model railways. Building model railway layouts in 009 (OO9) scale
Sunday, 28 April 2019
Tuesday, 23 April 2019
Model making for the movies - Harry Potter style
My daughter is mad about Harry Potter, so last week we went to the Harry Potter Warner Brothers studio tour. OK, so you are thinking, what has that got to do with model railways? Well, I found the way the sets and props were put together shared a lot with how we make models. For a start, the sets are largely made of plastic - fibreglass rather than styrene, with a wood and scaffolding frame - with great care for what is visible, and least possible effort into what is not.
Round the back of Privet Drive is this example of how the brick wall is coloured; on the far right the plastic brick moulding is primed, then through various stages of painting (including mortar and "random" bricks), and finally "ageing" (or weathering, as we would call it) to the final effect. It is surprisingly realistic, even at close quarters. Similar techniques are used for interior sets too. Where appropriate the ageing is taken to extremes, to depict really old walls and even damage, some sets were reproduced in damaged form.
It isn't just buildings though, every prop and item of clothing is carefully selected or designed, and in a film like Harry Potter set in a fantasy world, pretty much everything seen by the cameras is designed and made. Thousands of goblets were cast (in rubber) to fill a vault; newspapers, posters, and packaging produced; and vehicles (like the famous triple-decker bus) constructed. The vehicles may need to be powered, while some props contain motors, servos, and electronics to perform for the cameras.
There are some clever tricks too, re-using sets for different rooms with re-dressing, removable walls to allow filming from different angles, and the use of perspective - the corridor shown above appears to be about 15 meters long, but was actually less than 5.
There were also some fine examples of genuine model-making, as the more complex sets are modelled in 3-dimensional form to understand how the scene will be filmed, and how the set will need to work. Often this appears to be simply printed card or foam-board, but many are quite complex, such as the model of Gringotts Bank above, complete with roller-coaster style railway to the vaults.
This model of Hogwarts was rather fine too, however some models were actually used for filming. The most impressive was the huge detailed model of Hogwarts.
This model is 1:24 scale, which is quite a large scale; a small dolls-house scale or close to garden railway "G" scale, it's 1/2" to the foot and a figure would stand about 3 inches (9 cm) high. But Hogwarts is a huge castle, on a hill, with turrets and outer courtyards and walls - so it takes up a massive studio on it's own. My photos, hampered by the ever-changing "mood" lighting, don't really do it justice.
Despite the enormous size of the model the detail is really impressive. Just look at the glasshouses, the panelled door with the detailed stone archway, and the colouring and weathering of the stonework.
So as well as being fascinating to see how the movies were made, it was interesting to see common techniques between professional movie makers and amateur model makers, and maybe pick up a few ideas at the same time. No, I'm not building a model of Hogwarts, although I have already built a model of the Hogwarts express. Oh yes, of course, that was there too...
Railway enthusiasts may already know this is in fact GWR 4-6-0 "Olton Hall", built in 1937 and withdrawn in 1963. However it is now probably one of the most famous locomotives in the world, up there with the Rocket and the Flying Scotsman!
Round the back of Privet Drive is this example of how the brick wall is coloured; on the far right the plastic brick moulding is primed, then through various stages of painting (including mortar and "random" bricks), and finally "ageing" (or weathering, as we would call it) to the final effect. It is surprisingly realistic, even at close quarters. Similar techniques are used for interior sets too. Where appropriate the ageing is taken to extremes, to depict really old walls and even damage, some sets were reproduced in damaged form.
It isn't just buildings though, every prop and item of clothing is carefully selected or designed, and in a film like Harry Potter set in a fantasy world, pretty much everything seen by the cameras is designed and made. Thousands of goblets were cast (in rubber) to fill a vault; newspapers, posters, and packaging produced; and vehicles (like the famous triple-decker bus) constructed. The vehicles may need to be powered, while some props contain motors, servos, and electronics to perform for the cameras.
There are some clever tricks too, re-using sets for different rooms with re-dressing, removable walls to allow filming from different angles, and the use of perspective - the corridor shown above appears to be about 15 meters long, but was actually less than 5.
There were also some fine examples of genuine model-making, as the more complex sets are modelled in 3-dimensional form to understand how the scene will be filmed, and how the set will need to work. Often this appears to be simply printed card or foam-board, but many are quite complex, such as the model of Gringotts Bank above, complete with roller-coaster style railway to the vaults.
This model of Hogwarts was rather fine too, however some models were actually used for filming. The most impressive was the huge detailed model of Hogwarts.
This model is 1:24 scale, which is quite a large scale; a small dolls-house scale or close to garden railway "G" scale, it's 1/2" to the foot and a figure would stand about 3 inches (9 cm) high. But Hogwarts is a huge castle, on a hill, with turrets and outer courtyards and walls - so it takes up a massive studio on it's own. My photos, hampered by the ever-changing "mood" lighting, don't really do it justice.
Despite the enormous size of the model the detail is really impressive. Just look at the glasshouses, the panelled door with the detailed stone archway, and the colouring and weathering of the stonework.
So as well as being fascinating to see how the movies were made, it was interesting to see common techniques between professional movie makers and amateur model makers, and maybe pick up a few ideas at the same time. No, I'm not building a model of Hogwarts, although I have already built a model of the Hogwarts express. Oh yes, of course, that was there too...
Railway enthusiasts may already know this is in fact GWR 4-6-0 "Olton Hall", built in 1937 and withdrawn in 1963. However it is now probably one of the most famous locomotives in the world, up there with the Rocket and the Flying Scotsman!
Tuesday, 16 April 2019
Book Review: Narrow Gauge in the Somme Sector
I was recently asked to review a new book from publishers Pen & Sword, "Narrow Gauge in the Somme Sector - Before, during and after the first world war", by Martin JB Farebrother and Joan S Farebrother. As a fan of narrow gauge railways, and with an interest in the light railways used in the first world war, it seemed right up my street. Pen and Sword are a relatively new publisher in the world of narrow gauge railways, but are well established with an extensive range of military history books, so this book is very much at home in their range. It is actually the second book by the same authors in a series titled "Allied Railways of the Western Front", the first being "Narrow Gauge in the Arras Sector". I presume a third book may be possible for the Ypres sector.
This is a substantial, hardback book, with a dust-jacket cover featuring a Jonathan Clay illustration, which is attractive yet suitably sombre. The paper is good quality, the print clear, and the text seems well written. I notice it is also available in electronic format, which is handy if your bookshelves are already overflowing (like mine!), but I don't suppose is as satisfying, nor so convenient to reference the text to maps on previous pages.
The book opens with a summary of the geography and history of the area covered by the book, which has seen many armies fight over it through the centuries. Then the railway history of the region is introduced, including the network of meter gauge railways, this is of interest because of the part both the standard and meter gauge railways played in the war, and how they were affected by the front line. I hadn't realised the extent of meter gauge railways in this region.
The story of the part played by the railways in the war starts around 1916, when the need for good supply lines to the front-line trenches was recognised, and a concerted effort applied to supply and build good railway links. As well as the existing standard and meter gauge lines this included the building of 2' gauge light railways, now well-known amongst narrow gauge enthusiasts, with locos preserved today, and even scale models. These railway systems were a crucial link in what we would today call the "logistics" of feeding a vast army and fighting a war in often difficult terrain. A chapter is given to summarising the light railway equipment, including locomotives; no doubt there is overlap here with the first book in the series but it means this book stands alone.
The chapters through the mid part of the book cover the development of these railways chronologically, describing when each route was built, and by which company of soldiers. This inevitably means that the text can become a little dry in places, and not being familiar with the area it can be tricky to follow the geography, not every place mentioned is marked on the maps, and it it can take a while to find those that are. This is where the book shows it is a serious historical record though, and not coffee-table bling.
As the chapters progress a picture of the extensive and ever-changing network of railways is painted, that is far more detailed than other books I have read on this subject, despite the challenges of geography and the dangers of the battle. The background of the battles obviously drives the evolution of the railways, and the losses to German advances are described along with the building when the front line advanced. I found this fascinating, considering the speed with which both advance and retreat occurred at times (the war was not always as static as is often thought), but also quite moving, when the description includes the towns and villages that passed under the changing front. There are some first-hand accounts that add an extra dimension to the text, though sadly not many as soldiers were discouraged from keeping diaries. I would liked to have seen more on how the railways were operated, and their impact to those soldiers they served, but there are some examples of the bravery of those building and maintaining the railways in extreme circumstances.
The closing stages of the book cover the post-war recovery of the civilian railways, but also the winding up of the military light railways. I had never realised the part some of them played in rebuilding the towns devastated by the war, having passed into civil control, and indeed some actually ran a passenger service in the period immediately following the war. The use of light railway routes and equipment by industrial railways, particularly in the region relevant to the book, is also discussed, along with the locos that made it into preservation. I thought the final chapter of walks showing interesting remains was a fitting end to the book. As you might expect, there is an extensive bibliography and index.
There are numerous maps throughout the book showing the various railways of all gauges, at different stages of the period covered. I found these to be excellent, very clear, and very helpful to the text. I like a good map, and these really contribute to the book.
There are photos throughout the book too, which are well reproduced and captioned. There are enough to give a flavour to the text, from the pre-war meter gauge railways to the present day remains, as well as war-time photos of the railways in use. However this isn't a photo album, and there are other complimentary books that are more photo-heavy. Likewise this book isn't about loco or stock drawings or other technical details beyond a basic summary, that are adequately covered elsewhere. Here the illustrations are used to enhance the text, and set the context. I found those showing the meter gauge stations on the front line, after bombardment and with burned-out carriage remains, were particularly moving. It is easy to think that the trenches ran through deserted countryside, but this book shows how the infrastructure of civilian life was not spared, including how the meter gauge railways attempted to maintain a service behind the lines, despite being severed by the front.
So this is a high-quality publication, and a detailed historical record of the subject it covers. I'm not qualified to assess the accuracy of the content, but my impression is that it is well researched and with no obvious errors, it is also clear that the authors have a deep interest in the subject. Although it is in places not an easy read, it is an interesting and informative book, and much more than a textbook. The style is factual and informative, but also warm, and respectful of the horrors of the war. The excellent maps and the selection of period and modern photographs enhance the text in portraying the geographical and social context of the reality in which the railways were built and operated. Of course those with an interest in the narrow gauge railways of the first world war will find this book of great value, but it will be of interest to railway enthusiasts generally, and also to those interested in the military aspects of the war.
This is a substantial, hardback book, with a dust-jacket cover featuring a Jonathan Clay illustration, which is attractive yet suitably sombre. The paper is good quality, the print clear, and the text seems well written. I notice it is also available in electronic format, which is handy if your bookshelves are already overflowing (like mine!), but I don't suppose is as satisfying, nor so convenient to reference the text to maps on previous pages.
The book opens with a summary of the geography and history of the area covered by the book, which has seen many armies fight over it through the centuries. Then the railway history of the region is introduced, including the network of meter gauge railways, this is of interest because of the part both the standard and meter gauge railways played in the war, and how they were affected by the front line. I hadn't realised the extent of meter gauge railways in this region.
The story of the part played by the railways in the war starts around 1916, when the need for good supply lines to the front-line trenches was recognised, and a concerted effort applied to supply and build good railway links. As well as the existing standard and meter gauge lines this included the building of 2' gauge light railways, now well-known amongst narrow gauge enthusiasts, with locos preserved today, and even scale models. These railway systems were a crucial link in what we would today call the "logistics" of feeding a vast army and fighting a war in often difficult terrain. A chapter is given to summarising the light railway equipment, including locomotives; no doubt there is overlap here with the first book in the series but it means this book stands alone.
The chapters through the mid part of the book cover the development of these railways chronologically, describing when each route was built, and by which company of soldiers. This inevitably means that the text can become a little dry in places, and not being familiar with the area it can be tricky to follow the geography, not every place mentioned is marked on the maps, and it it can take a while to find those that are. This is where the book shows it is a serious historical record though, and not coffee-table bling.
As the chapters progress a picture of the extensive and ever-changing network of railways is painted, that is far more detailed than other books I have read on this subject, despite the challenges of geography and the dangers of the battle. The background of the battles obviously drives the evolution of the railways, and the losses to German advances are described along with the building when the front line advanced. I found this fascinating, considering the speed with which both advance and retreat occurred at times (the war was not always as static as is often thought), but also quite moving, when the description includes the towns and villages that passed under the changing front. There are some first-hand accounts that add an extra dimension to the text, though sadly not many as soldiers were discouraged from keeping diaries. I would liked to have seen more on how the railways were operated, and their impact to those soldiers they served, but there are some examples of the bravery of those building and maintaining the railways in extreme circumstances.
The closing stages of the book cover the post-war recovery of the civilian railways, but also the winding up of the military light railways. I had never realised the part some of them played in rebuilding the towns devastated by the war, having passed into civil control, and indeed some actually ran a passenger service in the period immediately following the war. The use of light railway routes and equipment by industrial railways, particularly in the region relevant to the book, is also discussed, along with the locos that made it into preservation. I thought the final chapter of walks showing interesting remains was a fitting end to the book. As you might expect, there is an extensive bibliography and index.
There are numerous maps throughout the book showing the various railways of all gauges, at different stages of the period covered. I found these to be excellent, very clear, and very helpful to the text. I like a good map, and these really contribute to the book.
There are photos throughout the book too, which are well reproduced and captioned. There are enough to give a flavour to the text, from the pre-war meter gauge railways to the present day remains, as well as war-time photos of the railways in use. However this isn't a photo album, and there are other complimentary books that are more photo-heavy. Likewise this book isn't about loco or stock drawings or other technical details beyond a basic summary, that are adequately covered elsewhere. Here the illustrations are used to enhance the text, and set the context. I found those showing the meter gauge stations on the front line, after bombardment and with burned-out carriage remains, were particularly moving. It is easy to think that the trenches ran through deserted countryside, but this book shows how the infrastructure of civilian life was not spared, including how the meter gauge railways attempted to maintain a service behind the lines, despite being severed by the front.
So this is a high-quality publication, and a detailed historical record of the subject it covers. I'm not qualified to assess the accuracy of the content, but my impression is that it is well researched and with no obvious errors, it is also clear that the authors have a deep interest in the subject. Although it is in places not an easy read, it is an interesting and informative book, and much more than a textbook. The style is factual and informative, but also warm, and respectful of the horrors of the war. The excellent maps and the selection of period and modern photographs enhance the text in portraying the geographical and social context of the reality in which the railways were built and operated. Of course those with an interest in the narrow gauge railways of the first world war will find this book of great value, but it will be of interest to railway enthusiasts generally, and also to those interested in the military aspects of the war.
Thursday, 11 April 2019
Return to Hexworthy
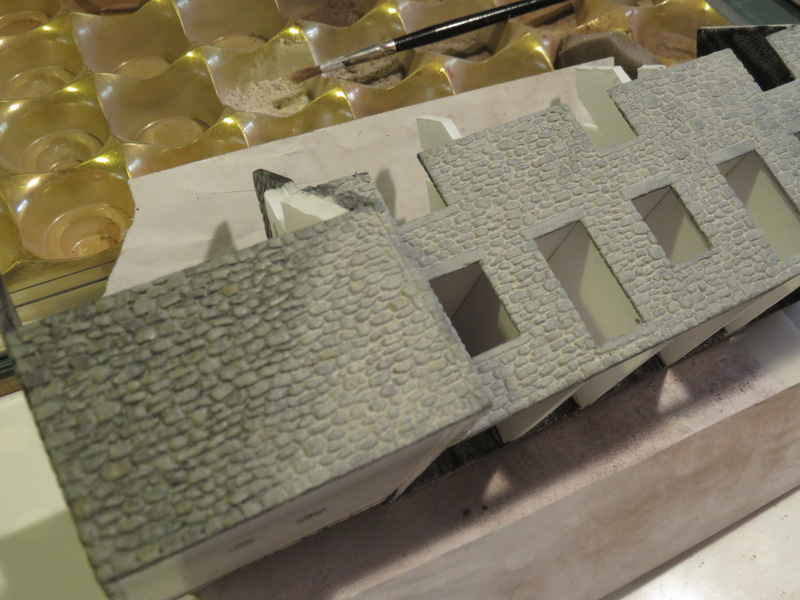
After a break of about a year while other projects have intervened, I've finally got back to working on Hexworthy. I had been working on the station building, I'd painted the stonework but a mortar wash hadn't worked well. Then it struck me, would weathering powder work? After some experimentation I settled on talcum powder, with some beige weathering powder mixed in. This was brushed over the stonework, into the mortar courses and off the faces of the stones.
As well as providing the mortar the powder tones down the stone colours and gives a pleasing matt finish. I pondered using a varnish (dullcote) to seal the powder, but that can dull the effect, and I'm not sure if it would affect the foam. Anyway, I'm happy with the effect, and it was quick and easy to do.
The other job that had stalled was the roof. I'd made the carcass from black plasticard, and started applying York Modelmaking laser-cut slates. These are self-adhesive strips with the slates cut into one side, and are laid overlapping to form the roof. The paper material is self-coloured, and looks just the right thickness, so it is pretty easy to use. However, the dormer windows made cutting them and fitting them somewhat more involved than for a plain roof - so it did take me some time!
The ridge tiles are folded over and stuck down, but they are reluctant to stay folded and are lifting slightly in places, I'm not sure how best to fix this without leaving visible glue. The roof is also rather uniform, and I'm not sure how best to weather it. Will it take a paint wash or will that damage them? Weathering powder might be too effective on the paper surface.
I realise I should have fixed barge-boards before the slates, so the slates could go over the barge-boards, I think they will now have to go on the outside of the ends. As you can see above, there is a rather large gap under the roof above the goods shed that needs a barge-board to hide it. The dormer windows need lead flashing too, again I'm not sure how best to do that. Then there is finishing the tops of the chimneys. You can see that I have pained and fitted the window frames, but there is still lots to do, and lots to figure out as I go.
As well as providing the mortar the powder tones down the stone colours and gives a pleasing matt finish. I pondered using a varnish (dullcote) to seal the powder, but that can dull the effect, and I'm not sure if it would affect the foam. Anyway, I'm happy with the effect, and it was quick and easy to do.
The other job that had stalled was the roof. I'd made the carcass from black plasticard, and started applying York Modelmaking laser-cut slates. These are self-adhesive strips with the slates cut into one side, and are laid overlapping to form the roof. The paper material is self-coloured, and looks just the right thickness, so it is pretty easy to use. However, the dormer windows made cutting them and fitting them somewhat more involved than for a plain roof - so it did take me some time!
The ridge tiles are folded over and stuck down, but they are reluctant to stay folded and are lifting slightly in places, I'm not sure how best to fix this without leaving visible glue. The roof is also rather uniform, and I'm not sure how best to weather it. Will it take a paint wash or will that damage them? Weathering powder might be too effective on the paper surface.
I realise I should have fixed barge-boards before the slates, so the slates could go over the barge-boards, I think they will now have to go on the outside of the ends. As you can see above, there is a rather large gap under the roof above the goods shed that needs a barge-board to hide it. The dormer windows need lead flashing too, again I'm not sure how best to do that. Then there is finishing the tops of the chimneys. You can see that I have pained and fitted the window frames, but there is still lots to do, and lots to figure out as I go.
Friday, 29 March 2019
Diggin' it
So here is the nearly finished unpainted result, thanks to a little effort over the last couple of evenings as well as on the demo stand. The mini digger is from Wiking, to HO scale but looks fine here, while both wagons are adapted from the 009 society kit. The left-hand wagon has one end removed and the other reduced to 2 planks, and is used to store ramps and timbers for unloading, as well as the drill attachment. I'm not sure the best arrangement to stow these and they are currently loose.
The digger carrying wagon itself is significantly adapted. One end is removed and the end frame tucked further under the floor, while the nearer end is sloped down. The end frame is under the sides, which are cut to a taper, and the removed wedge refitted as a sloping brace to the lower end frame. Under the end a beam is fitted just above track level, to be wedged with a timber during unloading to stop the wagon tilting (a detail taken from the RNAD forklift carrier). The wire loops are supports for the removable ramps, while the deck is reinforced with checker plate. The brake handle has had to be shortened too.
To hold the digger in place I fitted a 2mm diameter, 2mm deep magnet in the wagon deck, and another in a hole drilled in the underside of the digger. These tiny magnets are very strong and hold the digger firmly (it can lift the wagon), but allowing it to be removed. There's a couple of strips of lead under the wagon to make it stable. I suspect the real mini-digger would have a very low centre of gravity, despite appearances.
Stowed and ready to go. This pair of wagons will look right at home in the siding on Hexworthy. I just need to add couplings, and paint the wagons, plus weather them and the digger of course. I'm not sure what colour to paint the wagons - my usual grey, or perhaps a departmental yellow?
Sunday, 24 March 2019
Alexandra Palace
Yesterday I was at Alexandra Palace for the British Railway Modelling exhibition, where the Sussex Downs Group were manning the 009 society stand. There was quite a bit of interest, in the scale generally and in the models on display, and we even did some demonstrating.
It's an interesting show, a large and impressive venue (if a right pain to get to if you don't live in London!). There's lots of trade support including the big names (Hornby, Bachmann, Dapol, Hattons, etc...), but more interesting to me were some of the smaller suppliers who would otherwise only be accessible by mail order. There were layouts too, and some of them were very impressive, but they did feel thinly spread around the hall. I didn't have a lot of time for looking at layouts, and didn't get a program, but I did notice narrow gauge layouts were somewhat limited. Our little demo layout on the society stand was the only 009 layout - which may explain the interest, and seemed a little odd now 009 is increasingly supported by ready-to-run. The closest was Arigna in OOn3 (Irish 3' gauge).
There were a couple of American narrow gauge layouts in 7mm scale. I particularly liked this one (Clearwater Harbor I think), the tipping wagons and the harbour was a nice feature. There was a 7mm scale Cambrian Railways layout with a narrow gauge feeder too that I rather liked.

Not narrow gauge but Rolvenden was a lovely model of the well-known Kent & East Sussex light railway.

Some of the layouts were obviously there to draw the crowds, though I know I may be unusual as I don't get that excited by large tail-chaser layouts. However I did like Ealing Road, one of two layouts from the Great Model Railway Challenge. Yes, it's that layout with the pre-built scenery, although the urban setting did look good now it was finished.
Lightermans Yard also had an urban setting with a lot of detail, yet this is 2mm scale. Superb modelling.
It was nice to see Lymebrook Yard, an N-gauge layout I'd admired in Railway Modeller. The scenery is nicely done, and captures an era well, but it also shows how an excellent layout can be built in a small space.
That's all I've space for and I didn't get photos of that many layouts, but it does show there were good layouts spread through the halls. While it would be nice to see more NG, I expect there was something for everyone.
It's an interesting show, a large and impressive venue (if a right pain to get to if you don't live in London!). There's lots of trade support including the big names (Hornby, Bachmann, Dapol, Hattons, etc...), but more interesting to me were some of the smaller suppliers who would otherwise only be accessible by mail order. There were layouts too, and some of them were very impressive, but they did feel thinly spread around the hall. I didn't have a lot of time for looking at layouts, and didn't get a program, but I did notice narrow gauge layouts were somewhat limited. Our little demo layout on the society stand was the only 009 layout - which may explain the interest, and seemed a little odd now 009 is increasingly supported by ready-to-run. The closest was Arigna in OOn3 (Irish 3' gauge).
There were a couple of American narrow gauge layouts in 7mm scale. I particularly liked this one (Clearwater Harbor I think), the tipping wagons and the harbour was a nice feature. There was a 7mm scale Cambrian Railways layout with a narrow gauge feeder too that I rather liked.
Not narrow gauge but Rolvenden was a lovely model of the well-known Kent & East Sussex light railway.
Some of the layouts were obviously there to draw the crowds, though I know I may be unusual as I don't get that excited by large tail-chaser layouts. However I did like Ealing Road, one of two layouts from the Great Model Railway Challenge. Yes, it's that layout with the pre-built scenery, although the urban setting did look good now it was finished.
Lightermans Yard also had an urban setting with a lot of detail, yet this is 2mm scale. Superb modelling.
It was nice to see Lymebrook Yard, an N-gauge layout I'd admired in Railway Modeller. The scenery is nicely done, and captures an era well, but it also shows how an excellent layout can be built in a small space.
That's all I've space for and I didn't get photos of that many layouts, but it does show there were good layouts spread through the halls. While it would be nice to see more NG, I expect there was something for everyone.
Thursday, 14 March 2019
Fly screens
With the extension added to Slugworth we had opened up the holes in the end of the layout which had been covered with black plasticard. The exits were disguised with building exits, but light "leaking" through from behind didn't help the illusion, while the lean-to building was just 5mm deep leaving the transition to fiddle yard quite obvious.
The lean-to needed more internal depth, which was added with a simple box of foam-core board a couple of inches deep, lined with brick-paper matched to the existing opening. The floor of this building and the larger factory building was lined with grey card, cut to inset the track, which was left unpainted as it looks OK as it is here. Finally to block light we added the "fly-screens" cut from a heavy-duty bin liner. These simply brush out the way of trains and don't affect even the lightest wagons or finest detail, and being set back "inside" the buildings are not seen from the viewing side.
From the front the visual improvement with the inner walls to the lean-to and the inset track is significant, compared to the bare baseboard and track that would otherwise be obvious (from where cobbles join the concrete in the lean-to entrance). We were going to re-fix the doors to the lean-to but in the open position, however we were a little concerned about clearances and now the join is so neat there is no real need. The black "fly screens" may just be visible from some angles, they do hide the fiddle yard but the main purpose is to stop light from coming through, and that they do quite effectively.
Another "fly screen" was added to the back of the shed on the country side, this shed was already deep enough to hide the fiddle yard but again the blocking of unwanted light makes a difference.
The lean-to needed more internal depth, which was added with a simple box of foam-core board a couple of inches deep, lined with brick-paper matched to the existing opening. The floor of this building and the larger factory building was lined with grey card, cut to inset the track, which was left unpainted as it looks OK as it is here. Finally to block light we added the "fly-screens" cut from a heavy-duty bin liner. These simply brush out the way of trains and don't affect even the lightest wagons or finest detail, and being set back "inside" the buildings are not seen from the viewing side.
From the front the visual improvement with the inner walls to the lean-to and the inset track is significant, compared to the bare baseboard and track that would otherwise be obvious (from where cobbles join the concrete in the lean-to entrance). We were going to re-fix the doors to the lean-to but in the open position, however we were a little concerned about clearances and now the join is so neat there is no real need. The black "fly screens" may just be visible from some angles, they do hide the fiddle yard but the main purpose is to stop light from coming through, and that they do quite effectively.
Another "fly screen" was added to the back of the shed on the country side, this shed was already deep enough to hide the fiddle yard but again the blocking of unwanted light makes a difference.
Subscribe to:
Posts (Atom)