My layouts are all powered the same way: a hand-held controller plugs into a power-box, with a lead to the layout providing power for points and accessories as well as the controller output. I've got two power boxes, one is quite large and heavy and supports two controllers (though none of my current layouts need two controllers!) and the second is smaller for one controller. However, even that is quite bulky and designed to sit on the floor, and I end up taking both to shows so I have a spare. Last September I used an old Hornby transformer (from a simple train set controller, which broke) to rig up a temporary back-up supply, since this seemed to work OK I figured I could make it into a more compact and tidy solution for my small layouts - let's call it the micro power pack.

I got a small project box into which the controller plugs, with a lead to the layout, and taking power from the transformer. The box needed to include a capacitor discharge unit (CDU), I used the same
simple circuit I'd used on my smaller power box which uses a diode, 2200uF capacitor, and a resistor. The resistor limits the "charging" current flow; this transformer is only rated at 800mA, but gave out about 18V AC which is about 24V peak, so I reckoned a 33 Ohm resistor would do (V=IR and all that). Of course, I didn't have a 33 Ohm, but twisting a 47 Ohm and 100 Ohm together in parallel gave (according to my multi-meter) about 33 Ohms. That simple circuit aside, the box simply acts as a junction box for the AC and to pass through the controller DC.

So I measured how much space the terminal block needed and ordered the box, and a capacitor. Then I figured I should put in a thermal cut-off to protect the transformer from a short-circuit. Of course, the capacitor was larger than I'd allowed for, and the cut-off needed another terminal... resulting in an enjoyable (?) puzzle to figure out how to fit it all in. This life-size drawing around components helped me plan. I also wrote out which colour wires go where, as I am easily confused mid-way through soldering.
To drill the box for the socket and holes for the wires I used an offcut of timber to support it. The DIN socket needed a 15mm hole, and I found a couple of small self-tapping screws to hold it in place, the thicker cable needed a 5.5mm hole and the thinner cable to the transformer a 3.5mm hole.
The worst job is wiring the 6-pin DIN plug, the pins have tiny recesses into which the wires must be soldered. Remember to slide the plastic cover up the lead first. At least the sockets have tags.
Everything fitted in, but it is a snug fit! At least I didn't need to worry about securing the connector blocks, as nothing can move. Note the cable tie securing the white cable to prevent it pulling loose, the black cable from the transformer is simply knotted. I checked all the connections and tested it, I'm pleased to say it works just fine. Points can be changed one at a time at about 1 second intervals, any faster and the capacitor doesn't have time to charge, but that's fine for a single operator layout. Surprisingly, a loco continues to run smoothly while points are changed, given the single 800mA transformer powers both I'd wondered if this would be the case, although on small shunting layouts I tend to change points only when stopped.
The same arrangement could be used with any separate 16V AC transformer, including the accessory output of a cased controller. It would be easier if the box were bigger, in fact a larger box could take a "proper" CDU capable of powering multiple points if needed. The advantage of this arrangement is that there is one plug to run the layout (though I keep lighting power separate), the transformers and CDU can be used on multiple layouts, and mains wiring is kept well away from the layout itself.
Note that because the points and controller share a transformer winding here they should not share the same common return on the layout, nor should any accessories powered from the 16V AC.
The box had Velcro stuck to its base, and with some Velcro stuck on the legs of Loctern Quay it can be neatly fixed out of the way, with the short power lead connected to the layout.
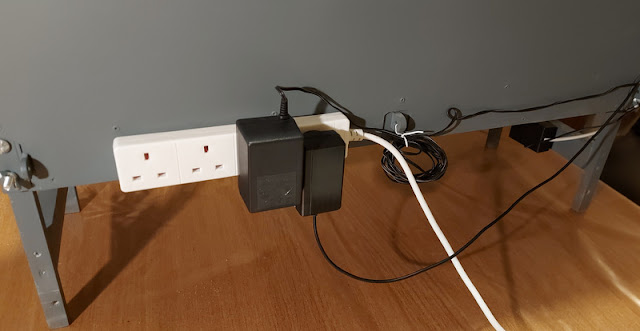
While I was at it I added a couple of screws to the back of a layout for an extension lead to slot on to, this allows the transformers to plug in out of the way. The one on the left is the new layout power, the one on the right is for the LED lighting - the lead for which does not reach the floor. This makes a neater and easier set-up for exhibitions, and less cabling and space needed for set-up at home too. Of course the same power pack will be useful for my other small layouts.


2 comments:
Wow! I've just built something similar, but your's is much neater than mine, although I win on the light up gizmos.
Yes, maybe it needs flashing lights? :)
Post a Comment