Tuesday, 9 March 2021

Book: Britain's Railways in the Second World War

Britain's Railways in the Second World War by Michael Foley is a new book from Pen & Sword. Obviously I've an interest in railways, and as an important part of Britain's recent history I take an interest in the World Wars too, so was intrigued by this book. 


It is what it says on the cover, the story of how the railways of Britain reacted, coped, and were used during the war, from evacuating children to feeding the essential manufacturing to moving troops and armour, all while struggling with reduced staff and limited resources. The story is told chronologically, from the start of war through Dunkirk and the Blitz to the support of D-day and beyond, although these events are the background and have an impact on the railways this isn't a military story. There are many human stories, and much about the organisation and running of the railways. 

The text does sometimes jump from one topic to another, and there are some instances of a topic being repeated from another perspective, maybe this is due to the chronological approach but in some places careful editing and rephrasing could have made the text flow better. Strangely, the GWR was referred to as GWS several times throughout the book (so not an isolated typo), even using GWR and GWS in the same paragraph, this and a couple of other minor errors suggest proofing could have been more rigorous.  Overall though, the text is engaging and interesting to read, and avoids complex and technical language making it easy to follow. 


The book is illustrated with photographs, many of them from the period and some with a direct connection to the text, although for a few the relevance is tenuous and probably better subjects could have been chosen. Reproduction is not great, being printed on the standard paper, and all in black and white although some originals would have been colour. Perhaps they would have been better grouped into photographic paper sections, which would allow better definition and possibly colour, although for those linked to the text this would have been less effective. In any case, this book is a story and historical picture, not a photo album, so the use of the photographs is appropriate in adding interest rather than being key. 

There is also a glossary, although it seemed rather short, readers who are not railway enthusiasts or without some familiarity of British railways might have appreciated a more comprehensive glossary.  A nice touch is the short chapter detailing where some locos, stock, and memorials from the time can be found, and noting that preserved railways can give a feel for what wartime railways may have been like. 


I found this an enjoyable book that feels more like a story than a history book to read. It tells of an important aspect of the wartime struggle and what life was like for the railway companies and their workforce. For those with even a passing interest in railways or in the impact of the second world war this is a book worth reading. 

Sunday, 7 March 2021

Ground frames and point rodding (Part 2)

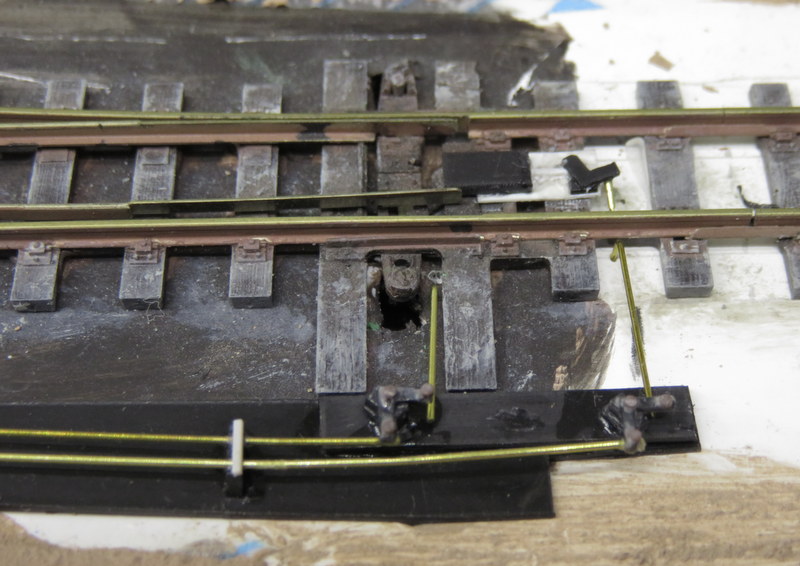
 After a visit to the paint shop, the lever frames and point rodding have been added to the layout.


Black and blue levers (for points and facing point locks), with aluminium dry-brushed with gunmetal for the handles. The chequer plate has traces of gunmetal too where many boots wear away the paint. The colours are perhaps a little dark, but may look more at home when the ballasting covers the black base, and I can add a little weathering powder to the timbers then too. 


From above the rods are clear emerging from under the lever frame, painted grey-brown with a dry brushing of gunmetal. The cranks are black with a touch of rusty brown. The facing point lock can be seen positioned just behand the tie bar, being careful not to obstruct the movement of the tie bar or the blades. 


The other rods run along to the farthest point with cranks in a similar arrangement. The rodding support stools are crude, but will be embedded in ballast and should be a fair representation from normal viewing distances!


At the other end of the station the small lever frame has had similar treatment. I may put a guard rail around this to prevent vehicles in the yard from damaging the lever frame or cranks. 


The lever frames cover the points on the running line which need facing point locks, the one from the loop to the front siding doesn't need a lock so I have used a Peco lever. These look quite effective although the planked base is rarely seen in reality. I have set it on strips of plastic to look like extended sleepers. 

Saturday, 6 March 2021

Ground frames and point rodding (Part 1)

Signal boxes are all very well for standard gauge railways, but let's face it only the larger and better equipped narrow gauge railways had the need (and cash) for such luxuries. Many lines managed with levers next to each point, although for those carrying passengers the regulations on facing point locks means ground frames were often use. I'm modelling Hexworthy in preservation so of course facing point locks would be needed, though as a terminus of a single line signals would not be necessary - movements being controlled by the single line token. So while some preserved lines have gained signal boxes in later years, I thought Hexworthy could manage with a couple of ground frames - the single line token equipment would probably be installed in the station building. The two points on entry to the station would need facing point locks, the loco release point probably does too since it is against the platform and a departing train could have coaches over it.


A Wills kit makes up a delightful pair of ground frames (with parts left for a couple more). The small one has levers for a point and its point lock, the larger the same for two points. The problem is, now they will look odd without some representation of the rodding and cranks that would connect them too the points. Wills do a nice kit for the rodding, but I only need a few inches...


The little frame is right next to the point it serves, although at right-angles so as not to obstruct the yard. I made up some planking to "hide" the crank and rod to the point next to it, and protect it from feet, but the rod for the point lock comes out to a crank. The rod was made from 0.5mm brass rod - I know it was often square, but the GWR used round and Hexworthy is in GWR territory, anyway plastic strip was too weak and flexible. The crank is an L-shaped piece of plastic with slices of microrod for bolts, stuck on a block of plastic. 


The larger frame controls two points. I made up the rodding on a sheet of 20" plastic, which will be buried by the ballast. The brass wire rodding is supported in stools made from 40" plastic pieces end-on, with notches cut in the top for the wire, and a strip of microstrip over the top - it doesn't bear close inspection, but I think gives a reasonable impression. 


The close-up shows a couple of cranks made from scrap plastic in the same way as before, as is the facing point lock - a block of 40" plastic for the lock mechanism, a "plate" of 10" plastic, and another crank. The rod to the point lock is actually in two parts, the nearer being an L-shape with the short leg punched vertically into the foamcore baseboard, the same is done for the tie-bar operating rod. The point is in reality operated by a point motor below the board, this rodding is entirely dummy. 

Saturday, 20 February 2021

Magnetic uncoupling with standard 009 couplings

While I am happy with using Microtrains couplings for most of my 009 stock with its advantages in shunting, I have realised that fitting them to my Heljan Manning Wardle is too difficult but also unnecessary. It will only be likely to run with suitable coaches such as the Peco ones, and so long as it can couple up reliably and uncouple to run round the type of coupling doesn't really matter. So retaining the "standard" 009 coupling is easiest, except that the ones factory-fitted to the loco sit too high, and I've been unable to adjust them until they couple reliably to the Peco coaches. 


A while back I bought a pack of Greenwich couplings to fit the NEM socket, these were bent up following the instructions and simply push into the sockets on the loco in place of the existing Peco type couplings. Being thin metal they are easily adjusted to sit level, which the Peco ones don't. As you can see here by leaving the loops off and the pivot tabs up (or cut off) they clear the cowcatcher easily. 


Being pre-blackened the Greenwich couplings look discrete but are entirely compatible with the Peco coupling - though since I have left the loops off the loco (to keep the cowcatchers) the coaches will need loops at both ends. I do need to provide some auto-uncoupling though, and I don't like pop-up ramps for the Peco loops.


So here is an ordinary staple held centrally in some pliers. Both sides were bent upwards from the flat plane of the staple.


This makes a U shape with the ends bent up - these tails were leaned back slightly, and trimmed about 3mm. 


The bent U shape is fitted over the outside of the Peco loop droppers. They can be tweaked to be a cosy fit, but not too tight as that can stop the loop moving freely. The upright tails are fixed with a little bead of superglue gel. The couplings are easily pulled out their sockets to have the staple fitted. 


The Peco coupling works normally, but when positioned over a magnet the staple pulls down which lifts the loop. If there are two loops a pair of magnets might be needed, but I only want to uncouple the loco (without loops) from the coaches so this should work well with one magnet. Here a tiny 2mm x 2mm neodymium magnet is held between the sleepers with blue-tack, a Greenwich magnet would be ideal but I don't have one, I will try a slightly longer magnet set under the sleepers which should work with less accurate positioning. However, the experiment shows this is a simple mod to add magnetic uncoupling capability to the standard Peco 009 coupling. It might work with other types so long as the loop is not magnetic (the Peco loop is plastic).  The coupling on the Manning Wardle is level here and couples to the Peco coach, but does still look slightly high in this photo, a quick adjustment with pliers should fix that. 


Sunday, 31 January 2021

Water supply and buffer stops for Hexworthy

A while back I got a resin kit for a water tower from Anyscale Models. It's a nice small size just right for 009, and the stone base fits well with Hexworthy. It came with some wire for pipework, but no outlet for locos to use, so I found a corner of plastic sprue and carved out the resin to set it under the tank, the filler bag is a piece of electrical heat-shrink insulation and a wire handle was added for operating a valve. 


While the tank is a nice size for 009, the base is too short - leaving the tank too low to fill a loco. I decided to make a platform for it to stand on, which could provide a coaling area too. The platform was made from pizza base foam and embossed as with the other stonework on Hexworthy, with some steps at the platform end and a wall behind. I will add the coal later. 


As you can see this now puts the tank at a good height for filling the tanks of locos. It is situated beyond the end of the platform alongside the loco release, where locos can be serviced after uncoupling from their train and running round. Similar arrangements are seen in preservation at Porthmadog and Welshpool. 


A close-up shows the pipework detail, a filler pipe and another outlet. The water is a piece of clear plastic painted murky green on the underside, there's a small gap which I should fill with gloss medium at some point. Really there should be some kind of level indicator or float valve on the inlet pipe. 


At the end of the running line a large stone forms a stop-block, hopefully preventing the road wall being demolished. The siding to the left has a Peco buffer stop. 

The problem with the Peco buffer stop is it looks a bit flimsy, not so bad on the end of a long siding but it doesn't look very substantial if used on a platform or running line. For the bay platform I beefed up the Peco moulding with some diagonal pieces of plasticard, suggesting hefty timbers set into the ground to reinforce the stop beam. It's simple but does make the little buffer stop look like it could survive a gentle nudge. 

Saturday, 9 January 2021

Finishing Hexworthy station

 Back in June I showed a canopy fitted to the Hexworthy station building. I realised I'd taken a couple of photos of it under construction so thought I should share them! It's made from plasticard edged with some plastic valancing I've had for "one day" for years. The felt roof is just masking tape, applied in slightly overlapping strips. Also in this photo can be seen one of the chimneys with flashing fitted just before final installation.


The underside of the canopy is braced with plastic section and strip (the black diagonals are difficult to see but help prevent warping), and a centre rib made from the sprue from the valance. Paper-clip wires are fixed in place to provide a mounting to the building - holes were punched in the wall for them to push into. 


It was several months later until I got around to painting it. It was made harder when I realised the colour wasn't straight from a tin, I must have mixed it! Eventually I got a reasonable match to the doors, though this is a lesson to use an available colour when it might need to be matched in the future...


Anyway, with the canopy fitted and the chimneys now fixed, I think the station is finished. I have wondered about fitting lighting before it is too difficult, but there are more pressing matters so we will see.


Round the back there is less detail, with no gutters or downpipes, though since it will be a couple of inches from the backscene it could probably have managed even without doors and windows!


Hmm, the café in the old goods shed could do with some interior detail though. The roof is not fixed on yet...

Monday, 28 December 2020

Scenic base layer

Work on Hexworthy continues slowly, but I have made a little progress. Following the carving of the polystyrene landscape, it was given an outer "shell" layer from kitchen towel soaked in PVA. This is a bit like "decoupage"  I suppose, the kitchen towel allows the glue to soak right through. A couple of layers is surprisingly tough once solid. 


This looked a bit like a hospital gown, so I moved quickly onto a base scenic layer. Normally I use plaster, coloured with powder paint, but I've heard good things about using tile grout so decided to give it a try, it even comes pre-coloured so bought a bag in a suitable shade of brown. I mixed some up and slopped it on with a big brush. 


It dries paler of course, not a bad shade for soil though it looks like rather dry soil - a desert right now! Anyway, a good base for further scenic work and quick and easy to do. 

I've also stuck the walling and bridge in place now, there are a few gaps to fill in.