I wanted a post and rail fence separating the railway land from surrounding farmland, but was wary that model fences can be vulnerable. I decided to make my own.

I made fence posts from wire. Most are straightened paperclips, each provides 4 inch-long posts which are stiff but bendable (i.e. wont break if knocked), and at about 1mm diameter (scale 3") seem the right thickness. I reckoned about 14-16mm is needed above ground (3'6" to 4'), the rest will keep it vertical. However, such fences have braced posts at ends and intervals, those I made from 1mm brass wire so a second bracing piece could be soldered to it at an angle. After soldering the angled leg was bent parallel to the post at ground level so it could go into the ground. Finally, the posts were left in blackening solution for a little while, I then taped them to the edge of a piece of card and painted them a grey-brown colour.

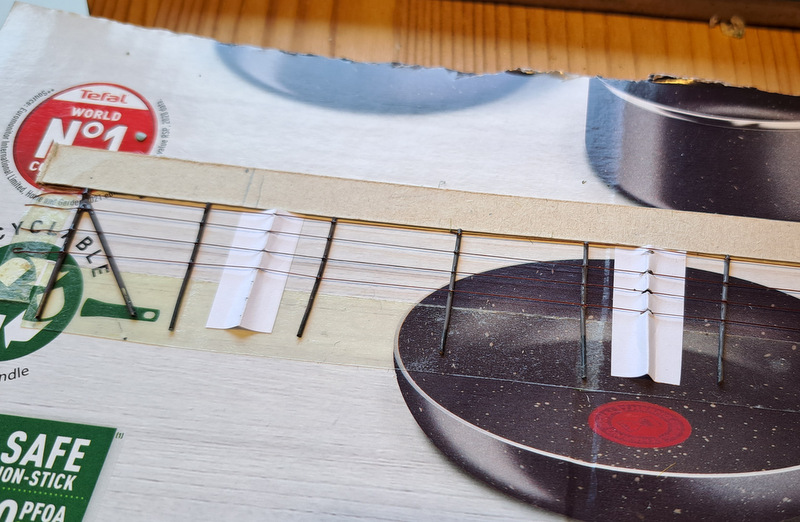
The fence was made up on a "jig" on a piece of packaging card (hence the pictures of saucepans). A strip of card makes an end-stop for the tops of the posts, and the bottoms are held on a strip of double-sided tape. The posts were placed at scale 6' intervals (24mm) using a piece of card as a spacer, this doesn't need to be accurate but the posts were set "vertically" as best as possible.
For the wire I got some "EZ-line", an elastic that stays taut and of course stretches if caught, it comes in various colours so I chose a rust colour. https://www.modelscenerysupplies.co.uk/EZ-Line-Rust
The spacing is helped by notched paper "combs", folded and all cut together, crude but seemed to keep the elastic in place. The notches are a about 3.5mm apart as I chose 4 wires - 5 might be better but the effect of 4 is sufficient. The elastic line is pressed into double sided tape at the end and placed over the posts and through the paper notches, taut but only very slightly stretched, and fixed to tape at the other end. I then secured each line to each post with a drop of superglue from the end of a piece of wire. The superglue seems to hold it quite securely.

The fence is simply planted into holes in the scenery, which if you recall consists of expanded polystyrene covered in a kitchen roll/PVA "shell" and a layer of tile grout. It is easy to push a dental probe in to puncture the shell, then force the post into the hole by hand (or pliers if stiff), the polystyrene holds the post upright while the hole in the shell stops it moving. Holes were spaced with the same piece of card, ensuring the elastic "wires" are taut (although too much or unequal tension might force the post to lean). Of course while the posts are placed vertically to about the same depth (around 16mm above ground), the wires follow the landscape staying parallel to each other.

As the fence progressed the unfixed end could get itself in a tangle. These clips held the end posts apart until I was ready to plant them. The card has a dab of PVA glue which was wiped onto the ends of the posts before planting, just in case they should come loose, although friction should be enough to hold them.

The effect is rather pleasing, following the contours nicely, while being very robust - the posts are more likely to cause injury than break but could be straightened if they do bend, while the elastic wire stretches but seems strong and firmly fixed. I placed the posts with the wire on the far side, but the superglue doesn't seem obvious anyway. The braced posts add a nice detail. It's pretty cheap too, the only significant cost is the EZ-line but I think it worth it.
The last photo shows I have added a little more static grass, mostly longer grasses, along the line of the fence (before fixing) and on the railway side where sheep can't (usually) get to it. Longer patches have been put down elsewhere too. This was done applying slightly diluted matt medium over the top of the existing grass, patchily to form uneven areas, the matt medium being invisible when dry.
No comments:
Post a Comment