Friday, 16 April 2010

Spirit of Welshpool

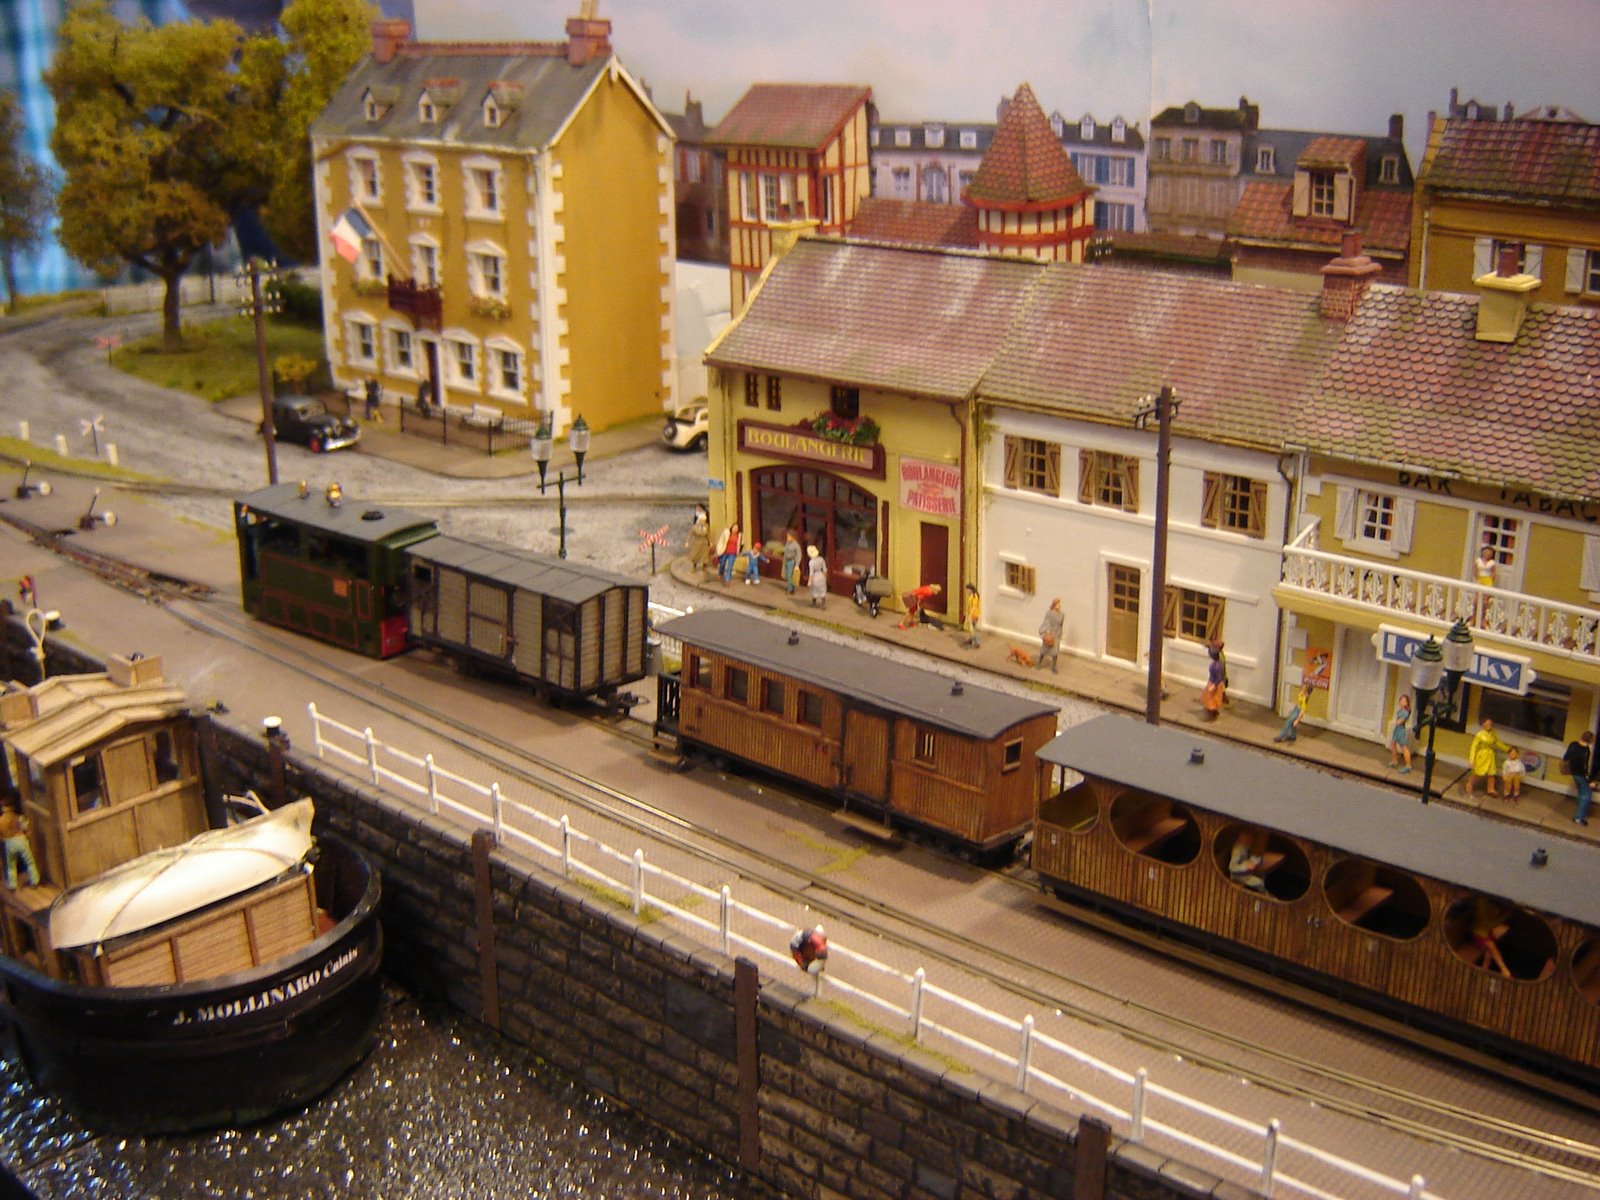
A few months back I posted some pictures of Mark Holland's under-construction layout inspired by Welshpool. Mark has obviously been busy recently as the townscape had really progressed by the time he set up the layout at Sparsholt last Saturday! His glamorous assistant operator (daughter!) confirmed that he had also been taking over the house somewhat with bits of layout too!

The effort is really paying off though, those familiar with the old pictures of the Welshpool & Llanfair railway threading through the back alleys of the town will recognise features in the model. Mark has done a great job of distilling the scenes into an atmospheric model, compressing and moving landmarks around but it is still recognisable, despite the whole town scene from the end of the station yard to the halt at Seven Stars being about 3 feet long. There is some way to go, the church is yet to come for example, and Mark is adding interior detail to the shops, as well as more people, vehicles and street clutter being required. But the washing on the lines, the railway running over the stream - they are all there! Would you believe the black-and-white cottage started life as an Airfix kit?


I was lucky enough to have a go at operating the layout for a while during the show, with a whole 5 minutes training (!). Actually it was great fun, although I am not a fan of the Bemo couplings, and there was one bit of track between a board joint and a point which was determined to derail any loco in one direction to frustrate me! I'm sure Mark will get that sorted. The sequence is to run in a mixed train, uncouple wagons in the yard, run up to station. Then back up, run-round, and shunt wagons. Reverse new train to station, depart for Seven Stars halt and the fiddle yard. Alternate with a railcar or goods only for interest! Mark is building up a fleet of Welshpool stock, which will really look good on the layout.

I'm sure I'll be able to bring more updates in the future!
Posted by Picasa

Wednesday, 14 April 2010

Narrow Gauge South 2010


Last Saturday was Narrow Gauge South - otherwise known as "Sparsholt", after the college near Winchester that provides the venue. The Sussex Downs 009 group were showing part of the "Everleight" modular layout, and I had volunteered to help. This is a superb layout (I can't claim any credit as it was built before I joined the group), but the quirks of operation take a little getting used to, and not helped by the gremlins that got into the system between the test and clean session the previous evening, and being errected at the show! So the first hour of operation was a struggle, but once the issues were sorted and operators (including me) "on-message" things improved! In addition group member Mark Holland had his "Spirit of Welshpool" layout there, which I had the pleasure of operating - more on that soon. My recently completed and unpainted railcar spent much of the day on one of those two layouts.

In between operating sessions I did get chance to look around, although with over 40 superb layouts it felt like a rush to see them all! No toddler in tow this time though, so a little easier to stop and talk, and take photos. Some of my better photos are here but for the full collection see my
fotopic site. I skipped the 009 society AGM - I'm glad too, as it took 2 hours! - which was the best time to get close to the layouts. All in all, a great show.


I did get away without spending too much money, although I did pick up a few essential tools from Squires did add up, some useful odds-and-ends, and a fascinating book on Light Railways full of inspiring and atmospheric pictures (see photo).

Posted by Picasa

Tuesday, 30 March 2010

Railcar ready for painting

I've just completed the final details, so the railcar is now ready for painting. Well, it needs a good clean and polish first, but there's not much point in doing that until I am ready to paint it! The trouble is, I don't have any etch primer and I'm not sure my usual Halfords primer will be the best for brass, so painting might be a little delayed.

Final details included door handles (bent s
taples), the ventilators over the doors (from the etch), a battery box and more unkown rodding under the side shown, and a starting handle on the "front" (right of coupling in the lower photo). The glazing cut previously was trimmed to clear door-handles and roof and slid back in (of course it will be removed for painting). I did wonder about putting driving controls inside, but since they are not visible in photo's and I am not sure where they would be, I thought better not to guess and get it wrong. However I will also need to amputate the legs of some passengers!


So final verdict on the kit? Well I am still not a fan of brass, plastic kits are much easier and to my mind, the results just as good. Also the description of a "scratch aid" kit is spot-on, although the sides are nicely etched and you don't have to cut the windows out, the rest of the model has to be scratch built, and to build anything approaching the prototype research is required too. I have found a lot of help on the NGRM forum as well as through comments on this blog, a real benefit of the internet! But for models of less-well known prototypes the Worsley Works range are a big bonus.

That said, while it has not been an easy project, it was not exactly difficult either, just challenging enough to make it interesting and enjoyable. I have managed with standard tools found in just about every modellers toolbox, and my average skills, and has taken a couple of months at my sedate pace of about 3 evenings a week, so it should not be beyond the capabilities of anyone with a little kit-bashing experience. It's been fun, and has resulted in an attractive and unusual model I think!

Now, what colour to paint it?
Posted by Picasa

Sunday, 28 March 2010

The railcar, a kettle, and some plastic ...

OK progress has been interrupted a bit lately, but I have completed the roof!

The kit didn't come with a roof - and I'm not sure I could have rolled a brass roof to the right shape anyway, so again I have reverted to my usual plasticard. The trouble with plastic is that it doesn't stay bent - unless that is you give it a hot bath! So two pieces of 20-thou plastic were cut to the lenght of the roof but over width, and taped to a used tin can. Then I put the kettle on ...


... no not more tea! Here's how it is done. Put said tin into jug and pour in boiling water. Allow to stand for a while (now have your tea!). Empty away, rinse in cold water, and then remove the tape. Hey presto, curved plasticard! Simple but effective, and not my idea - I've done it before but can't remember where I first hear about it. This tin was pretty close to the right radius, slightly too tight, which is fine as it is forced to the right radius later.


I said two pieces of plastic were bent - one was trimmed to the roof size with slight overlap over the bodysides, the other cut to fit just into the bodyside, then the two were cemented together - there is no way that bend is coming out! To make it even stronger I cut a piece of 40-thou plastic to fit inside the body like a ceiling, and - here's the fiddly bit - 4 small pieces to the curve of the roof to act as "ribs" like this: ( - which were glued to the false ceiling, then the curved roof stuck over the top. It is now really solid, and exactly the right radius! It is a faily tight fit into the body and helps hold the sides rigid, especially when being picked up, when painted a spot of PVA will hold it in place such that it could be prised off if needed.


Finally I found some lamp ventilators in my bits box - whitemetal castings of unknown origin - and added a couple as per the photo's I have. Also some fine microstrip makes the rainstrip along the edge of the roof.

Posted by Picasa

Thursday, 11 March 2010

Railcar - Tackling the underside!

Recent progress with the railcar has focussed on the underframe and all detail below the body. This has highlighted that as a "scratch aid" kit there is an awful lot of scratchbuilding involved!

First two layers of 40 thou plastic plus further packing has been added below the floor, which had been set further up the body to get the chassis the right height. The plastic extends slightly below the lower beading as per the photo's I have. Then an underframe was added from plastruct "H" section - allowing for couplings. The very distinctive radiators under the ends were made from plasticard scored with a razor saw, giving the grille effect, then detailed with microstrip strapping, though they have been cut around the coupling.


The Kato chassis has had as much of the "N-gauge" detail removed as possible, but the plastic frames hold the wheels and motor in place so care was taken not to weaken them. Very simple detail was then added for W-irons, axleboxes, and truss-rods, from plastic. Not much of this will be visible! Incedentally the chassis is now a fairly tight fit into the plastic hole left under the body!

Much thought was given to the steps - although the prototype has two steps to each door, I settled on one, as this model has been built lower and on smaller wheels than the prototype. I was also concerned that lower steps might hit platforms, as well as being very vulnerable! The steps were made from off-cuts of the brass etch and soldered to springy wire, which was then bent to suitable supports and glued into holes in the floor behind the solebars. Hopefully this would make them robust enough!


Finally the prototype railcar has some unusual and distinctive rodding (or pipework?) along the side of the chassis, I think these are controls to the driving positions but I'm not sure. Since they are always in shadow, and hard to see clearly on prototype photos, I have made a representation from micro-rod.


This view of the underside of the body, and the chassis removed, shows the basic detail on the chassis as well as the plasticard packing under the body, supports for radiators and details, the brass and wire steps, and how the Microtrains couplers are screwed into place - they can be removed for painting.

Posted by Picasa

Saturday, 20 February 2010

Railcar Interior

The railcar has been making steady progress recently, an hour or two at a time in an evening, although it doesn't look like dramatic progress! Layers of 40-thou plasticard have been added above and below the floor, cut to be a tight fit around the chassis, such that it seems to stay in place with friction at the moment! However the main focus recently has been on the glazing and the interior, which because of the large windows all round, will be very visible.


In the corners of the body, between the doors and the end, plasticard was built up to make the recesses behind the handrails. Strips of 20-thou plasticard were cut for the panelling up to the windows, and these were glued in place with packing strips so that they form a slot for the glazing - cut from 20-thou plasticard - to slot into. The end glazing also slots behind the plasticard corner pieces. The pictures hopefully show this better than I can describe.

I've been given a drawing of the interior, which has been most helpful. I thought the best way to hide the chassis was with a dummy floor, made from 40-thou plasticard. This left enough space either side of the chassis for a couple of strips of roofing lead - in this scale the more weight the better, and it does help make the running more smooth.

With the dummy floor in place (the cut-out is to clear the capacitor, which is the highest part of the chassis) the tops of the seats have been glued on, and the end seats made up. The wide strip at the right-hand end would be the engine cover. The floor is about 3mm higher than it should be to rebate the chassis to the right ride-height., and the dummy floor over the chassis is only just below the window line, so any passengers will have to suffer major surgery in order to fit!
Posted by Picasa

Saturday, 13 February 2010

Brighton Modelworld

I took my little boy along to the Brighton Modelworld show today. This show covers all sorts of modelling, from Lego to Model Engineering, dolls houses to radio control racing cars, boats to planes, and even robots. It is a show firmly aimed at the family, but judging by the good range of trade support, it is well supported by enthusiasts too. However, to be honest, from a model railway point of view, many smaller shows are far better! There were some excellent layouts, but to my mind too few, and much of the rest of the show was similar to last year. That said it is good to look at the skills of modellers of other subjects, and the radio control tanks are fun, plus the show is very interactive - we had a ride on a real steam train (see below!) and made a model aeroplane from polystyrene. Like I said, it is aimed at the family, and my son loved it!


On the model railway front I thought the best layouts were Overlord, the well-known model of a dockside in the midst of D-day preparation, and County Gate, possibly the most impressive 009 layout currently on the exhibition circuit. Now I must apologise for the poor standard of photo's, as ever photographing models is difficult whilst holding onto a 3-year-old!


This is based on the proposed extension of the Lynton & Barnstaple Railway to Minehead, featuring not just stunning scenic work, but superb running and computer control, and also a well-thought-out imaginary history including freelance loco's and railcars that "might" have been built for the extension. One example of the latter is this Mallet "River Avon":


The builder of County Gate, John De Frayssinet, had kindly offered to give my son the "guided tour", which he was very excited about. As well as being allowed to view the layout close-up, and see the back of the layout with the stock, hidden tunnels, and computer control, the highlight for him was being allowed to drive a train! The deep concentration on his face hides his excitement, but don't worry my hand was not far from the controller stop switch!


So many thanks John!

You can find a few more of my feeble photos here.