With the plan decided, final adjustments to the positioning of the points was made - with a layout this size a few mm either way can make a difference to how the layout works.
Michael Campbell's blog about his model railways. Building model railway layouts in 009 (OO9) scale
Monday, 19 May 2025
Rail 200 challenge - getting started
Monday, 23 September 2019
Paint and Light
Sadly the pale blue paint used for the back-scene on Slugworth had run out, so I popped to the DIY store to find something similar, but without much luck in the wood paint ranges. The original tin was actually a left-over from the bespoke colour mixing service, from the bargain basket, actually an emulsion paint for walls but I had used it directly on the wood back-scene of Slugworth and it had worked fine, with a nice matt finish. So I checked out the bargain basket of left-overs. There was a 1 litre tin of "blue hoo" which was the first shade of blue from white - basically white with a blue hint - not quite blue enough, but it was £2.50 so I picked it up, along with a couple of tester pots of a light blue emulsion - these were then mixed in to make my own shade of pale blue!
The result is a very pale matt blue, and works well for a hazy sky background. I don't plan anything else on the back-scene, just the low-relief buildings. Ideally the back-scene would curve around the rear corners but that was impractical in this small layout (particularly due to the sector plate and buildings), but with a plain background the corners are not obvious.
I'd removed the switches from the fascia for painting, before refitting I stuck a new print-out of the schematic diagram on with pritt-stick. Two versions had been drawn (in MS Word) - one with the outlines of the switches and marking-out lines, used for drilling holes, and this one without. The clear plastic was screwed on and the switches refitted through the holes from behind. The result looks tidy and is easy to follow (I hope) while being simple to make. Of course on testing it I'd got two of the switches swapped, but that was soon rectified...!
The final task for layout presentation was the lighting, again I used the left-over strip of "natural white" LED's used on both Slugworth and Hexworthy - full details can be found here. I have found that arranging the LED's to point straight down is not as effective as pointing them backwards. The lighting beam is arranged to sit an inch or so forward of the front of the layout, and angled so the inside of the fascia - where the LED strip is attached - is pointing down as well as back. Even so it seemed there was lots of light towards the rear and on the back-scene but items at the front were not so well lit, so I added short additional strips attached to a mounting at 45 degrees to the fascia - this means they are pointing down and back at about 20 degrees to the vertical. The mountings were knocked up from plasticard - quick, cheap and easy, but I had to take care soldering the wires to the strips!
The wires were then run back under one of the pivoted support arms to a socket, which was secured under the "tab" that rests on top of the end of the layout when the lighting is folded down. The socket accepts a standard wall-wart power supply.
So here's the finished layout "structure" seen from my standing eye level, and I've placed the buildings so far to get a feel for the scene. The folding legs lift the layout closer to the viewer, the back-scene cuts out background distractions, the lighting illuminates the modelled scene evenly, and the top fascia and side panels frame the scene, hiding the lighting and ends of the back-scene. All simple elements to add to a layout but really improve it's presentation. There are other ways of presenting a layout, but I would argue that some kind of backdrop and lighting are essential if a model is to be appreciated.
Saturday, 6 July 2019
Backscene Part 2
So after mulling it over I decided I wouldn't be happy with it, so ordered a replacement, only one of the two sheets was needed as the short right-hand piece looked fine. The question was how to make a better job of fitting it at the second attempt, especially as experimentation on the old piece showed the print is damaged by masking tape.
I decided on a 2-step approach. First I applied PVA glue to the first inch of the backboard, I don't know how well it will hold the plastic-backed print (experiment on an off-cut suggests sufficiently), but it did allow the back-scene to be positioned carefully and adjusted, checking the edge is neatly against the fixed piece and it unrolls straight.
When I was happy with the position the glued inch was weighted and left overnight.
Back out in the garden with everything (including the rolled back-scene) masked for the spray glue. This time my wife helped, while I unrolled the back-scene carefully keeping it straight and under tension she smoothed it down a little at a time with a cloth, working away from the glued edge.
And it worked, a week on there is no sign of ridges or bubbles. The lesson I think is that tension must be kept evenly on the paper while applying it, and it's a two-person job to do properly.
The join between the two pieces is much neater this time too, here it will be partially disguised by trees but it isn't that obvious. It isn't nice deciding to re-do a job, but I'm glad I did.
Friday, 31 May 2019
Hexworthy Back-scene
I'd come across https://www.art-printers.com/ through members of the NGRM forum, who do custom back-scenes as well as a range of standard ones, so I contacted them with my big picture and carefully measured dimensions. John at Art Printers was most helpful, discussing the best way to crop/stretch the panorama to fit the layout and other edits (he could have created the panorama too if I hadn't already). We ended up with a little cropped from the ends, and a slight vertical stretch to the final image. When I was happy the back-scene was printed and dispatched immediately. I chose the premium option which is more hard-wearing, and I thought the price was very reasonable and the service excellent.
The back-scene was printed to the dimensions I requested, but with a small margin, which I trimmed easily with a scalpel, using books to keep the rolled paper flat while I did so. Because my scene went over one roll of paper I needed a join, which I had arranged to be towards the right-hand end where I expect to use more trees. It did give me an off-cut of blank back-scene paper for a trial run, so I found an off-cut of board in the garage, took it outside, sprayed the glue on, and stuck the blank paper on. I know that sounds weird, but it prepared me for how the real thing would go!
The next step was to dry-run the back-scene, and check it fitted. I needed to trim where it fits under the bracing at the ends, and figure out exactly where the two pieces joined. I marked the join with a pencil line. The next thing to think about was how to stick it on straight and in the right place... the dummy run had showed that the glue was strong, and although the paper could be pulled away gently if not firmly stuck, there wasn't much hope if it had been pushed firmly down.
I decided to hold the back-scene like a scroll, holding against the baseboard so it is level over the back-scene (layout on it's back) , line it up to a mark, and press down. So I put a clear mark in a place that would later be hidden, about a foot from the end.
The dummy run had also showed that the spray glue got everywhere, so the rest of the layout not already masked up from painting was masked up, including the top edge of the back-scene board, and the layout set outside on it's back on the trestles - also masked as best I could. Then a last check the board is clear of lumps and debris! The glue is simply Wilkinson's own brand as that's all they had. It was sprayed liberally over the back-scene board, including up the end boards right up to where they meet the "wings" at the ends. The glue instructions say to cover both surfaces, but that would't be practical so I just sprayed the wood, and to wait 5 minutes before sticking together - but I had a lot to stick, so gave it just a couple of minutes before starting with the longer back-scene.
And a few minutes later the job is done. Despite my best efforts the longer scene is very slightly skew, and has risen about 3 mm by the far end, but it fits and looks fine, the gap at the bottom will be hidden by scenery. Wit hindsight a second pair of hands might be helpful here, to ensure it is held in line with the baseboard and pushed down at the same time. The shorter piece was butted up to the first piece and fortunately the join is quite neat. Best of all the premium paper has gone on smoothly, without wrinkles or bubbles or tears, and is stuck firmly - even in those curved corners. Overall I'm very happy with how that went!
Saturday, 25 May 2019
Backscene preparations
So this is the real view across the West Dart valley at Hexworthy. I remembered to take a tripod, set the image size to maximum, use a little optical zoom, and take lots of overlapping photos. Actually this was my second attempt - I'd done the same thing the previous year, but the 5 photos didn't make a wide enough picture to a high enough resolution. This time I took 12 pictures with more zoom to make a wider, less tall combined image.
I found a program called Hugin which did a great job of combining the 12 photos into a complete panorama image. The result looked good and should work well, but at this point I got a bit stuck, as I didn't have suitable software or knowledge to do further editing or the means to print out such a large image, even on multiple sheets. So I will pick up that story later...
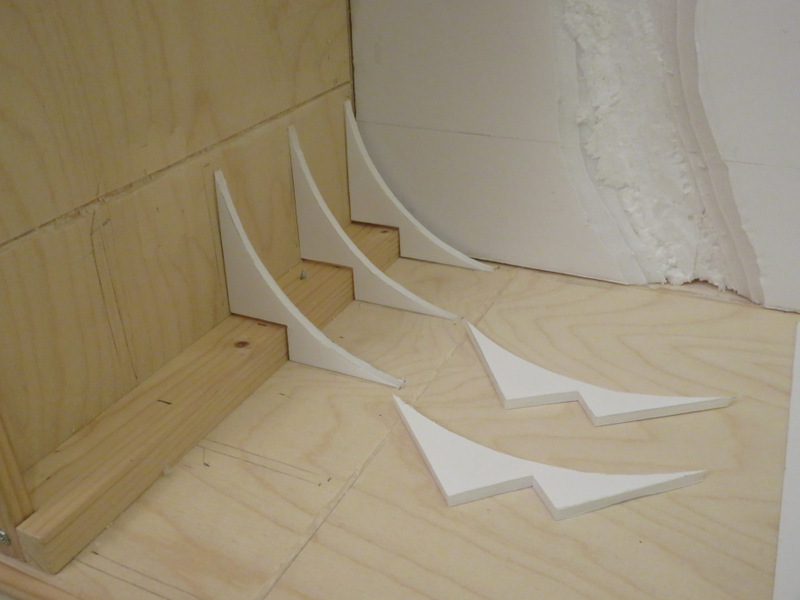
Now I wanted the backscene to wrap-around the internal corners of the layout in a curve to avoid corners and shadows. I know you can get bendy MDF and thin ply, but adding more wood to the layout means adding much more weight, and seemed overkill. So I cut some formers from foam-core board, cutting round a metal cake-tin lid to get the curvature (the picture shows the layout lying on it's back). I then cut a shallow slot into the ply just beyond the end of the formers, with a shallow chamfer back towards the formers.
The backscene support was then simply made from a piece of 20-thou plasticard cut to fit into the slots - which both force the plastic into the curved corner, and recess the edge to hopefully give a smooth transition from flat to curve without a step. I glued it to the formers with contact adhesive, although my formers were not entirely consistent, so maybe something with more gap-filling properties (no more nails, silicone caulk) would have been better. Anyway it seems to hold fine.
The last preparation step was to make the layout presentable. Although the ply outer skin could have been varnished, after a discussion with the wife (the layout will sit in the dining room) we decided on the grey paint used for Slugworth & Co. This is actually Wilkinson's primer, so goes straight onto the wood, although visible areas got a rub-down with fine emery then a second coat, which gives a nice smooth satin finish. I also painted the rear of the layout, the lighting bar, the domestic fiddle yard, and even the backscene boards as it should give a better surface to stick the backscene to when sealed.
To be continued...
Sunday, 18 August 2013
Backscene and buildings progress
Also visible in the photo above, the centre ground has been raised a little and a sheet of brick embossed plastic is being painted to represent the block-paved area used to stack the finished concrete products. Really it should be a herringbone pattern but I've had to settle for a conventional brick pattern.
Friday, 23 September 2011
Cosmetics
Amazingly I found a matt-black emulsion paint test-pot (Crown "rebel") at my local DIY store (presumably for the Goths, but why would you need a test-pot to see what black looks like?!). All the exposed chipboard of the box sides where it has been cut had already been sealed and smoothed with PVA glue. So the edges, and any other exposed card areas, or marked external surfaces, were touched-up with the black.
Other than the two holes in one end for the tracks, the main modification to the box was to cut out a section of the front. I've kept this to re-fit, using some small hinges obtained from Squires. The hinges are super-glued to the box and then track-pins pushed into pre-drilled holes via the holes in the hinge plates. The lid catch still works, the hinged front now makes the closed box much stronger.
Sunday, 7 August 2011
Making a stand
(1) tables at exhibition venues always seem to bow towards the middle, and as the table will probably be shared with another boxfile that could mean a serious slope to one end! and...
(2) a table is a little low for most people to view.
So it seemed to me that it would be worth making a stand to place the layout on.
And here is the result of the raid on the stocks of offcuts and recycled pieces of wood in the garage! It is simply 6mm MDF on some softwood ends, making a box about 2ft wide, 1ft deep. and 6 inches tall. It provides a flat surface for the layout, by adding packing under one end it can also be levelled, and has an open rear providing somewhere to hide the exhibition paraphernalia. The lamp used to illuminate the layout can be clamped in place too. (You can see here why I thought the gates on the cassette shown in the last post were necessary! At the time of this photo they had not been added).
This view shows the the lamp over the layout, it works well and gives a very good light. The extra 6 inches of height help with the display, without making it harder to operate or more difficult for children (and the disbled) to view. I might even stick some information about the layout on the front.
You may have noticed the backscene. My first attempt was to spray white over a grey background, with paper templates for hills etc being removed with each coat to give a "shadows in the mist" effect. Actually the effect was terrible! Fortunately my parents were visiting so I asked my Mum to bring her paints - she has got quite good at painting backscenes over the years! The cloudy sky works well with the flourescent lamp and the hint of countryside beyond helps set the farm scene.
Saturday, 23 April 2011
The end of the sky
I made the end pieces from some foam board, a sort of stiff but lightweight plastic board I got from the marketing department at work (it is used for promotional signs). MDF would have done just as well. As you can see I cut them to a curved top profile (while together so both have the same curve), this lessens their intrusion while providing an effective backdrop.
These pieces have to be removable of course. They attach to the lid by the simple means of a potruding screw that pushes into a slot in the lid, the slot is angled to help prevent the end falling sideways. A couple of pegs (made from offcuts of plastruct tube) are fitted into the bottom edge and locate in holes in the top edge of the boxfile ends. The photo below might make this clear! I also fitted magnets to help hold the ends in place, but in practice they have little effect. The result is that the ends are quick and easy to fit, and hold the lid in the vertical position effectively.
Friday, 10 October 2008
Backscene and factory yard
Mike Beard pointed out that the cobbles should run parallel to the tracks, however being a cramped and oddly-shaped site this would have been very fiddly to arrange, plus the track is not quite straight. However the cobbles are parallel to the buildings and those between the rails parallel to the rails, I think it looks OK. And I took great care to ensure the surface is just below the rail tops - even outside the rails! They were painted grey with enamels and then given a couple of washes of green/black acrylic, wiped away to represent dirt between the setts.
Both pictures show the completed backscene, using Townscene backgrounds. Some of the foreground buildings are mounted on card and stand slightly proud of the backscene proper. Any edges are blackened. They do seem to blend well with the buildings as I had hoped, although the town is looking larger and more important than I had envisaged!
Sunday, 14 September 2008
Let there be light!
The most obvious is the lighting. This consists of two 30W tungsten strip-lights inide the pelmet, as shown in the photo. The ply wasn't thick enough to screw in to, so I stuck them in place with a hot-glue gun. The tin foil (pre-crinkled to diffuse the light) reflects the light and prevents the wood getting too hot. I left the lights on for several hours and the ply was just warm to the touch. They are wired to an in-line connector so the mains lead can be removed, then to one 3-amp fused plug.
The lighting may be simple, but is very effective as the picture below shows. Tungsten light gives the impression of a bright, sunny day, but that matches the blue sky! Othe progress that can be seen is that the ground contours have been built-up, at the back using card to raise the houses and yard areas, and with expanded polystyrene at the front of the layout. I also carved drainage ditches into the cork beside the track. Although essentially a flat area, the subtle changes in level are important to avoid the flat-board look!
On Saturday I went to the Worthing MRC show in Lancing. You can see some pictures here: http://picasaweb.google.co.uk/campbellsonline/2008_09_Lancing#
There were some good layouts, some average and a few looked unfinished. Trade support was the usual Hornby and toy cars etc., no Squires this year, but I did manage to pick up some odds and ends - chimney pots for the station, some second-hand books, and another Townscene backscene. This has some house and shop-fronts that will enable the backscene to come together, so that is my next job.