Showing posts with label Hudson Hunslet. Show all posts

Monday, 22 January 2018

Thakeham Hudson Hunslet article

In print again!

Thakenham

The latest issue of Narrow Gauge & Industrial Railway Modelling Review has my article on building the Hudson Hunslet Diesel - a model of the prototype used at Thakeham. It's always an honour when my work is worthy of making it into print, and especially a magazine featuring such high quality modelling as this one. The editor, Roy C Link, has done a great job of presenting the article, and the rest of the magazine has some top class articles too.

IMG_1713

Friday, 28 October 2016

Thakeham Hunslet and preparing Thakeham for the return to EXPO

So last night, after some burning of midnight oil over the last 3 weeks, I completed the Hudson Hunslet.

IMG_1717

The last week has been painting and weathering - which I'll come back to in another post. The blue came out a little darker than I expected, but looks good, and I'm happy the loco is recognisable as the unique Thakeham example!

IMG_1713

The layout was of course completed years ago, but I have still made some minor changes. For example the old man walking his dog didn't really seem to look at home, and in dark clothes was easy to miss. I've since found this plastic figure, which I've painted up in brighter colours and equipped with a dog lead (brown paper!), I think she looks much more natural.

IMG_1711

I also wasn't really happy with the the tree at the front of the layout - a home-made effort, the shape of the trunk wasn't right. For speed, and frankly because it looked better than any I've made, I bought one at the Uckfield show to take centre-stage. My tree was moved in front of the engine shed, where it seemed more at home, and the weedy trunk and branches less obvious. While at it I've improved a few bushes and added some grass tufts.

IMG_1715

While building the loco I carried out some clearance tests - fortunately the cab missed the bridge handrails (not by much), and fitted the buildings. Some plastic was removed from the tipping mechanism, but the main issue was the long overhang of the cab meant the wagons stopped short of the tipping dock. So the track needed extending about an inch. The rails were unsoldered to slew them parallel to the "wing" of the layout, the last sleeper removed, and a piece of copper-clad inserted extending all the way to the end of the new additional length. I've soldered rails on too, though I'm not sure they are needed - it's the overhang that's the issue. A new and more substantial buffer stop was soldered up and a foam block protects the loco. The copper-clad track is self-supporting but I added a block of wood to protect it.

IMG_1714

I've even made a few extra sand "loads" for the wagons, and adjusted the collecting bin for them. So other than a few last-minute checks and packing up, I'm ready for EXPO-NG tomorrow. If you're there do say hello, you'll find me opposite Narrow Planet, just round to the left as you enter the hall.

Friday, 21 October 2016

Thakeham Hunslet - Adding The Details

After a few long evenings I've finished the Thakeham Hunslet ready for painting.

IMG_1708

One problem I had was fixing the chassis. At first it was a tight fit where the motor fits through the footplate, but that was working loose and the bolts that held the chassis together were holding the footplate up, so it wasn't really held securely. I made up plastic ends to the chassis that are held on by the bolts as well as epoxy, these not only provide a platform for the body but have "wings" that allow holes for securing screws. Under the footplate more plastic was added to rest on them, and allowed a couple of self-tapping screws to take hold. Result, it may be crude but the chassis is secure!

IMG_1703

Up top, I've got rather carried away with the detailing. Having such good reference photos it was hard not to, and with such an open bonnet area the detail can be seen, so bits of plastic, microstrip, wire, etc. were used to represent the visible parts. The castings for the radiator, engine, clutch, fuel filter, and coupling block have been used from the kit, but the bonnet had to be made to fit.

IMG_1706

I even reproduced the levers and rods that form the modified cab controls. The kit does include the controls for the "standard" loco as built, but the modified Thakeham loco controls were easier to make from plastic and wire. So the driver has hand throttle, clutch foot pedal, two levers to select gears and a ratchet lever for the hand brake.

IMG_1707

Engine bay details added include the starter, alternator, and batteries, though the latter are separate for ease of painting. I've added some rivets from glue, though they may be a bit over-size. They aren't too obvious though, like those on the prototype.

Last week I was discussing the model with Chris Ford, and whether I could find a suitable driver. The next day he passed me some figures. As he'd predicted, the plastic figure was somewhat of a midget, but this whitemetal chap looks just right - though being so far from the wheelbase I was worried about weight distribution. In fact the engine, radiator, coupling and other castings make the front so heavy (OK the bonnet is stuffed with lead too) that the addition of the driver, even so far back, nicely puts the centre of gravity between the wheels. He's got a pin up is posterior though, to make sure he doesn't slip off the seat!

Wednesday, 12 October 2016

Thakeham Hunslet Progress

Earlier in the year I mentioned starting on a model of one of the Thakeham Hudson Hunslets, using the Nonnesminstre kit as a basis. I'd prepared a motor bogie, and assembled the frames and footplate. In July I managed to take measurements of the prototype thanks to the helpful folks at Amberley.

Then, out of the blue, I was asked if I could take Thakeham Tiles to EXPO-NG as another layout had pulled out. Since Thakeham was built for the EXPO Dave Brewer challenge three years ago I'm delighted that the organisers think it worthy of showing again, in it's own right, as it were. However it struck me that if I was going to build a Thakeham loco to run on the layout, now is the time!

IMG_1644

So the dimensions were translated to a scale drawing, albeit at 1:40 scale to match the kit (slightly over scale for 1:43) and a couple of tweeks to match the kit frames. Then it was time to start cutting plasicard to see if I could get the cab looking right. I find calipers invaluable for marking up plastic; as well as setting and transferring measurements, they can score a faint mark which with pencil rubbed in, becomes the cutting guide.

IMG_1646

The cab sides are 20 thou plastic with the roof, floor, front, and rear from 40 thou. The windows were a challenge, the beading is formed from micostrip, which is then shaped with a fine blade and emery paper to give a rounded appearance. It's a little over-scale but they are a distinctive feature so needed to be present. Glazing has been cut to fit, and put away for later. Getting the tapered front to the cab to fit together was tricky too.

IMG_1648

The next challenge is the bonnet. The prototype has an extended bonnet from the original loco, so the kit component wouldn't work. An inverted tray was made from 40 thou plastic, with a triple layer top for shaping, and internal bracing. Once the curve looked right, a sheet of 10 thou plastic was fitted over, warm water helping the shaping. As with the prototype this finishes short of the cab, sitting on the fuel tank.

IMG_1647

So the outline shape comes together, so far it looks OK but there are a lot of details to add. Nothing is assembled yet.

As a reminder, here's the prototype. You can see how open the internals are, with just some linkages and cables filling the space behind the engine, which adds to the challenge of a convincing model!

DSCN5655

Wednesday, 1 June 2016

Preparation, Preparation, Preparation

Much of the work involved in making a model is preparation rather than construction. For example, I've made a start on an O14 Hudson Hunslet kit by Nonneminstre Models - which involves preparing the white-metal castings for the chassis to ensure a good fit before assembling them, and filling any gaps. As the prototype chassis is a single, massive casting rather than the five pieces of the model, I've taken the unusual step of giving it a coat of primer before proceeding further with the build so that I can see any remaining gaps and imperfections, and treat with filler and emery paper.


I'm planning to adapt the kit as per the Thakeham locos, but while I have plenty of photos I don't have dimensions yet, so this may sit on the back burner for now.

At the same time the Hudswell Clarke 009 loco has been primed. First I blackened the nickel-silver which both helps paint adhere, and disguises any wear or nicks in the paint along the edges. Then any gaps are filled - I find Squadron Green Putty ideal - before the model is cleaned. A couple of coats of Halfords etch primer are then applied, and once hardened the model is examined and any visible gaps or imperfections seen to with more filler and emery paper - before another coat of primer.


Meanwhile I've started yet another loco kit - of which more another time. However the build starts with preparing the N-gauge loco chassis - which means dismantling it completely, and chopping it up. As you can see that means a fine mess, I hope I can get it back together again - and working!


Monday, 27 October 2014

EXPO Narrow Gauge 2014

So once again EXPO-NG proved to be a highlight of the year for any narrow gauge enthusiast, with a superb range of quality layouts and lots of specialist trade.

This year I was helping the Sussex Downs group with the 009 society stand, which entails a little demonstrating and a good deal of chat (I got half-way through a wagon kit, which is about right!), I got the feeling there were a lot of visitors new to 009 modelling. Most had joined the society but had the usual questions about what to buy, what couplings to use, and so on; I think this is evidence that recent new products, promised releases, and publicity about 009, are increasing interest in narrow gauge modelling.

We managed a good turn-out to man the stand so there was plenty of time to mooch round too, and meet lots of familiar faces. I spent a little money too, mostly in the society sales room (though by the time I got in there in the afternoon it was starting to look quite bare!), but you're probably interested in the layouts. This being 2014 there was an emphasis on O14 layouts (geddit?), which was great for me as it is one of my favourite scales.


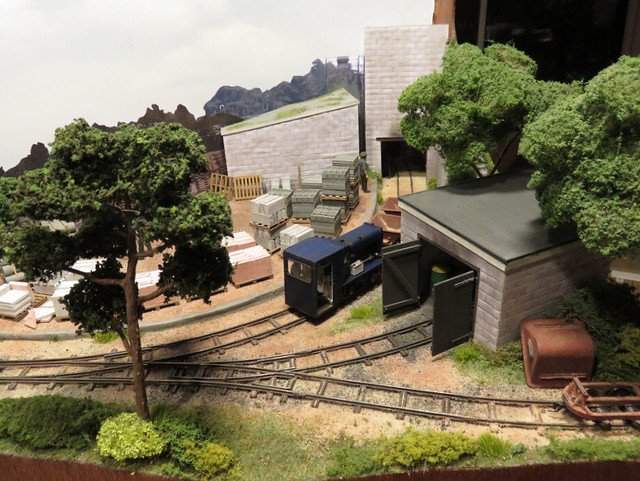
I'd been following the build of Abbey End by David Malton on the NGRM forum; it's a model of the end of the Abbey Light Railway in Leeds, a passenger line which sadly closed a couple of years ago that David used to work on. The layout is simple but brilliantly executed, capturing the peaceful woodland brook-side setting and with models of the actual locos and stock. David has presented the layout attractively and professionally too, it deserves to do well on the exhibition circuit.


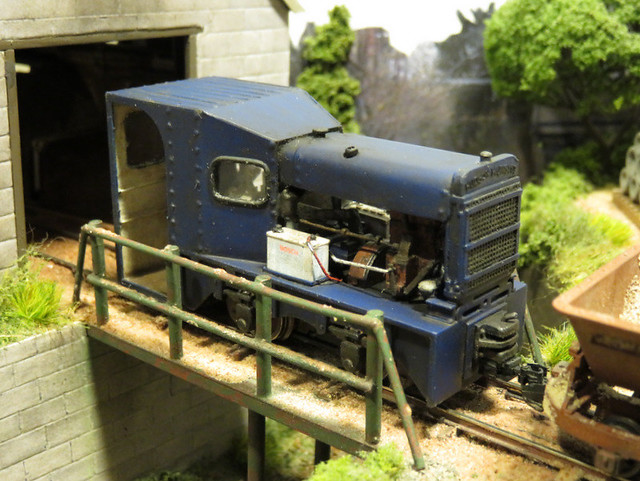
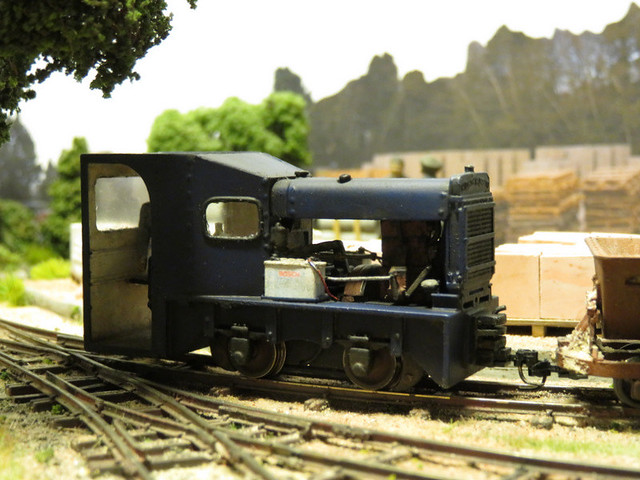
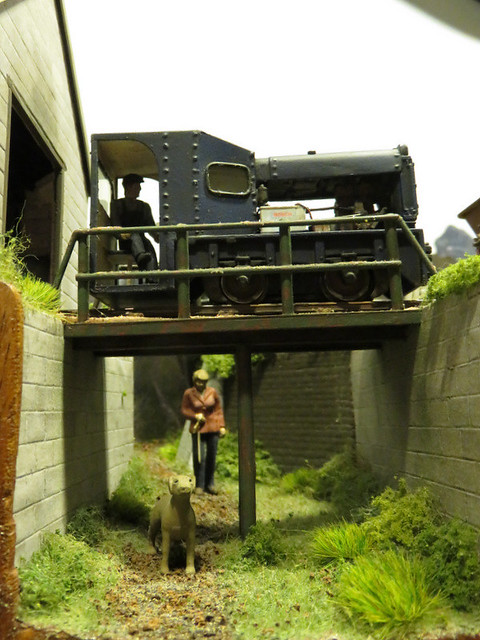
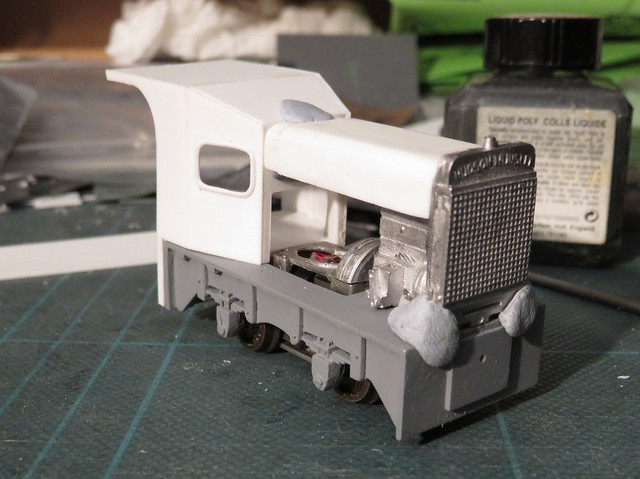
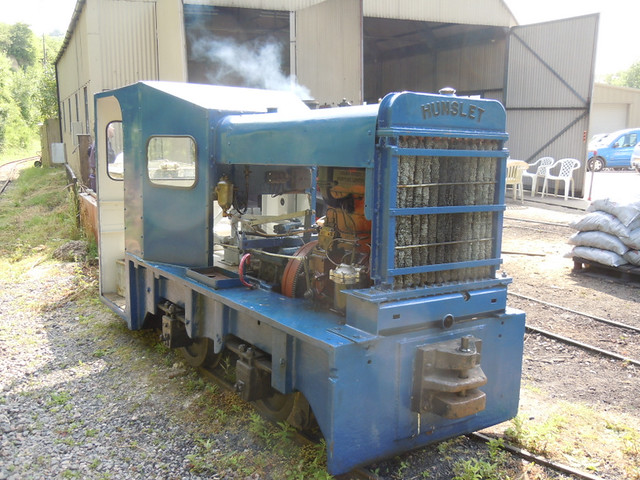
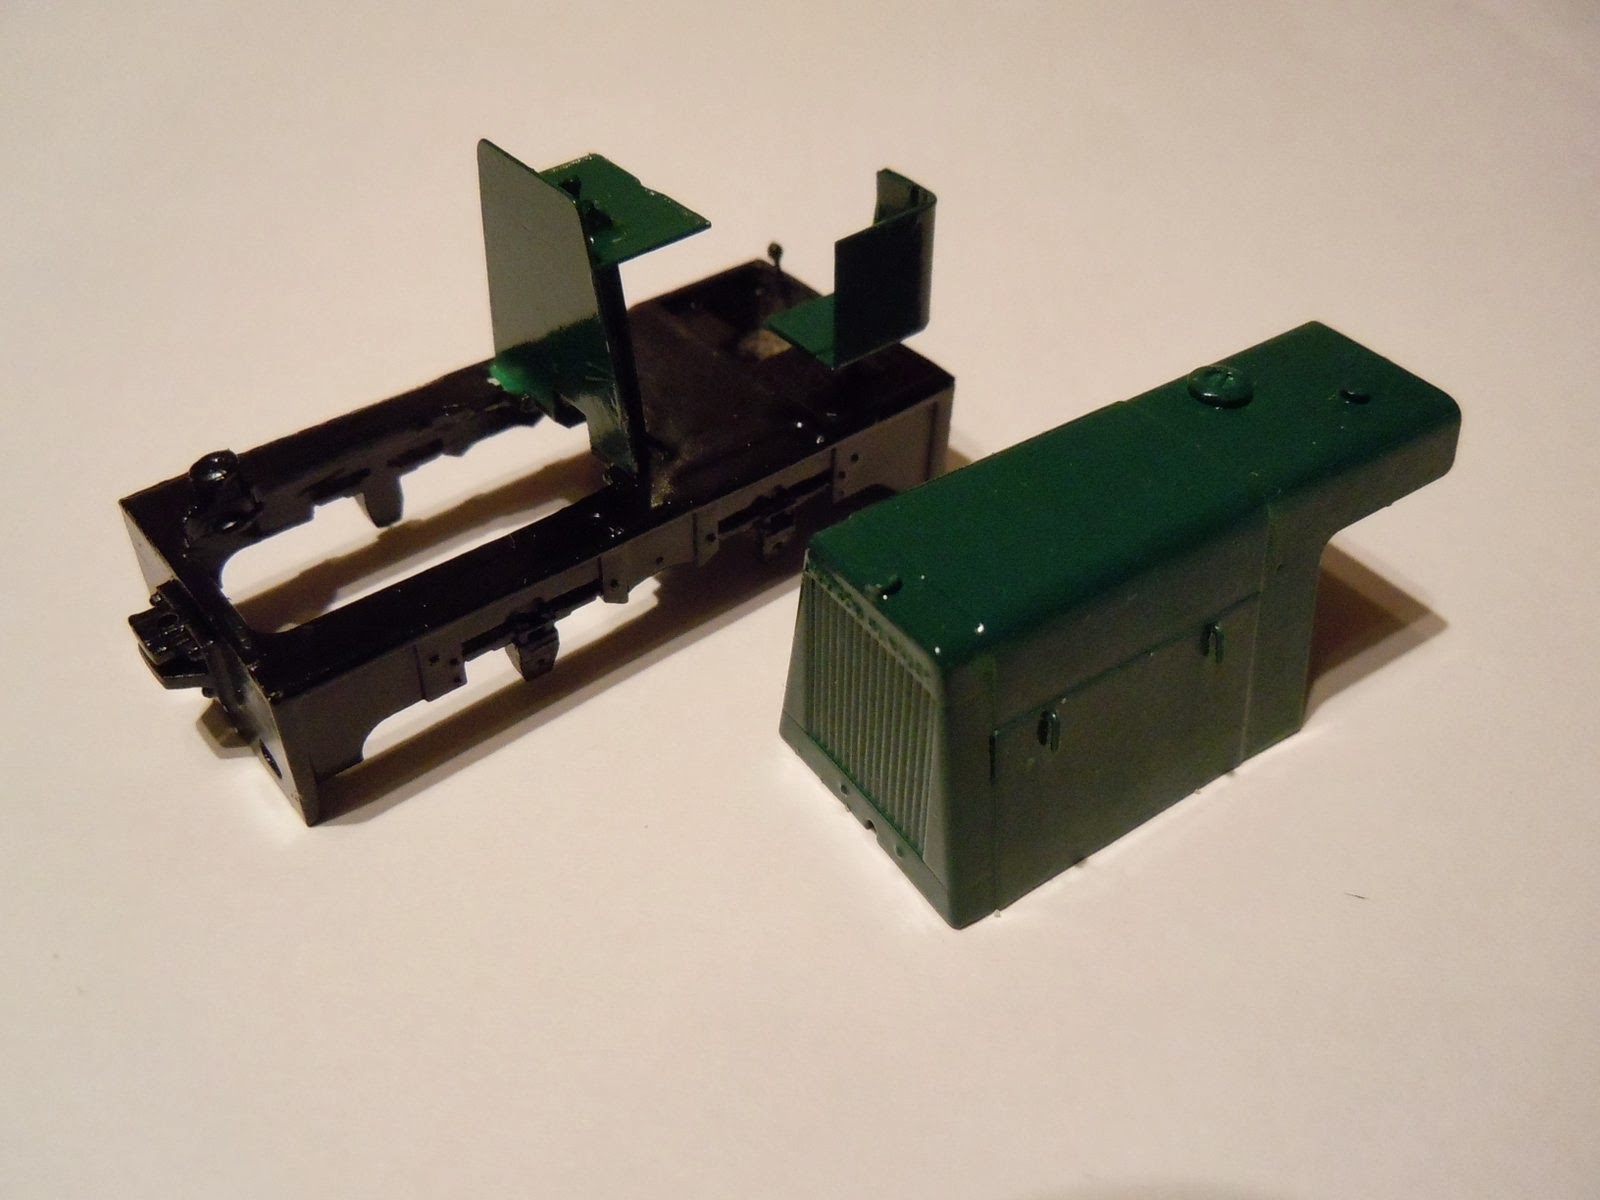
David had commented he had concerns about the reliability of his loco fleet, this being his first exhibition, so I offered back-up power in the shape of my Hudson Hunslet from Thakeham. I'd fitted some Bemo couplings in place of my Microtrains, using the same pocket and screw, which allowed it to work with the Peco couplings David uses. As it happens his loco stud performed fine, but it was nice to see David using the Hudson too.


Simon Hargraves' South Brierly Sewage Works is an old layout by contrast, one of the first O14 layouts on the exhibition circuit, and based on a prototype which was featured in the Roy C Link handbook. It's got a lot in common with Thakeham in size and operation, and was also built as a competition entry! No surprise then it's my kind of layout.


Rhyd by David John is a different kind of O14 layout, and clearly captures the spirit of the Welsh Slate railway in the Ffestiniog area. A brilliantly modelled scene and top quality stock too, and since the owner lives waaay up Scotland it's unlikely to make many shows in the South, so it was good to see it.


John Clutterbuck is a bit of a pioneer and evangelist for O14 and the 'Review has often featured details of the construction of his long-term layout project, the Pentewan Light Railway. John has vowed this is the only outing for the layout so it was a rare privilege indeed to see it (well, the part of it shown) in the flesh. I love the way the railway winds through the bleak Cornish moorland, giving a real sense of distance, while the modelling is to the highest standard possible.


Not all the layouts were O14, but several were unlikely to be seen again. Another superb layout that caught my eye was Regionale Tramweg Moulburg in HOe by Jan van Mourik, from the Netherlands. It packed a lot in - town, harbour, two stations, goods yards, engine sheds... but was full of character and detail.


Edge, the latest 009 model by fellow blogger Chris Ford, on it's one and only exhibition before passing to it's new owner. Chris built the layout to illustrate an up-coming book but it is to his usual high standard, perhaps the new owner will exhibit it?


Finally this was the last outing for Pagham Harbour, the well-known 009 layout by Richard Glover. It's featured in the 009 news many times though it's 3 incarnations over the last 20-odd years, and it's peaceful character has been widely admired. Indeed it won two awards at EXPO-NG! Like Edge it has now been sold, so perhaps it's time is not yet over.

Well I've run out of space but do explore further, my rather large photo collection from the show can be found here.

Sunday, 13 October 2013

Hudson Complete

The Hudson has also been making slow but steady progress between work on the layout, but has gone fast enough to catch up the O&K while in the paint-shop, such that the final weathering and varnish was carried out on both at the same time.

My deviation from the instructions left me with the body and footplate/frame as separate assemblies, which made spray-painting easier! The green is Halfords spray enamel as I used on the Lister a couple of years back and is rather shiny, the can of black I had in also turned out to be gloss. Ho hum.

 
I wanted this loco to appear much newer and less worn than the O&K, to reflect the fact it would be about 20 years younger. Still, it can't be shiny on an industrial layout, so the paint was given a good burnish with a fibreglass pencil, then a coat or too of well thinned dirty paint. A dusting of weathering powders and a coat of Testors Dullcote matt varnish finished things off in the usual way.

 
The figure is from S&D and meant as a tractor driver, with legs wide apart. His left arm and head were supplied separate allowing their position to be chosen, but he's still had some serious surgery to bend his right leg in, while his left was amputated at the thigh to twist it to the position seen here.

 
Picking out the control knobs in red helps them be seen - black is more likely though! The epoxy glue knobs have come out very well. I did swap the handbrake (right) and reversing lever (far left) as I thin the instructions have these the wrong way round.

 
Both locos took a little fettling of pickups and body retaining screw tightness (not sure why) to get them running, but now both seem to run well. The O&K has a slight gait and is rather noisy running one way, but seemed to improve with running - I wish I had a continuous run to run them in!

 
Posted by Picasa

Wednesday, 4 September 2013

Hudson Hunslet Build Progress

While most of the focus has been on the layout recently, I have made occasional progress with the Hudson Hunslet kit. I managed to fold up and solder together the bonnet and radiator weeks ago, I was very pleased to get this right as it is a tricky shape, the two parts of the bonnet are partially overlapping and partially aligned.

 
The side panels are then attached, along with the handles/catches at their top. As you can see in the picture I used a piece of card with notches and a strip of masking tape to hold the handles in position, some solder had first been applied to the bonnet side, the iron was then applied to the inside of the bonnet. I was very relieved the rest of the soldering didn't fall apart! More tricky was the rear panel and angled control panel as seen below - a picture which reveals how untidy the soldering is inside the bonnet! The sanding gear control lever can be just seen protruding from a slot.

 
At this point I was diverging from the instructions. I tried soldering the main frames to the footplate, and managed to get one end on, but I wasn't going to get them straight and perfectly aligned when soldering, and my iron isn't really up to a good job. So I continued making up the body, attaching the seat and rear bulkhead (with sand-pipes) to the footplate, and the gearbox with controls as a separate unit. This is as far as I got with soldered construction:

 
Here's a close-up of the gearbox and controls, sorry it's a bit blurry but this assembly is about half and inch tall! I'm rather pleased with the soldering. The instructions suggest soldering a handrail knob to the end of each lever and filing to a ball shape, but I figured life is too short, so I simply added a blob of epoxy glue. They may not be perfect spheres, but they should look fine when painted. I now think the long lever to the left (the reversing lever) should be the brake lever, and that the instructions have the wrong part-numbers, but I didn't realise until too late.

 
The frame was finally assembled using epoxy glue. Purists may sniff at this but if Jaguar and Lotus can stick their cars together I'm not worried, it will be plenty strong enough given the surface area to bond. It was also easy to do without burning fingers, and with a few minutes to adjust until everything was aligned. At this point I was going to glue the bonnet in place, but then had a better idea...


Posted by Picasa

Sunday, 9 June 2013

Scary Chassis Stuff

The scary part of the Hudson Hunslet kit for me is building the chassis. For the most part I've used commercial chassis under my locos in 009, and the two previous 014 locos I have built have had pre-assembled chassis blocks requiring very little work. The chassis in this kit though comes... well, flat packed!

The etched Nickel Silver parts assembled reasonably easily, and soldered together as square as I could (using the inside of a square). The sand-pipes were somewhat fiddly, and I think they are a bit short, but eventually I got them all soldered in place. So far so good!

 
At this stage I masked the bearings and applied a little primer to any parts that might be visible later.  The instructions suggest the brake-gear could be made removable, which I thought was a good idea as it makes painting easier, and avoids soldering to a completed chassis. Soldering the nice brake-shoe castings to pieces of wire was fun.

 
The next stage was assembling the wheels and gears. The idler gears are held in place by small brass collars which need super-gluing to the shafts, as the instructions say "do not allow the glue to wick along to the gear"! After a nerve-racking few moments, somehow they all still rotate. The axles need pushing through the wheels and drive gear while being passed through the chassis frames - yet another tricky job! I used small pieces of lead as packing while tapping the axle through. I have to admit the wheels are not entirely perpendicular to the axles though.

Having achieved a rolling chassis it was time to attach the pick-ups. As with the O&K I decided to substitute the wire provided for phospher bronze-strip, this meant attaching the small pieces of PCB  to the chassis side rather than on top of the sand pipe bracket as instructed, but that was easy enough. Finally the motor is attached and wired to the pick-ups.

 
To my amazement the chassis not only works, but runs smoothly and sweetly! The gears will get a drop of oil in due course, and of course the body weight will help, but even without that performance is good. The photo below shows the brake gear loosely fitted, after painting a drop of epoxy inside the frames will secure them.

 
So, really scary bit completed, and I think I can call it a success!
Posted by Picasa

Wednesday, 15 May 2013

Something Shiny!

My wife and I recently celebrated 10 years of marriage. Apparently this is traditionally marked with a gift of Tin, so I was thinking a container of biscuits would do the job, however I was informed that something smaller, shiner, and much more expensive was required if I wanted to get to 11 years.

The bonus was I was also given something small and shiny - not so small or quite as expensive(!) but to my mind much, much more exciting...

 
Opening the box reveals a very flat-packed kit for a Hudson Hunslet diesel. This will be perfect for Thakeham (there was one there) if I can get it built in time, and alongside the layout, for EXPO-NG. However this is easily the most complicated and scary kit I have ever had!

 
Posted by Picasa