Showing posts with label Eggerbahn. Show all posts

Tuesday, 5 November 2013

A collection of projects

Since we are expecting to move house soon I had cleared away all my modelling materials and most of my tools into boxes, I even finished Thakeham 3 weeks before EXPO to allow time for this. But as is the way with house moves it seems we are still some way from the big day, so a box was reopened and some projects dug out.

 
Bottom left is another Egger coach grabbed at EXPO so I can increase my rake to three, or run a second mixed train (Awngate only fits two bogie coaches).

Above that is a Wantage Tram etch, along with a Halling chassis (top left) I got to go in it. However the Halling doesn't fit as it is too long, a shame as they are superb runners, so I have other thoughts developing to use that. Meanwhile I picked up a Meridian MPD18 chassis kit at the Convention.

Bottom right is an impulse buy from EXPO-NG, a WW1 Simplex should fit Awngate nicely. My son wants me to build the full armoured version but I'm leaning towards protected. This was bought with the MPD18 chassis to fit - but this time a Mk2 version despite being bought just a month later than the first I bought, hence the different packaging!

So there is plenty to get on with. The coach is probably the easiest having done two already, and the Simplex if a "proper" kit so should be reasonably straightforward, but I'm keen to start the tram loco to have something a bit different for Awngate, even though it may be the most complex project here.

So here is the MPD18 Mk1 chassis! It proved fairly quick to put together, though being tiny it is rather fiddly. The etch fits together very cleanly, I'm not convinced by the motor mount but it seems to work. I'd rather have larger wheels, these are just wagon or pony-truck wheels and I think they'll struggle to pick up power well. The axle is small too,

 
A couple of tips to anyone building one:
- Two brass tube sleeves are supplied to allow the worm gears to fit the smaller diameter axles. The instructions suggest drilling holes through the sleeve tubes to allow the superglue in to attach them to the axle, this sounded fiddly so I simply cut across the tube with a razor saw until a hole appeared.
- The pick-up on the insulated side is supposed to be fitted under the chassis by gapping the tiny PCB and soldering the upper half behind the lower part of the chassis side. I found this impossible, it would have been easier before assembling the running gear into the chassis. But then I realised I didn't need to bother as it could be superglued to the outside of the chassis and work just as well!

 
Considering it's tiny size and it is the first 009 chassis I have ever built (other than a Salford Models Hudson diesel which I failed to get working as a teenager) I'm rather pleased. It seems to work - but only with a finger on it, as it is too light to pick-up power! I need to add more weight to properly test it.
Posted by Picasa

Saturday, 20 April 2013

Front Page News!

 
When I posed my newly-built train on Chris Ford's layout at the Haywards Heath show, Mick Thornton (known as the Roving Reporter within the 009 society) was keen to get a picture. I thought it might get into his photo-report in the 009 News, but it is a real compliment to see it make the front cover!

Also in the News is the news that Tom Dauben and Steve Fulljames will be jointly taking over the editorship - I'm sure they'll do a great job!
Posted by Picasa

Monday, 18 March 2013

Larking Around in Haywards Heath

Saturday saw the Sussex Downs 009 group host their Biennial "member's day" exhibition in Haywards Heath. The club's own layout, the Upsan Downs & Everleight Railway, was assembled for the first (and quite probably the last) time as a 50ft x 10ft L-shape, achieved with the modular format of the layout and arranging the "universal" fiddle-yard in the centre. Parts of this layout are 30 years old, but it is superbly detailed. I spent most of the day operating the Upsan Quay end, seen here.


There were plenty of other layouts, some by members, some by previous members, and some by friends - some even in scales other than 009! John Thorne's Purbeck was voted favourite by the public ("Best Unfinished Layout" - because no layout ever is!). The show went well, plenty of visitors (much better than 2 years ago, perhaps due to a better venue and date), excellent catering, and a good atmosphere.


Chris Ford had his excellent Tal Coed layout on display - recently featured in Railway Modeller, and the first time I had seen it, I can say it is a superb scene but much smaller in reality than it looks in the pictures! Chris had suggested a double-header to compare Skylarks, so having bodged a suitable coupling onto the rear of mine we gave it a go. The Kato and Fleishmann chassis ran at very different speeds, and that train doesn't really warrant a double-header, but they look pretty good together I think!


I also couldn't resist posing my Skylark and the Egger-bash coached on Tal Coed for a photo of them in the countryside. This is a fake though, although these are not large coaches they are too big for the clearances of Tal Coed!

Anyway, for the rest of the photos and the other layouts, click on the link below:

Haywards Heath Sussex Downs 009 Group 2013

Thursday, 14 March 2013

Skylark and Egger Coaches Completed

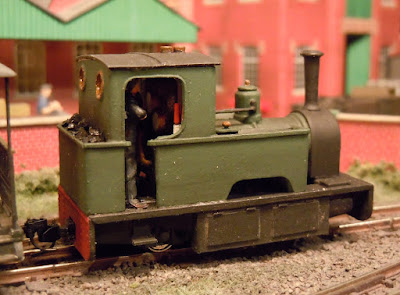
So here are some pictures of the completed Skylark loco and coaches. Well, I need to add some passengers at some point, and maybe one day I'll get some transfers to add lettering. I'm pretty pleased with how they turned out - the modifications made to the Eggerbahn coaches have made a big difference to their look, the tram skirts on the Skylark look convincing, and by my standards the painting and weathering has come out well. Most of all both the loco and the coaches look right at home on Awngate, together or with my other stock, and fit in with the tramway theme.
       
Don't forget the Sussex Downs 009 group exhibition this Saturday in Haywards Heath. I'll be there helping out on the club layout or one of the other member's layouts, so do say hi. More details here.
Posted by Picasa

Monday, 11 March 2013

Painting, Windows and Finishing

I'm not great at the painting, but being a mug I decided a two-tone livery would look best on the coaches, and brush-painting that took me a while! That was followed by a little weathering with dirty washes and weathering powders. The windows are the original Eggerbahn mouldings which have a ridge round each window, the only way that was going to look right was to paint it to look life a frame. More fiddly work with a brush, especially with the bars on the end door windows!

 
At Brighton I had picked up a bottle of "Micro Kristal Klear", which is a PVA-like glue that dries clear and does not mist plastic glazing. This was ideal for sticking the windows in, once in place the seat backs were stuck in place that hides the bottom of the glazing. The other feature of the glue is that it can be drawn across small openings to form the glazing, which I have tried with the Skylark spectacle plates, it can be seen drying in the picture above. If it works well I've got quite a few locos with unglazed spectacles...

 
Despite my best efforts keeping all the bits together I found I'd lost the glazing for the guard's compartment doors. I cut new glazing from clear plastic - set in an part open position, as all the other opening windows are open, so it would look odd if they were closed. A piece of microstrip finishes the frame.

 
Having added coal to the bunker and a driver figure inside it was time to stick the roof on the Skylark. The curvature of the plastic roof is slightly too much, so here it is being held in place while the epoxy dries!
Posted by Picasa

Wednesday, 12 December 2012

Putting the brakes on

Some of you may know Mike Beard, who has been describing on the NGRM-Online forum the re-build of his own Egger coaches, a more extensive rebuild than I have tackled. He mentioned to me a while back that he was looking at 3mm Scale Model Railways products for detailing the coaches. But it was a pleasant surprise to find a pair of brake handles in a Christmas card - thanks Mike!

 
Of course coaches like this usually did have brake standards on their balconies. They didn't take much fitting, and as you can see from the rather poor photo below, they do add more interest to the end of the coach.

 
The size is spot-on too, so Mike was onto something looking at 3mm scale, but surely the poor 3mm scale people would need a stepladder to put the brakes on?
Posted by Picasa

Sunday, 7 October 2012

Coaches - Final Detailing

The last few evenings have entailed the fiddly detail work that complete the coach, it takes time but it is enjoyable and well worth the effort. As "freelance" coaches there is no prototype to copy, which means looking at photos of similar coaches to figure out what the details should be - in some ways this is more of a challenge than copying a prototype!

So the balcony railings have lost the spikes and gained a plasticard "wooden" rail instead, I've copied the prototype step from the last post to the other 7 corners, and made a stab at the under-frame truss rods. The vertical supports are in fact solid across the coach - cheat I have seen others do and is virtually invisible from normal viewing angles, while making them strong enough. The truss rods are brass rod with a short piece of wire insulation representing the tensioner.

 
Moving on to the roofs, I decided that oil lighting was the most likely and fortunately I had some spare Parkside Dundas sprues with some on. The take a little cleaning up but look OK, and save some fiddly work! Two per compartment looked far too generous so I stuck to one, and I quite like the unequal spacing on the brake coach.

 
A cruel close-up of the brake coach shows how the under-frame and steps look - not too bad I think. I'm particularly pleased with the detailing around the guards compartment door, hopefully it now doesn't just look like it was scored into the side of the body.

 
Another close-up showing the ends of the coaches, the steps, and buffer-beam overlay. I'm rather pleased with the way the balconies have come out. I've yet to fit the couplings - in fact I haven't cut the Bemo style couplings off one set of bogies yet.

 
Talking of bogies, they are too modern really but since they are barely visible I can't see the point of changing them. I've also omitted brake gear - I'm not sure what it should look like and most of it won't be visible either. I did think about fitting vacuum hoses but the castings I have domintated the balcony ends, I'll look out for something smaller. So for now I think they are about ready for primer, which will show up any imperfections.
Posted by Picasa

Thursday, 27 September 2012

Progress with the Balconies

The next challenge was to fit the balcony railings to the ends of the coach in a sturdy manner, so they don't fall off when handled. I also wanted to be able to leave the roofs off until the coaches are painted and glazed, so ideally the railings should be affixed to the body and chassis only. The solution I came up with is shown in the photo below: the


The bottom of the corner posts fits into "feet" on the steps, which should appear to be extensions of the end frame of the chassis. The tops of the wire corner posts bend through 90 degrees under the roof, they then bend downward into a piece of plastic fixed into the inside of the coach body. The photo below shows the recesses cut into the underside of the roofs to clear the wire.

 
I'm pleased with how the look with the roof on, and they certainly seem well attached - even at this stage, without glue. I'm still to deal with the spikes, they will be removed and replaced with a plastic strip representing a wooden handrail.

 
Also visible above is my "prototype" step. The original steps were too fragile and long gone, so I need something more sturdy, this "solid" plasticard step (which doesn't show up well in the pictures) is certainly solid, the issue is ensuring sufficient bogie clearance. With some trimming of the end of the bogie and careful position of the points the coach is easily able to negotiate 12" radius Peco points, so it looks like this should work.

 
Posted by Picasa

Sunday, 23 September 2012

Coach Balcony Railings

I can't put it off any longer - it's time to have a go at the balcony railings! I think these will be what give the coaches character, and it is important to get them right. They could also be rather delicate, so there is no real option in my mind but to make them from metal.

These are the component parts - the railings from the Scale-Link etch, trimmed as shown, and some brass wire.

 
I figured the only way I am going to get these railings straight and even, and them solder them together without suffering severe burns, was to use a jig. Nothing complex here, just an off-cut of MDF with some thin card (slightly thinner than the wire) stuck on. The wire is laid into each slot up to the stop, a steel rule used to hold it in place, and then it is bent down.

 
With the wire uprights in the slots and held in with blu-tack they are tinned with solder. A little flux paste is applied to the ends of the railings and they are lined up with the marks and uprights, it then just takes a few dabs of a tinned soldering iron to solder it all together.

 
The results I am pleased with - strong, square, and even, and more to the point, I've not gained a single burn. Since I took this picture the excess solder has been filed away, I think they should look quite neat once painted. One thing I have just thought though - spiky railings on a moving coach don't seem a good idea, do they?

 
Posted by Picasa

Saturday, 15 September 2012

Coaches back on the workbench

It may not have escaped your notice that this summer has been rather quiet on the modelling front, and the last few posts will give some reasons why! However I have managed to spend a few evenings getting back to the workbench, and the Egger OEG coach conversions. Nothing major to report yet, but I have done a little more work on the underframe, and added some longitudinal seating inside. Not visible here but I have also cut up the one-piece window mouldings from the original coach into pieces that can be fitted around the seats and partitions.

 
I have also been pondering how to tackle the end balconies. Thanks to Bernard Taylor via the NGRM-Online forum I have the fine etches seen below, from a Scale Link railings etch. They have the right feel for elegant balcony railings. I've also obtained some brass wire, already used for adding handrails (seen above) in the existing holes where the plastic gates located. I now have a plan coming together for how I'll make the balconies, but more on that next time...

 
Posted by Picasa

Sunday, 8 July 2012

Update From The Coachworks

So here's how the Egger Bash is coming on. I've created the brake composite by adding a door to the side and blocking up the adjacent windows as per the mock-up in the last post. This has worked quite well, the door window is exactly the same size as the other narrow windows as are both panels. The door itself is rather narrow in reality, but it looks OK so let's not be picky!


Also visible in the above photo is that I have cut away the chassis outriggers (which implied a welded steel chassis, out of character for the style I am after), and added a new frame. The body has also been raised by the addition of strips of 40-thou plastic, helpful as the H0 scale body is a little low for 00 scale people!

There is a double line of beading moulded into the body side, but along the bottom edge the lower bead is barely formed. So having deepened the side I used fine microstrip to reinstate the bead, which should hide the join too. This is quite difficult to see being white-on-white - I won't really know how well it has worked until the body is primed - but hopefully this photo gives the idea.


I've added some internal partitions...


...and started work on the balconies. These have a planked floor, but for some reason the outermost plank is much wider than the others, then there is a gap where the end fitted. I've narrowed the odd plank and added another of similar size, reducing the gap at the end too. The balconies will be critical to the look of the coach - they will be rather different to the original coach, and I have a plan forming!


Saturday, 30 June 2012

Egger-bashing

I've always rather liked the Eggerbahn "OEG" coaches, with their large saloon windows, end balconies and rounded roof-ends they have a feel of the Welshpool & Llanfair "Pickering" coaches. Being H0e scale they are somewhat smaller than the Welshpool coaches, but actually fit quite well with most 009 stock, and anyway smaller coaches make a small layout seem bigger! So I thought a couple of them would make a rather nice tramway-style train for Awngate.

For some reason these coaches sometimes seem to attract silly money on evilbay, but I had one I got from the 009 society sales stand a few years ago before prices rocketed, and picked up another at a reasonable price recently. Neither are "mint", having just one step each (they are rather vulnerable) so they are ripe for "bashing" into something more British-looking.


As you can see the first thing to do was to cut away the raised "OEG" motif from the side, a tricky job with much careful sanding to get the side smooth. The next step is to dis-assemble the coach ready for further work. The roof is glued on, one came off with careful leverage but on the other coach it seemed to have more glue - and when it did eventually come away it broke one of the windows with it. However, that may not be a problem...


While at NG South I spied some Egger coach conversions on Charlie Insley's layout, Winter Overcoates. As well as modifications to the balconies and underframes, and repainting into GWR livery (similar to the Welshpool coaches), one has been turned into a guards/brake coach.


Awngate only has space for two bogie coaches, and that doesn't leave much room for a brake van, so perhaps a brake composite would be a good idea? However I don't want too much of the coach given over to the guard, so having studied the Welshpool brake composite I have come up with this proposal:


Apologies for the basic MS-Paint doodle, I don't run to Photoshop, but you get the idea! Half the coach is still a Third class saloon (originally Second), then there is a small guards/parcels compartment with a single door, and finally a First class compartment. Perhaps a look-out ducket would add character, but it seems unnecessary and there isn't really space.