Tuesday 25 November 2014

The Train Set Runs!

I promised a picture of the board in the folded-away position, so here it is!


The protrusion into the room is quite small - around 12", and doesn't block the window. There's space for some storage underneath too, though admittedly it isn't pretty! The black strips you can see are foam pipe lagging, to soften the blow when crawling under the layout and coming up too soon!


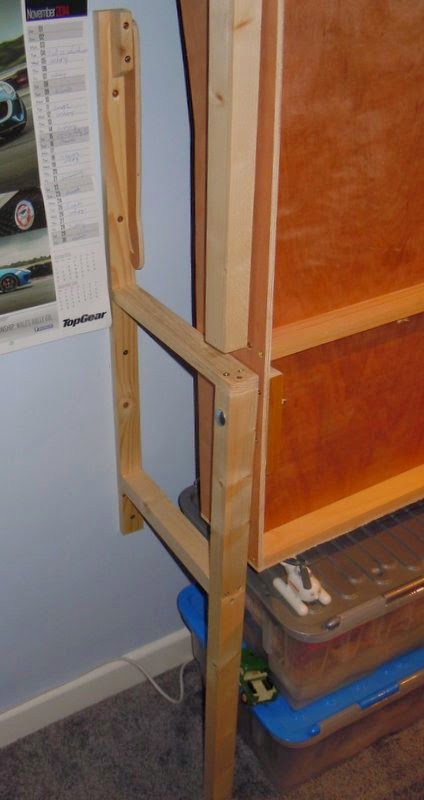
This is a close-up of the rear leg and the frame that holds it off the wall, the pivot bolt can be seen. Above it the front leg hangs, and in this picture the safety catch is not in use!


So base-board done there was pressure to lay some track! First the board was painted grey (with emulsion tester pots) where the track was to go, realistically ballasting isn't going to be high on the priority list but a grey base looks better than plywood. The end curves are 2nd and 3rd radius set-track and the points to the inner "loop" line are Hornby set-track, but the crossover and the branch to the upper level use Peco Streamline, and the straights are flexi-track.


There's no 3rd radius set-track point (a major omission I think), so I used a 2' radius streamline point which is a little larger in radius but flows well. The transition between point and straight, and the inner track at this location, were laid in flexi-track to match. Laying flexi-track and streamline points takes more work - trimming sleepers and carefully lining up the rails - but the result looks better and runs well too.

Much of the track came from my train-set around the loft of my parents house, it has since spent many years in their shed too, so was well tarnished, nothing would run on it. Some vigorous cleaning with a track rubber and fibreglass pencil brought back the shine and (more importantly) the electrical conductivity.

That last photo also shows the Gaugemaster double-controller set under the upper level. I wired one control to the inner track and the other to the outer track, and so we (just) had trains running by half-term!

Friday 21 November 2014

Installing the baseboard

With the baseboards made it was time to assemble them together. This is not a portable layout, so they were clamped together then big screws used to fix them. I guess it could come apart in the future, though I won't be worrying about splitting track or wiring at baseboard joins as that would significantly complicate things. The front and rear profiles were cut from two pieces of ply, and screwed in place spanning the board joins, hopefully making the whole thing rigid.

The next trick is to pivot the board to the wall. I made up a simple frame for each rear corner: a batten screwed to the wall with a weight-bearing leg spaced away from the wall about a foot. It is this leg that the layout is bolted to with 10 mm bolts and locking nuts. The front corners simply have a leg attached also with a single bolt, so they fold down the side of the layout as it goes vertical.


The layout down, the wall-battens can be seen against the wall but they don't carry the weight of the layout. The double-deck front part of the layout adds to the strength. Underneath the layout the step/box I made recently can be seen, allowing children to operate the layout and see what they are doing, as the lower track is about 3' from the ground.


A close-up of one of the hinged bolts, which is set about 10" into the layout. The leg is in the foreground, the wall batten can be seen behind.


I forgot to take a picture of the layout stored upright, and now I'm not allowed to put it away (!), but as stowed the board is allowed to go slightly past the vertical so it gently leans on the wall. A pair of risers on the side of the layout, topped with a piece of felt to prevent marking, rest against the wall. The main weight of the layout goes down the rear legs, but enough weight is over-centre pushing against the wall to mean it isn't going to fall down.


Nonetheless, just to make sure, a couple of catches are fitted to the wall battens. This simply pivot onto a protruding screw head at the side of the layout, and mean it cannot be pulled down.


I left a cut-out under the rear of the front station board, where the station will be at a high level, and fitted a shelf. My old Gaugemaster "D" controller, which my Dad bought me for my train-set when I was a kid, fits nicely into the gap. It is secured with some wood strips all round and above, and a couple of large washers. When the layout is stowed upright this is pointing down, so the washers are pretty vital!

Monday 10 November 2014

Trainset Mk 2

A few years ago I built a train set for my son, which folded to go under his bed. We moved house last year and in the summer I redecorated his new bedroom, and we got him a new bed - which didn't allow for the storage of the layout. In any case he was growing out of the simple train set, and it had some limitations including an over-tight curve on the inner track, so I had promised him a bigger layout in his new room.

We'd arranged the room so one wall was mostly free, and I figured the best approach would be a board that folded up against the wall. I'd suggested this for my Nephew and the concept (as built by my sister-in-law) seems to work well. I worked out the space available was about 7' 6" long by 4' 6" wide, leaving space to access bed and wardrobes even when the layout was down - which should allow it to stay up overnight. It's also a reasonable size for a layout I thought, so I doodled a few plans which he looked at, thought about, then he gave me his brief:
  • A double track oval for running trains - and including his sister or friends
  • A high-level track, ideally with bridge
  • A big station with lots of platforms
  • Goods sidings
  • A second station
  • A turntable and engine shed
Phew, a demanding customer! Now the space doesn't seem so big. A few more sketches later I had an idea, so tome for a full-size plan to check. Lining paper was laid out and boxes of track dug out the garage:


It's ambitious but seems to work, so I got a couple of 8' x 4' sheets of 9mm Ply. I'd worked out the main board sizes I needed so I could get the timber merchants to cut it, which also meant I could get them in the car! The layout is made of 4 boards: 2 of 4' 7" by 2", one 3' 6" by 21" and one 3' 6" by 14", and all include some aspect of double-levels. Mostly cross-framing is using 2" x 1" timber but ply was used on the more complex sections, with smaller timber for screwed joints. Ply fascias on the outside are considered part of the framing, and the extra depth adds strength, while the double-deck section should add rigidity along the length of the board too.


This took me quite a while, which is when I realised I'd never built a layout this large or complex before! Anyway here are the four boards laid out together, the rising line and upper section are clear. The front and rear fascias have yet to be fitted, as they will be cut in two sections and bridge the gaps between the three boards, adding rigidity. Note that the front has developed a slightly curved frontage to push the middle board out, easing the curve on the rising line and maximising the access hole in the middle.


Monday 3 November 2014

A hook and a step

Ahead of the Uckfield show I had a couple of jobs to do for Awngate. The fiddle yard had developed a slight sag, now it attaches to the layout by slotting it's extended frame into holes in the layout frame.


This was fine when the fiddle yard was a simple plank for holding a couple of cassettes, but the extension to add shelves to the back of the plank have added a significant weight. Perhaps the timber has shrunk or worn, but the result is a distinct downward slope.

My solution was one of those hooks usually used for holding gates open. With the loop on the layout the hook is engaged to create a diagonal brace.


My 7-year old son was keen to help out at the show, and I certainly didn't want to discourage, but the height of the layout (about 43" to track level) made it tricky for him to see well enough to position the trains. I did consider lowering the layout but it's enclosed presentation would make it difficult for other operators and most viewers, so a step was needed, and one big enough to stand on comfortably and move around.


I had in the garage some melamine faced 1/2" chipboard shelves surplus to requirements. A 12" wide 30" long shelf forms the top, another shelf cut in half lengthways made the sides, and some 6" wide shelf offcuts were used for the ends. I assembled them rather like flat-packed furniture with some left over wooden dowels set into holes locating the sides to the top, and "choc-bloc" screw connectors holding it together. This means no screws showing to the outside, though I can't say it is a terribly neat job!


The finished step in use at Uckfield - and it certainly worked, both for my son and other visiting children. It's plenty strong enough, though not exactly lightweight! When packed in the car it is inverted and used to store the stock box and other bits and bobs. At home it will have another use, though more on that another time...