Showing posts with label OK RLc1. Show all posts

Wednesday, 21 May 2014

Fettling Thakeham

In the run up to the SWING show I had Thakeham set up for a practice. I had forgotten how fiddly it was to load the wagons without derailing them! The magnetic stick works fine, but to get the load into the skip and off the magnet requires a steady hand and a careful twist of the stick. Then I had a cunning plan...


It's a simple sheet of black plasticard set carefully to just clear the back edge of the skip wagons, which stops them being pushed or tipped off the rails. Since the wagons are always propelled under the hopper there's no issue of clearance for other stock. However it does make the process of loading them much easier: the magnetic stick is used to push the load down into the sip, then slid forwards, as the wagon is held by the plastic the load is pulled from the magnet, and the stick can be lifted away.


Also while testing I was not happy with the way the O&K loco ran, it's always had a grinding noise when running in one direction and occasionally seemed to stick, so I stripped it down to apply drops of oil to the gears. The construction of the chassis means that without the body on the layshaft driving the rear axle (under the driver) is free to rise up. I wondered whether the body was not restraining it enough, so I folded a small strip of bass and superglued it into the recess in the top of the chassis so it holds the layshaft in place.


With the chassis now able to be tested without the body it ran smoothly, so I added the body, only to find it wouldn't then move at all! Slackening the bolts off allowed it to move, but the grinding noise was louder than ever, so it was clear the body was catching. There is a recess in the footplate to clear the worm gear seen above, using a burr in a mini-drill I deepened and widened it as shown. With the body refitted and the bolts done up tight the chassis ran without any grinding.


That said, it's still hardly a quiet chassis, none of my O14 locos are, due to the low gearing and metal bodies. The bigger wheels means it can do a reasonable speed without the motor screaming as the Lister (with similar gearing) does. But it does run reliably and slowly now, and spent Saturday alternating with the Hudson Hunslet running on Thakeham.

Sunday, 6 October 2013

Finishing the O&K RLc1

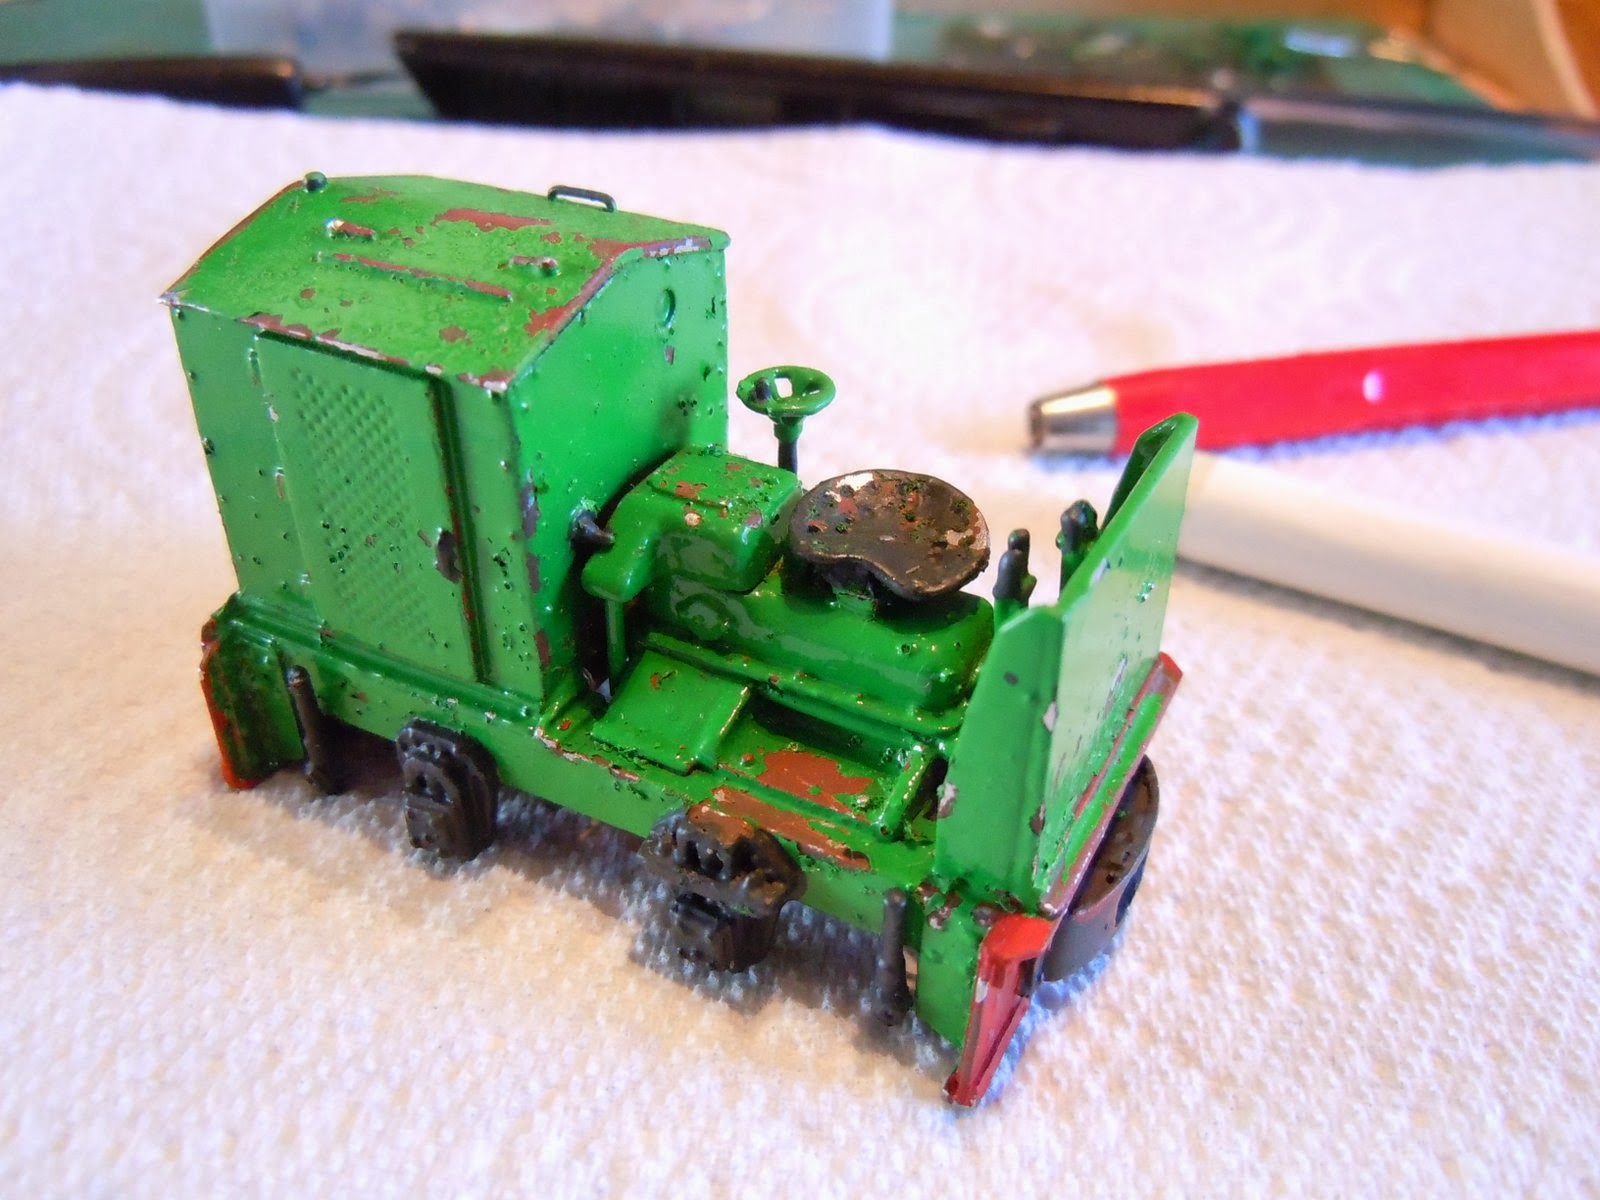
We last saw the O&K complete but in bare whitemetal. Painting started with a coat of red oxide primer, followed by a patchy wash of rusty brown, the buffer-beams were given a coat of red then masked off. I wanted a well-worn look for this loco so tried the salt over water again, plus a few blobs of PVA in places I wanted more rust.

 
The top coat was a light green enamel from Halfords. It took a while to get the salty bits to break away despite soaking the model in water, perhaps this technique works better with acrylics? The PVA was stubborn to remove too (maskol would have been better if I had any!), and so in a few places bare metal now showed through. Maybe an etch primer would have been a good idea too..

The green was also really very shiny, and rather lurid, in fact at this point I wondered if it were a good choice! So the panels were burnished back with a fibreglass pencil. Always do this over a tissue, afterwards fold and bin the tissue so you don't get bits of fibreglass everywhere, they are irritating if the get in your skin!

 
There then followed touching in the red bufferbeams, black details, and rusty red/brown over the rusty patches and any shiny bits. A wash of well thinned dirty brown dulled the paint further and collected dirt into the nooks and crannies, a darker wash filled the grilles. Finally a dusting of weathering powders and a coat of Testors Dullcote matt varnish completed the painting process.

 
The result is as hoped, a dirty and slightly rusty machine that has had a hard life, but still in use. The effect over the grilles didn't work as well as I'd hoped, but the final shade of green is rather nice. The driver is of an unknown source (from a friend) and isn't the most detailed, but is much better than the driver that came with the kit!

 
It's funny how you only notice things like the silvery hair and that small white particle on the footplate in the photos afterwards isn't it?

 
All looks good, though I admit I haven't actually had time to test it works since reassembly yet!
Posted by Picasa

Wednesday, 24 April 2013

Body building

Since my last post about the O&K and despite recent distractions (!) it has made surprisingly rapid progress. The body is not complicated, and with minimal cleaning up the parts they were assembled using Epoxy over the course of a few evenings. The most time-consuming job was opening out the coupler blocks and buffer beams for the Microtrains couplings, ensuring they will be at the correct height. These will be fitted after painting, as will the starting handle, to be attached on the inside of the rear sheet.


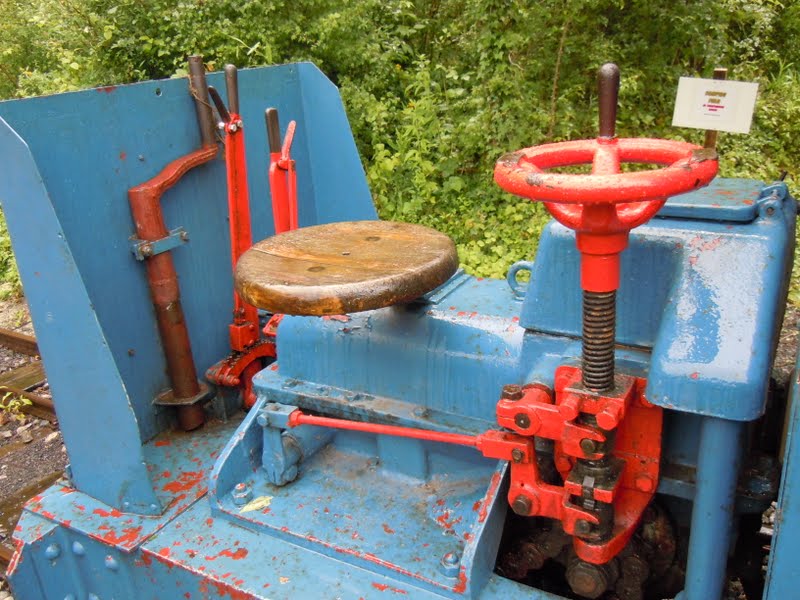
The kit instructions are very good and include black-and-white photos, nonetheless I have found it helpful to refer to my own photos taken at Amberley last year. There are several O&K's there, but this blue one is the prototype for the kit:


For more photos click here to see the set.

The next question - what colour should I paint it? I have a feeling these were originally supplied in red, can anyone confirm that? I'm not sure about that blue, though it is different and shows up the red controls well. On the other hand I have some of the green I used for the Lister left...
Posted by Picasa

Thursday, 11 April 2013

Better Pickups

I wasn't really happy with the wire pick-ups on the O&K, they didn't seem flexible enough to make good contact without applying too much drag to the wheels. So at Brighton I picked up some phospher-bronze strip, which is much more springy.

 
The strip was easily soldered to the PCB on each side, and with a little bending the pick-ups could be arranged onto the backs of the wheels without shorting on the block. The result makes much better contact than the wire, with far less friction, and from the test run I think it runs better too. Plus in my experience pick-ups on the backs of wheels suffer less from dirt build-up in use than those acting on the treads.

 
Posted by Picasa

Wednesday, 30 January 2013

Making a start on the O&K

With the weather still too cold and damp to start spray painting in the garage, and enthused by the Landswood Park article, I thought it a good time to start on the Nonneminstre Models O&K loco kit I got last year.

With the main parts spread out it is clear there is a fair amount of flash to clear up, and probably a bit of fettling to get the parts to fit together well. However the detail of the mouldings is as good as I have ever seen in a white metal kit. The same can't be said for that poor driver figure though...

 
However I should start with the chassis, which is supplied assembled without pick-ups, and for 16.5mm gauge. The instructions say to push the wheels in for 14mm gauge, easier said than done but I found placing a wheel face onto a piece of wood with a hole for the axle, and hitting the other end of the axle with a hammer, got the job done! I have a KB scale gauge which includes a back-to-back check. However the axles were then a very tight fit, so I found it necessary to file the sides of the chassis block very slightly.

 
There isn't space for the pick-ups to go behind the wheels at 14mm gauge so they act on the tread, so it is suggested to fit them to the underside of the chassis, though I didn't want as they may then be visible. The instructions do say "We reckon those working in 14mm gauge are wee bit able!", hmm, thanks for the confidence but I'm not so sure.

The pick-ups are made by soldering springy wire onto a piece of PCB stuck to the chassis side in such a way it won't be visible after assembly. The instructions suggest soldering one side direct to the chassis, but I didn't want to solder it to white metal. I wanted to be able to disassemble the chassis without removing pick-up wires, so a notch was cut into each side of the chassis block so the wires can route to the motor through the same hole in the footplate.

 
With the footplate and bottom keeper plate attached the chassis can be test run. The first attempt didn't go well, the motor couldn't seem to overcome the resistance of the chassis. So I stripped the chassis down including removing the motor and layshaft, and spent some time filing back the chassis block and adjusting the pick-ups until it could be freely rolled. The second test was much better - now running smoothly - although it needed a lot of weight to make the pick-ups work well (although the track was dirty too!). With all that gearing it will be another slow runner...

 
Posted by Picasa

Saturday, 7 January 2012

Happy New Year!

Since this is the first post of 2012, may I wish a Happy New Year to all readers. I know we are already a week in to this "Olympic" year (does anyone else think they will be bored of the Olympics before they even start?), but I have contracted my usual post-Christmas cold, leaving me with little energy for picking up the modelling of an evening. And anyway, the way I am coughing now, holding a scalpel would be dangerous! Fortunately for you the common cold is not a virus that can be spread via the internet.

Last year proved a busy one for my modelling, as I couldn't resist entering the EXPO-NG Dave Brewer Challenge, and a year ago I was hacking about a box-file and building track for the first time. The whole project took me in new directions and was great fun, and the result  Landswood Park even won the competition! While I was building that I also had an invitation for Awngate to be shown at EXPO-NG too, which as one of the biggest NG shows in the UK, was a great honour. So I also spent some time upgrading and completing some of the scenics, and finishing some stock, and of course the day of the show was rather busy! The concentrated effort to have both layouts ready resulted in a lot to report on this blog, with my busiest year yet averaging 5 posts per month.

So what will 2012 bring? Well probably not quite so much modelling activity, but Awngate is booked to appear at Narrow Gauge South at Winchester in April (another of the big NG shows!), and I have a few jobs I'd like to do by then. There is the possibility of further shows later too. I have some ideas for locos and rolling stock to build, although that will probably be as I fancy, as there is already sufficient stock to run the layout.

Landswood Park may have no further purpose as the competition that it was built for has passed, but it is a fun little layout and I have enjoyed working in 014, so more wagons may appear. And a couple of months back I took delivery of a new project:


The photo above shows the prototype for the kit, an O&K RLc1 now at the Amberley Museum, not far from me, which I think it would be entirely suitable for a farm railway.
Posted by Picasa