Sunday 30 April 2017

Historic Futuristic Travel

Looking for an interesting day out with the kids over the Easter break I spotted an offer with Hovertravel for cheap day returns to the Isle of Wight. Now I think Hovercraft are a pretty fascinating form of transport - technically, they are flying rather than sailing - and there isn't anywhere else you can ride one as a scheduled passenger service.

IMG_2821

Hovertravel run a service connecting Southsea (with a big car-park) to Ryde in just 10 minutes, which is used by a lot of commuters in both directions. How about that for a journey to work? They are, I think, quite majestic as they roar across the see, swoosh over sand, shingle, and concrete, and relax onto the ground with a sigh of the engines. Quick, and quite civilised, if a little noisy!

IMG_2815

It seems a futuristic way to travel except that they've been around since the late 1950's and don't seem to have caught on more widely, the cross-channel service stopped in 2000 and the craft we travelled on is around 30 years old. Hovertravel see a future though, having invested in new Hovercraft built in Southampton, but sadly the new arrival seems to be sitting in disgrace, with transmission trouble.

IMG_2850

I do hope it's sorted and secures a future for Hovercraft, but while the new model looks more sleek, I think I prefer the old one - it has more windows, and what use is travelling so fast if you can't see that you are?

The Isle of Wight has figured out integrated transport. Outside the hover terminal is the railway station - which continues down the pier to connect with the newer but slower catamaran service - and the bus station. We chose the train, which runs a frequent and reasonably priced service down to Shanklin over electrified lines. That sounds modern and efficient, but visitors may be surprised by the train they find...

IMG_2846

Yes, that's an underground train. In fact it's a 1938 London Underground train - which, if you think about it, makes it older than most of the carriages seen on preserved railways across the UK. And yet this is part of Britain's national rail network, operated by SouthWest Trains! By some quirks of history a small fleet of these trains have been found ideal to run this short line, making for an interesting journey with the varnished wood and springy seats inside. Mind you the seats need to be soft as the ride at 40+mph is quite alarming, bouncing and swaying quite violently. As the guard (yes, they still have them) commented, it's as good as any fairground ride.

IMG_2822

So, a day out to the Isle of Wight. We went back in time and travelled into the future.

Saturday 22 April 2017

Two shows in one day

I was rather spoilt for choice today, with several shows within striking distance, but I couldn't visit all of them. I did work out that I could make time for two if they were in the same direction, so I started with a long trip up to the M25 to the 7mm NG Association Surrey Group show in Merstham.

IMG_2874

It was nice to see Cranbrook Town again after a good few years, it has real character that has survived several changes of ownership and is now owned by Paul Davies.

IMG_2889

Totherend (Roger Jones) was new to me, with a quirky layout and working standard-gauge wagon transporters it offers something a little different. Nice locos too.

IMG_2861

Morton Stanley was recently featured in Railway Modeller, and shows how an interesting layout in this scale need not take up great space or expense. It may be the last time I see it though, as builders Chris Ford and Nigel Hill have it up for sale - if you are interested!

These, along with most of the 11 layouts were O-16.5. More photos from the event can be found here. There was also the 7mm NGA sales stand and a few specialist traders, plus some familiar faces to catch up with.

A short while later I was at the Crawley MRS exhibition - confusingly, in Horsham. This is one of the larger club shows and has a good number of layouts and traders, and was of more interest to my son. And I always find something I need at the Squires stand. Now I do find many of the traditional club layouts (big ovals with a station) a bit, well, lacking in interest to be honest, but there were some layouts that caught my eye.

IMG_2896

Narrow Gauge is always of interest and Theobald’s yard (Orpington and District Model Railway Society) mixes 7mm SG with 16.5mm gauge with some remarkable track-work and quirky trains.

IMG_2908

The World's End is a well-known OO layout with some superb buildings and scenic work. OK, the trains just trundle through, though they are prototypical, but it is the modelling that makes the layout worth studying.

IMG_2914

More modelling worth studying was found on Newhurst, a 7mm SG layout. Oh, the trains were nice too, but the scenery made it stand out.

More photos from Horsham here.

Thursday 20 April 2017

Track Down

Over the weekend I'd popped over to Gaugemaster to buy some track. Since my last few 009 layouts had used "recycled" points from an earlier layout it's many years since I bought track - and I have to confess I was surprised how much four points and three yards of track (the new "mainline" 009 type) costs! Anyway, time off this week means a chance to lay the track, between playing with the kids.

IMG_2805

Track laying started at the join to the fiddle yard - which I connected with the split hinges. A piece of copper-clad PCB was stuck firmly down and the rails soldered to it aligned to the FY track.

IMG_2799

Tools of the job. I use Xuron track cutters which are quick, quiet, and clean. Do watch for flying off-cuts though, and a file is used to clean up the end of the rail so a fish-plate fits. A razor saw is useful to mark the rails where to cut them with  the cutters, the scalpel is for trimming or separating sleepers, or opening up the chair to take a fish-plate. It's also used to cut holes in the foam-core board. The 12" radius tracksetta is a useful guide that curves are no sharper, though there are few curves on this layout, for bits that should be straight a steel ruler along the rail is a useful check.

IMG_2806

Track is glued down but first all the pieces are cut to size and laid "dry", held in place with track-pins beside the rails and sleepers - this is enough to hold the curves and position. You can just see the pins either side of the curves here. These pins are Gaugemaster or Hornby and are reasonably chunky - not the flimsy Peco ones. Track laying starts with the "main" line and loop, with sidings positioned later. Much time was spent carefully checking and adjusting the position of the points and curves so there is sufficient clearance, the loop is just long enough for 3 Peco L&B coaches (not that all trains will be that long), while at 5 inches the release should take any loco I anticipate.

IMG_2803

With the track cut and positioned holes were cut for point motor actuator rods, and for the point vee/frog wire that comes pre-attached to these new Peco points. The track was then inverted and PVA glue run along under the rails (keeping clear of moving point parts), then carefully positioned on the marks and between the pins, being weighted down (tins of beans did the job) while the glue sets. The pins can then be removed.

IMG_2802

While most of the track is the neater "mainline" style, the front siding uses the older "crazy" irregular track for an older less well-kept effect.

Track feeds (arrows) and rail gaps (orange lines) were marked out before sticking the track down. Where gaps were at a join - such as at the loop release point - insulating rail joiners were used. However where gaps fall in plain track I prefer to cut them later.

IMG_2809

I used to use a slitting disc, but having found these useful disc saws at Squires I've found that, with practice, they can make a neater cut, and with less risk of shattering. I'll probably run some epoxy glue into the gap at some point to make sure it doesn't close up if it gets warm.

Monday 17 April 2017

A Visit to the Lavender Line, and a Visitor to the Bluebell Railway

Looking for a day out on a bank holiday we decided to visit the Lavender Line at Isfield, near Uckfield. This is a small preservation group with a nicely restored station and about a mile of track. though normally they only run on Sundays, which is rarely convenient for us.

IMG_2637

Trains were running every half hour, alternating between steam and diesel. The steam was this nice Bagnall, towing a single trailer car from a DMU. It looked an odd combination, but since there is no run-round loop trains are propelled back to the station with the guard in the front cab, with brake and horn to hand.

IMG_2636

Diesel duties were handled by a "Thumper" DEMU.

IMG_2670

Other stock was an ecclectic mix with some small Diesel shunters, coaches and multiple unit trailer carriages in various states of repair, a selection of wagons, and this unusual Wickham railcar from British Rail Research.

IMG_2644

The train ride out and back only takes about 20 minutes, but a ticket allows multiple rides (so we tried both trains), and the kids rode the miniature railway too, so we were occupied for a couple of hours. It's a very welcoming place, with kids invited onto the footplate to get close to the controls, though my daughter was rather wary of the big fire!

IMG_2674

Just a few miles along the road the Bluebell Railway is a much better known line, and this week has perhaps the most famous loco of them all visiting - The Flying Scotsman. We hadn't planned to visit but we happened to be passing... though the price of a platform ticket was more than a day rover ticket on the Lavender Line! Still, my Son wanted to see his favourite loco, and it turned out hundreds of other's hadn't been put off either.

IMG_2679

So we got up close, but decent photograph opportunities from the crowded platform were pretty limited. It didn't help that it's train was two coaches longer than the platform, and it entered the station tender first.

IMG_2713

In fact we found the most dramatic views were from the picnic area below the line, where we got a good view of it departing.

Saturday 15 April 2017

Baseboard Finishing Touches

Hexworthy will need a control panel, and like Awngate, the best place seemed to be the front fascia. The layout will sit on a shelf and be front operated, and the fiddle yard adjoins the end, so other than the hassle of a separate control box, it's the only logical place. The panel is a scrap of 2mm aluminium from the guillotine at work, which happens to be an ideal size, but normally I'd fit it to the rear of the fascia for neatness. Here though there wouldn't be space for it to be removed from behind for access to the switches, so it had to go in from the front - so to maintain a neat appearance I decided to recess it into the fascia.

2017-04-14 17.50.11

Here's my piece of aluminium, with some trial printouts of the panel layout. These aren't yet final, but show it will all fit. The fascia (bottom) has had a suitable sized hole cut out, with two other layers cut too, one to the size of the panel, and one a little smaller.

2017-04-15 15.07.04

The two layers are glued behind the fascia creating a 6mm deep recess which the panel just fits, and a support which it will eventually be screwed to. These two layers also reinforce the thin ply edges so this is not a weak point. Meanwhile, the foam-core board is cut away with a knife to make space.

2017-04-15 21.18.29

Fitting it together, you can see how the foam-core structure and the timber reinforcement conspire to make access from the rear so tricky. I've also added a socket for the power connections at the same time.

2017-04-15 21.17.55

All fitted together. I need to drill the panel for the holding screws, when I drill it for the switches too. I've also cut and fitted the "wings" that frame the sides of the scene, and hide the untidy bits like split hinges and back-scene framing.

2017-04-15 21.21.47

Talking of the back-scene, I've used some offcuts of the thin timber strip to brace it. These are screwed to the lower reinforcement, glued to the ply back-scene, and stapled through from the front. The ply back-scene is much stiffer now, with no tendency to bow.

2017-04-15 21.22.34

So there we have it, one tidy looking, solid, yet surprisingly lightweight base-board. I do need to add a lighing beam - when I've decided what lighting to use - but for now I can proceed to track-laying!

Friday 14 April 2017

The Baseboard Core

Phase 2 of the baseboard construction involved 5mm foam-core board, this is the stuff made with expanded polystyrene sheet between two layers of thin card. It's easy to cut with a knife and can be glued with PVA, or more quickly and strongly with a hot glue gun, making baseboard construction easy and flexible - and relatively quick. I've used the technique for Pen-Y-Bryn Quarry and more recently Thakeham Tiles, with the former I learned it is easily damaged so needs a protective layer, with the latter I clad it in 3mm ply which worked well. Hexworthy is a much bigger board, and the need to connect it to an existing fiddle yard led me to make the outer ply "skin" first and make the foam-board core to fit. Actually this is probably a harder way to do it...

IMG_2630

The first task was to mark out the "deck" including transferring the track plan from the paper plan, which was done with the highly technical method of using pins...

Now I forgot to photograph the construction phase, but it was pretty similar to that of building the board for Thakeham. Here I doubled the thickness of the foam-board under the track, not because I think it needed the strength, but to increase twist resistance and to enable cuts (e.g. drainage ditches) to be added to the top surface later. Bracing was cut and glued to the underside at about 9" intervals, interlocking where longitudinal and cross bracing met, like an egg-box. Some diagonal bracing was added too.

IMG_2631

A complication was the river along the front, which is set about 1" lower than the track bed, polystyrene sheet was glued in the gap to firmly join the two layers and will be cut to form the river-bank in due course. There's also a stream under the tracks, which has yet to be fully cut out but the base is ready underneath. The front will have a thin ply fascia, though this has yet to be cut and fitted, and there will be "wings" at each end which will help stiffen the end boards.

IMG_2633

Underneath the bracing can be seen. Due to the length of the board I was concerned about flex or twisting, so I decided to box in the rear part of the frame to make a "torsion-resistant" beam. There's little track over this part, and if I need access to wires etc I can cut access holes. Once the board was glued into the ply outer shell (with PVA) it turned out to be surprisingly stiff. The strip-wood runners along the base are more to protect the foam and bear the weight onto the supports, than to add strength.

The resulting board seems pretty strong, there's no bending and no end-to-end twist unless significant force is used. There's a little flex in the back-scene, which is unlikely to be an issue but I plan a couple of diagonal braces. It's certainly easy to move about on my own despite it's length, at around 4 kg I think. Hopefully I'll get it finished over Easter, and maybe even buy some track...

Tuesday 11 April 2017

Narrow Gauge to Hexworthy


A little while back, I posted about using map data from websites to plan imaginary railways. This was the route I plotted, for a narrow gauge railway running from Buckfastleigh to Hexworthy on Dartmoor.

BuckfastleighToHexworthyOS

There are a number of (long disused) tin mines and some granite workings around Hexworthy, some involved significant works, such as a mill leat that runs for miles across the moor following the contour lines, to power the mine machinery. So it's not unreasonable to suppose that wanting to increase their output in such a remote location, the mine owners got together to promote a railway. The terrain is pretty hard going and the budget was limited, so inspired by developments in North Wales, narrow gauge was chosen and the line opened in the early 1870's.

The railway starts in the yard of the South Devon Railway (later GWR) at Buckfastleigh which had arrived in 1872, where there were a couple of exchange sidings, and immediately starts climbing to reach Buckfast. This is where the sheds and workshops were located, there being more space. From then on the line climbs through open farmland to a halt near Scorriton, and curves over the Holne Brook valley with a small viaduct, before tackling the steepest climb to a deep cutting to reach Holne. This is the main passing station, and the point where the line re-enters the Dart valley. After a short downward stretch the rest of the route follows the valley side, climbing but getting closer to the river below, which is crossed near Dartmeet. A station here serves the main road, and became a popular tourist destination, but the final terminus is the quiet hamlet of Hexworthy, where a spur back across the river serves an incline to the various quarries, high on the moor to the south.

BuckfastleighToHexworthyAltitude

Now Tin was refined at the mines so unlike coal or slate, the outward traffic was low volume, high value. The remote location and the need for coal and stores for the mines, and to support and transport the workforce, made the railway necessary - rather like the Redlake Tramway built a few miles south, years later, where china clay was moved by pipeline. Anyway the point of this is that while gradients were considered steep, around 1 in 50 to 1 in 40 (2% to 2.5%) with a short section at 1 in 36 (2.75%), these were not unusual on NG lines and acceptable for the expected traffic, though in later years it limited train length as granite quarrying increased.

GoogleMapsView

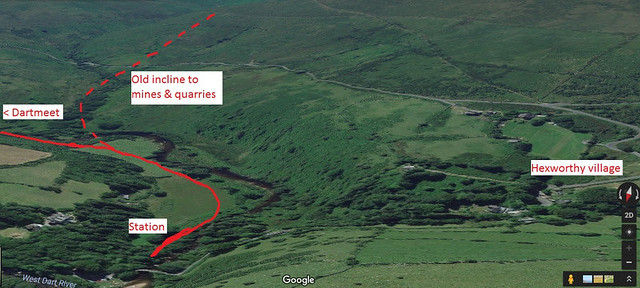
This is the setting of the station at Hexworthy, as seen by Google from the North West. The station lies along the river bank by the narrow stone bridge (bottom left), some way from the village of course! The mines and quarries are scattered along the top of the ridge to the South (right and top).

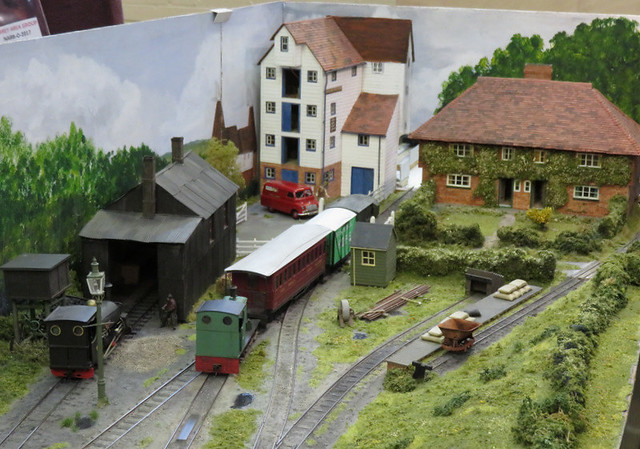
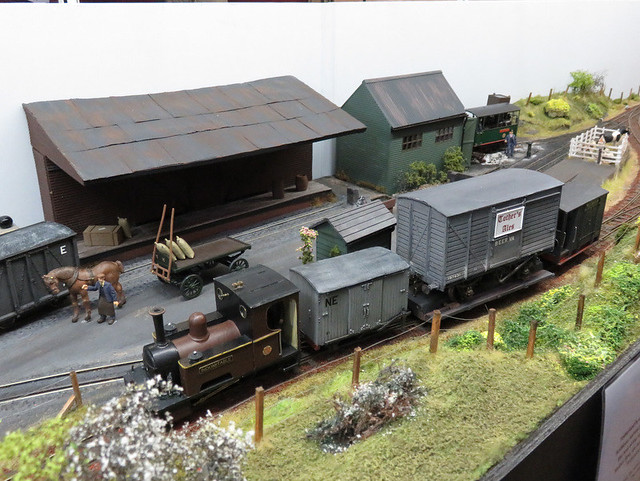
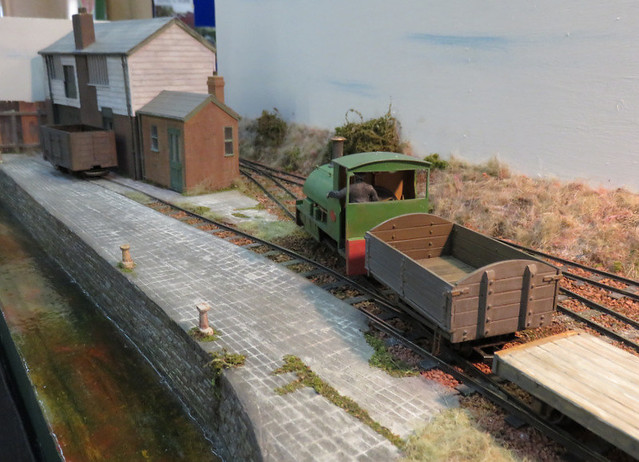
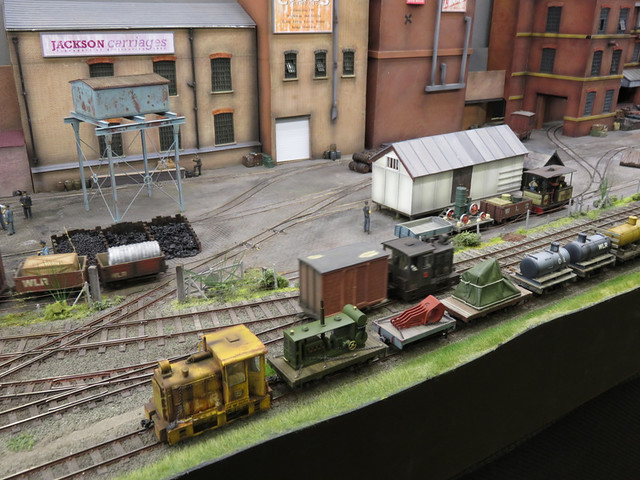
Now I plan to set my model in the present, or recent past, as a preserved line. This railway would have made a popular tourist line and although there would be no goods traffic, the works trains seen on preserved railways offer opportunities for interesting models and operation. I also like the juxtaposition of well-kept stations, locos, and coaches, with grotty maintenance wagons, workshops, stores, and even decaying stock awaiting restoration, that is often seen on "Heritage" lines. The fact that an imaginary preserved line is a great excuse to run whatever stock I please is a happy coincidence (honest...), but preservation is an era and setting that I, and many others who never knew the steam age, can relate to.


Plan1

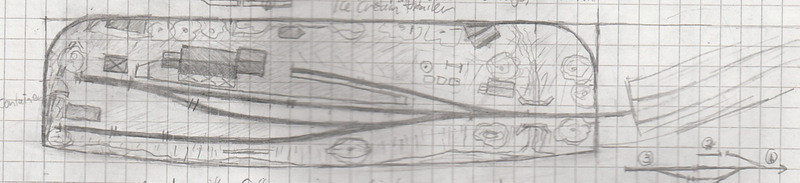
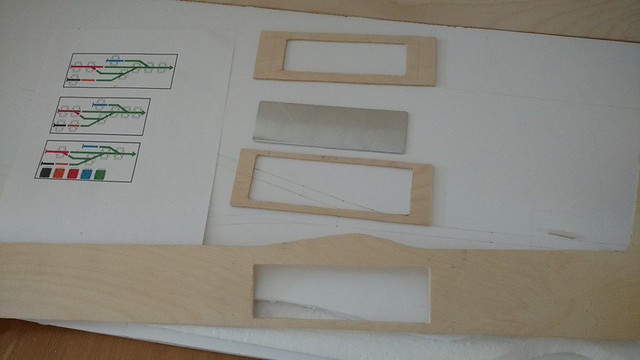
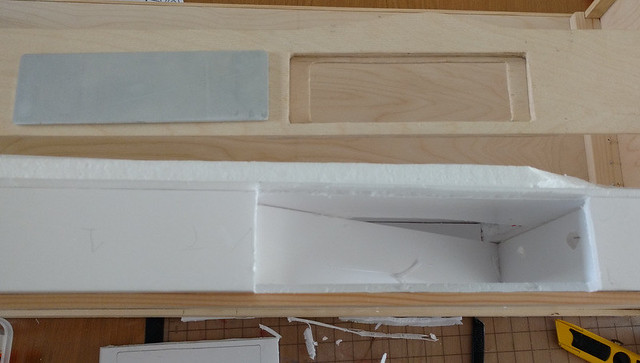
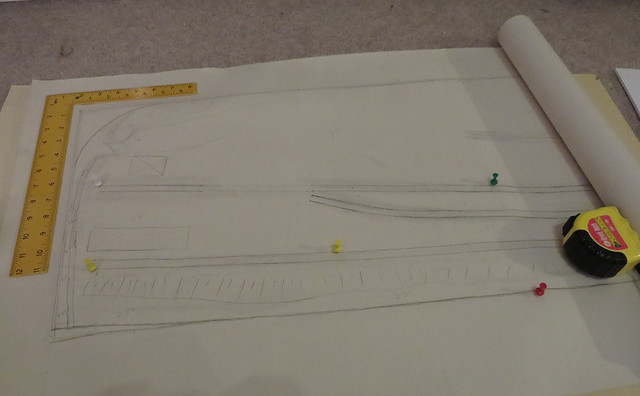
The idea for this layout has formed over the last couple of years, with dozens of plans sketched, but this is the final design. Earlier variants tried packing more in - with a workshop or engine shed, but I settled on "less is more" as preserved or not, I want to capture the open remote feel of the location. As well as a run-round loop there is a bay platform for spare coaches or "special" trains, this is a truncation of the old goods siding as the goods shed will be the station cafe. Along the river bank the quarry exchange siding is now used for maintenance trains, with an old shipping container or similar used as a store. Of course there will be a car-park, and maybe a playground, but it will be a quiet sleepy place between trains.

IMG_1978

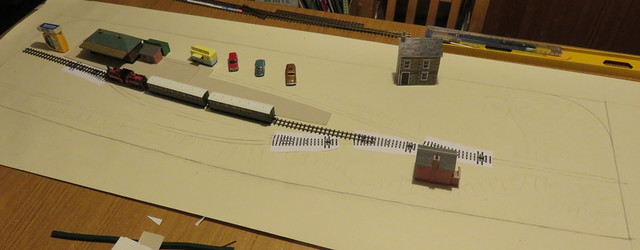
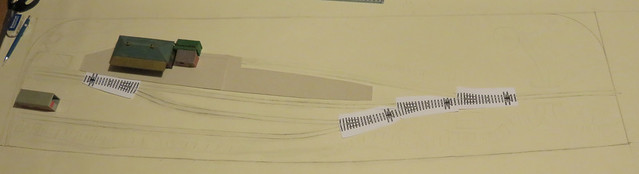
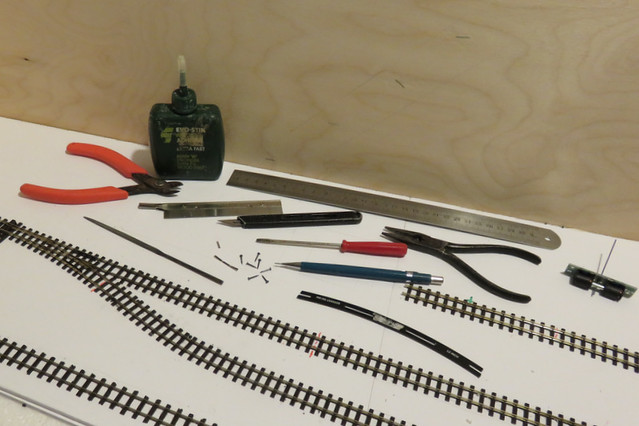
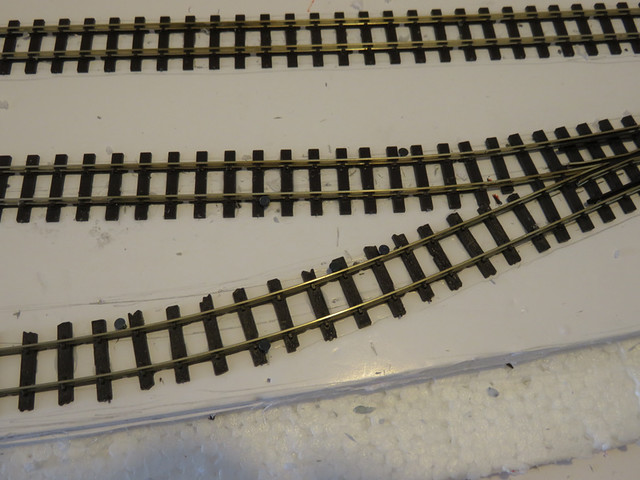
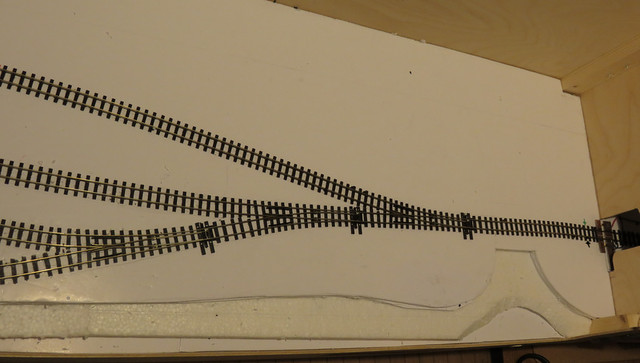
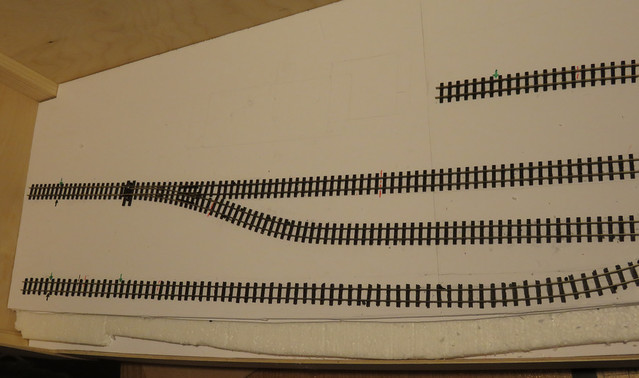
Sketches are useful but I always like to do a full-size plan before starting work. A roll of lining paper, some downloaded plans of PECO points, and a spare length of flexi-track are the essentials. A few buildings and vehicles are used to get scale - though any suitably sized object will do - and some stock placed to check clearances and perspective. It's very easy to rub out lines and move things about until things are just right - and on a small layout like this, half an inch either way can make a big difference to the way things look, and work!

IMG_2028

Saturday 1 April 2017

Work starts on a new layout...

Yes, I have started a new layout....

I've been doodling plans for some time, and will expand on those in a future post. Suffice for now to say it's 009, and will eventually fill the space on the bookshelf occupied by Awngate, so is a similar size (albeit a little longer). It also uses the "Super-Fiddle-Yard" built for Awngate a couple of years back, meaning I've had to make the end to match.

IMG_2626

There's some experimentation going on here. I have a plan for where I want to end up, and working back from that I decided to start back-to-front, or at least outside-in. So what you see here is the back-scene with end boards, the middle will follow shortly!

I got some good quality 3mm birch ply from a local timber merchant, who did a few cuts for me so they are straight, and I could fit the bits in the car! I also got various bits of small section timber, some from the off-cuts bin.

IMG_2627

The fiddle yard is joined using the same split hinge system as for Awngate - I got an extra set at the time, which have had to be aligned. I've added a timber frame to the base of the fiddle yard to raise it about 1.5", as the Awngate base-board is very shallow, and this one will be deeper. The frame can be unscrewed for use with Awngate, which has another show booking yet!

IMG_2629

Round the back is the other hinge making a rigid and self-aligning join. B&Q do a "Hockey-stick" timber section that is ideal for the top of back-scene brace, and their cheap staple-gun is a good way to attach it.