Monday 23 October 2017

Top quality layouts at Uckfield

Last Saturday I set out over the South Downs through gale force winds to the annual show at Uckfield. I've found in previous year's that this show has a record of high-quality layouts, some from far afield, making it well worth the trip, and this year's billing looked just as promising. The venue is not large, but the emphasis is on quality rather than large layouts, and covering a variety of interests - including some narrow gauge. In addition the show attracts some specialist traders that don't do many shows. Anyway, enough waffle, here are some of my favourite layouts...

IMG_3932

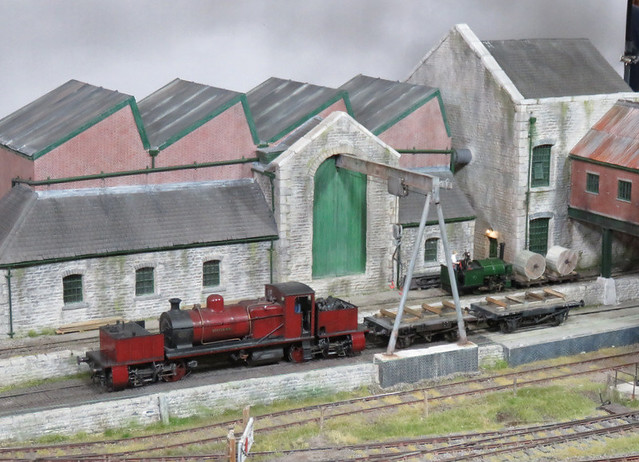
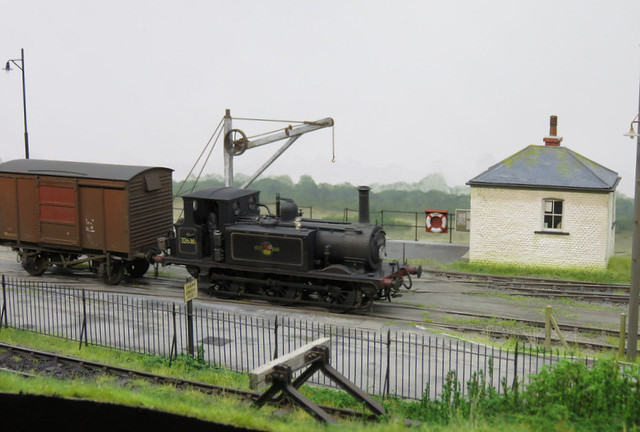
Denton Brook (O & O14) by Giles Favell, a layout I've watched develop on the NGRM forum. On the face of it the layout is simple, though well executed, however it is brought to life by the working features - working hoist, radio control lorry, and even fully working mobile crane.

IMG_3937

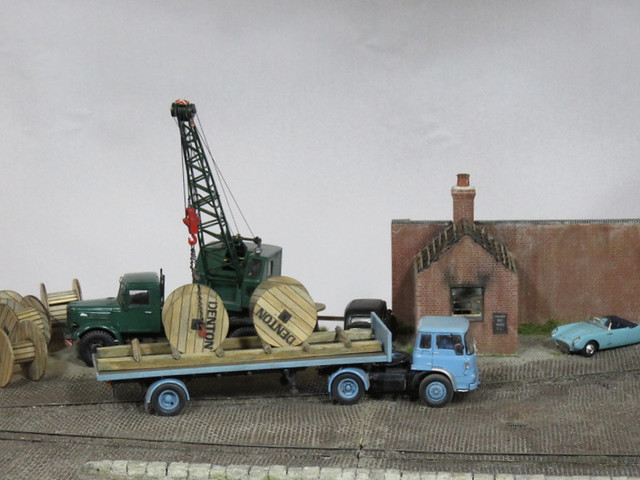
These are fascinating to watch and reflect Giles' superb skill in making them work so well, and look so good at the same time.

IMG_3910

Arun Quay (Finescale O) by Gordon & Maggie Gravett. Well known for their superb scenic modelling skills, they have returned to Sussex for inspiration to their latest, superbly detailed layout. I like the neat trick of showing the quayside from the landward side, with the river and distant scenery painted on the misty backscene, which is hung an inch or so beyond the quayside "edge" of the layout. Not only does it look natural it saves modelling the water I guess...!

IMG_3920

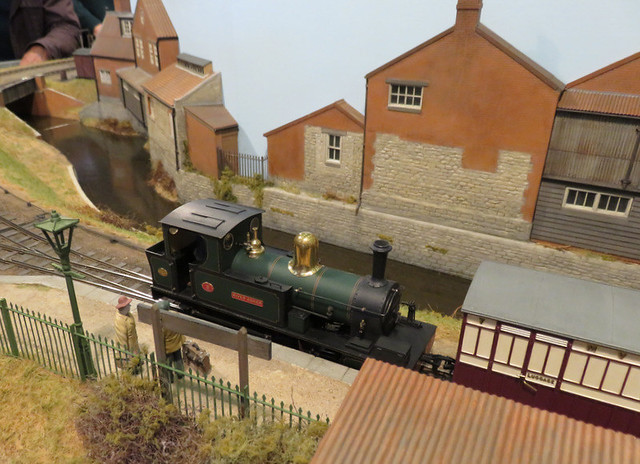
Bridport Town (O16.5) by David Taylor is a convincing and characterful freelance narrow-gauge layout. I've admired David's work since I saw pictures in Railway Modeller years ago, and it was a pleasure to see it close up.

IMG_3965

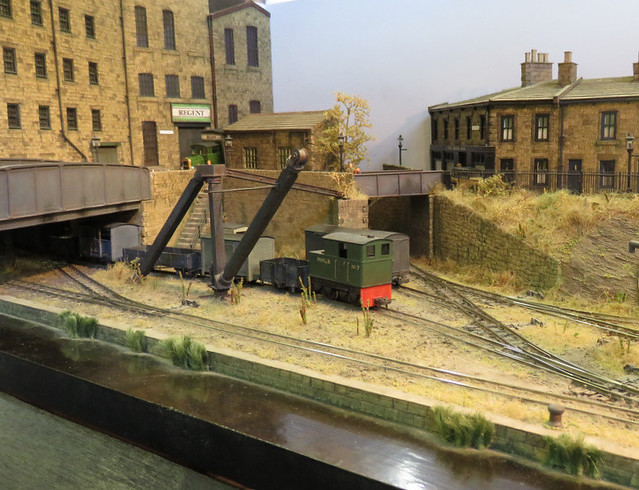
Another characterful layout that is part of a well-thought-out freelance line is Moorton Bottom Yard (009) by Paul Windle, and as well as the brooding warehouses and last-of-the-summer-wine terraces it features a working wagon hoist. Paul is of course an accomplished 009 modeller well known for his locos (I have a few) and scenic layouts.

IMG_3944

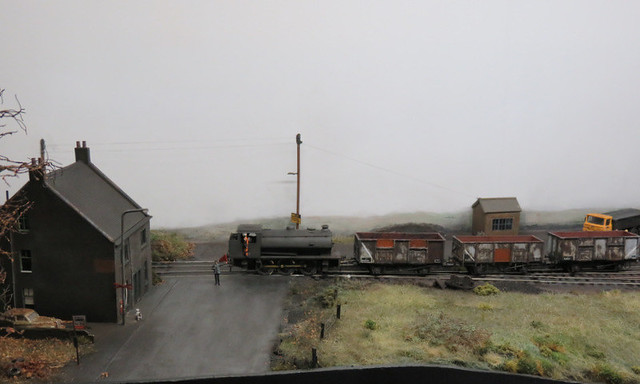
Six Quarters (OO) by Oliver Turner captures a bleak, winter's day, depicting an NCB coal yard, and is a refreshing change from so many layouts. Everything is weathered and toned down, and the scene just really works. This is another layout I've seen develop online on Oly and Chris's blog, and it was good to see it in person.

All good layouts, worth seeing if you get the chance. And that's not all, I ran out of space here but there are more photos and layouts over on Flikr.

Wednesday 18 October 2017

Fitting Magnets

Before going much further I needed to fit uncoupling magnets. I find the Microtrains surface mounted magnets work well, but are too long, so I snap them in half before fitting them. They stick up between the sleepers so while they can be disguised as board crossings, it is nice to have hidden magnets in some places.

In the past I've had some success using cupboard latch magnets set below the sleepers, though on Awngate they needed strengthening with neodymium magnets attached to them - I think the plywood baseboard diminished their power too much? Heworthy has a foamcore base so I think they should work well.

IMG_3898

The staring point - a pair of B&Q magnets. Bought in packs of 10 they work out quite cheap.

IMG_3899

The magnets are popped out with a screwdriver and snapped together, the magnetic field is between the large faces, and two together is wide enough where one would not be. This time I attached the steel plates to the outside as I think this will "focus" the magnetic field at the poles in the same way they do in the cupboard latch, or a steel pin does through an electromagnet.

IMG_3900

The completed magnet assembly, and an oblong hole cut through the baseboard under the track. The foam core is at least easy to do this with a sharp scalpel - with plywood the hole would have to be cut first.

IMG_3902

From above, the cupboard catch magnet is rear right, under the sleepers, the Microtrains surface mount (cut in half) is front left. At this stage the cupboard magnet seems much more powerful than the Microtrains one, but ballasting may change that.

Now I shall have to do some testing to check they work well, and that I have them in the right places.

Sunday 8 October 2017

Tests with Stones and Windows

Not happy with the moulded stonework sheets, and not having had great results with clay before (except for cobbles), I've decided to experiment with foam sheet - and scribing the stones by hand - as I've seen others do this with impressive results.

IMG_3905

The lower piece is a pizza base, the oblong piece on top centre is from a pack of foam I picked up years ago, I think it was marketed by Busch or Faller though I've not seen it since. I've looked for the blue foam others have used but can't find a local stockist. It can be found on ebay or online but can work out pricey with postage, and I fear it may get damaged. Anyway both these foams seem to work OK and I don't need a great deal.

Also shown are the implements I've tried. The right-hand and lower of the centre areas were done with a sharpened HB pencil, but I think the courses are too thick for 4mm scale. I guess mortar is an inch or two thick at most in a stone wall, so well under a millimetre. The upper centre and lower left were done with a 0.5mm propelling pencil, which I think looks better. The top left corner was done with the dental implement but I found the long point difficult to control.

So a promising test, though I suspect my stones are a bit too regular. I gave the test pieces a wash with brown acrylic. Looking at the way this has collected in the mortar courses I think I'd be better starting with a wash of grey, then dry-brushing browns on top. I've seen pastels used with great effect for stone colouring, so I might even give that a go.

IMG_3903

I've drawn out the station building, reducing it's length by 20 mm, which I think will look better. It's marked up with measurements - as I can't draw lines all over the foam and rub them out, this will help me mark it out neatly.

IMG_3905

The next big question is windows. Top we have a moulding by Dornplas, nice and fine but lacking detail - they don't look like sash windows. On the right is a Wills set, the lower ones of which look really nice - but only two on a fret so I don't have enough and I'd need several packs! Sadly the others, like the Dornplas ones, lack sash detail. Those lower left I picked up from a second hand stall, but I think they might be Peco. They have nice sash detail, though the mouldings are a little thick - I tried thinning one with a fine file but I'm not sure it improved it, just made it wobbly!

I've noticed some nice ones from York Modelmaking - a bit pricey though:

https://www.yorkmodelrail.com/00-scale/windows-templates-and-headers-1/00-scale-window-frame-204

https://www.yorkmodelrail.com/00-scale/windows-templates-and-headers-1/00-scale-window-frame-203

The other option is of course making my own. I've done it before but it's fiddly, and I'm not sure I can do better than these.