Showing posts with label tank wagon. Show all posts

Tuesday, 8 October 2024

Colourful wagons

I've three exhibitions coming up this Autumn and with little modelling done over the summer, I've several jobs ongoing to finish some projects before the exhibitions. Most of these are focused on Hexworthy, but first up three wagons have been completed for Loctern Quay. These had just been awaiting weathering which was done with an acrylic wash followed by a dusting of the underframe with the airbrush. 

The Royal Daylight tank has also had a dark wash around the filler caps and streaked down the sides, I used water soluble oils for this which allowed a damp brush to remove paint until a subtle rain-streaked look was achieved. Whether this is spillage during loading, or just soot, is open to conjecture...


As well as weathering the weedkiller wagon, I decided the valves and spraying gear were not visible enough. I touched in the valve handles in red, and also put red ends to the "spraying" bar - since it is low to the ground and protrudes beyond the sides of the wagon, this seems a plausible measure. Although intended for Loctern Quay, this wagon could also be used in works trains to Hexworthy.


The Peco banana van has had the roof painted grey and the couplings removed to be replaced with Microtrains ready for shunting at Loctern Quay. The wash was applied then dabbed off with a damp kitchen towel until it settled in the planking and crevices, without looking overly dirty. The airbrush applied a little track dirt along the lower sides and underframe, and a little soot over the roof and upper ends. It now looks more at home at Loctern Quay - OK, it's unlikely to be actually carrying bananas, but could have been painted as a joke or advertising stunt perhaps?


Three more wagons that are colourful and distinctive, so should work well in the shunting puzzle at Loctern Quay and add interest to viewers. Now I just need to make photo cards for the puzzle, and run some tests to thoroughly check coupling reliability. 

Wednesday, 18 September 2024

The writing's on the tank

I can't believe the last update on the tanker wagons was in May. Progress has been a bit intermittent. While sourcing some suitable transfers I finished the painting. The wagon chassis were painted grey, as usual for my freight stock, with black underframes. The round tank got sprayed with a red aerosol I had in the garage, I picked out pipes and valve/filler caps in metallic aluminium. The square tanks were painted off-black, as were strapping and other details. I'm not sure whether to paint the weedkiller pipes in a more visible colour?


I decided on Woodland Scenics/Model Graphics rub-down white gothic lettering. This provides a range of sizes, which was useful as I wasn't quite sure what size to use, and I thought rub-down lettering might be easier given I've not used transfers since my teens. I printed out the wording in the nearest font I could match at a range of sizes, decided which size would fit the wagons best, then found the nearest size on the transfer sheet. 


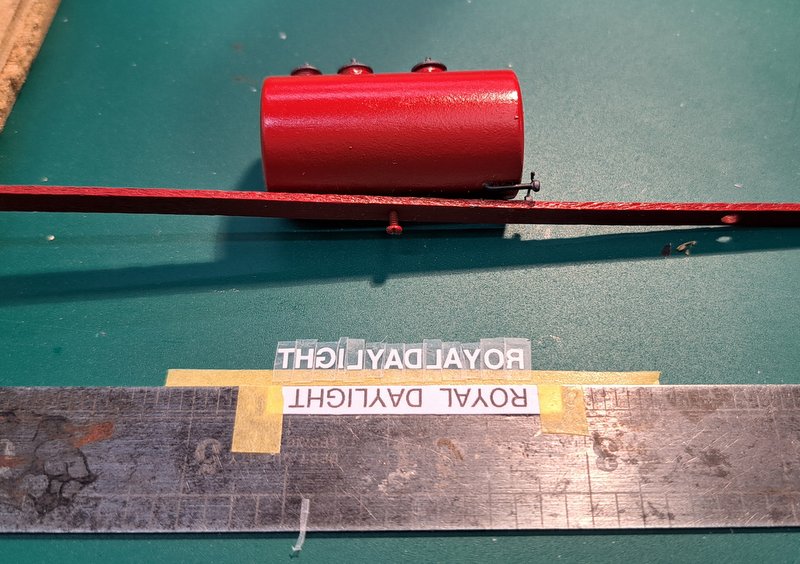
Before starting on the tank wagons I used an old Colin Ashby wagon as a practice run, lettering it for loco coal. I found the transfers easy to apply, but tricky to line up, especially if handling the whole sheet and where there is uneven detail. So, I decided the cut out each letter and align and space them onto a piece of masking tape, before transferring (ahem) to the model. Of course, this had to be done upside-down, I put a length of tape half onto a steel rule and flipped it over then placed the lettering on face down and back-to-front.


The tape was then peeled off the ruler and lined up on the model, ensuring the lettering is straight and positioned correctly, before rubbing the lettering down with a pencil.


The same technique was used for the round tank, this time I used one of the printouts to help get the right spacing - albeit in mirror! Positioning the right letters in the right order and the right way round when they are upside-down and back-to-front takes some concentration...


The tank was still attached to the coffee stirrer used for holding it for painting, so I taped that to the edge of a block of wood to hold the tank on its side. The ruler was flipped and positioned with the letters along the centre of the tank, and a second strip of tape used to hold the top of the letters in place. With everything checked for alignment, the letters were rubbed down and the backing sheet removed one by one.


And here's the result. The lettering gives purpose to the wagons, and should help make them stand out in Loctern Quay's shunting puzzle. 

I've refitted the wheels and couplings to the tank wagons, these are now just awaiting weathering, and of course picture cards for the shunting puzzle. I'm sure I put the wheels from the open wagon somewhere safe... when I find them it could get added to the fleet, though it has already served its purpose as a practice for the lettering. 

Thursday, 30 May 2024

Road tanker

The Meridian kit for the round tanker wagon using a Bagnall chassis is based on an example at Snailbeach which had been built using a tank from a road lorry. I recently saw this early road tanker, at an event at Goodwood, which is probably of a similar era. I figured some detail photos might be useful.


The tank is oval rather than round, probably to reduce the centre of gravity, and of course is branded Shell Mex BP (I guess petrol) rather than Royal Sunlight (paraffin). However, it looks to be a similar size to that used at Snailbeach. 


I can't quite work out if the hand-pump on the rear is connected into the tank, or what it was used for.


This tank also has three openings on the top, but equally spaced. The photo isn't very clear but the openings have a metal plate over them with a couple of pipe fittings, presumably for a filling pipe and I guess a vent to be connected during loading. There are also three levers protruding from little shrouds, but these aren't all on the metal plated openings.


However, the levers are aligned to the three outlet pipes at the bottom of the tank. These protrude from the left side and look like they have a tap on the end, although I think it is a pipe connection and valve assembly. My guess is that each lever at the top opens a valve in the bottom of the tank to discharge via the aligned outlet. The tank will be divided into three sections internally, which both prevents surging of the liquid and enables up to three separate deliveries (or three separate products) - modern tanker trucks have this arrangement too. Therefore, there are three separate filling connections and three separate outlets, plus some hoses to connect the outlets to the receiving tank. I'd expect both filling and emptying are by gravity, but perhaps that pump handle on the end is used to dispense?

A close-up of the discharge outlets. The pipes can be seen connecting them to the underside of the tank. The photo of the wagon at Snailbeach suggests that had three outlet connections at the end (rear) of the tank, rather than the side like this. 

Tuesday, 21 May 2024

Tank wagons part 2

On with the tank wagon kits. Microtrains couplings were fitted to plasticard packing underneath, with a slot cut out the end framing. The screws were shortened so as not to protrude through the floor. I omitted the centre buffers from the wagons as they'd obstruct the couplings. 


The hole in the floor of the round tank wagon chassis is for a screw to secure the tank, as I thought the relatively heavy resin tank might be vulnerable with a small glue contact patch onto the cradle. I drilled a hole dead centre underneath (hopefully!) and used a Microtrains coupling screw self-tapped in. The white metal cradle has been worked with a scalpel and round file to match the profile of the tank - as supplied it was a larger radius so the tank could rock side to side. 


The resin tank had tiny imperfections, presumably bubbles from the casting process. I rubbed squadron putty in with a finger, rubbed smooth with fine emery, and gave it a coat of primer. I then repeated the process for all the imperfections I'd missed, and this is the second coat of primer - yet still a few gaps have been found and filled. The red primer confirms it will look good in red I think...


That photo also shows the detailing, although the tank, straps, and brake stand are all still loose for painting. The brass has been blackened.

The small filler looks like it might be a vent in the drawing in the instructions, but all 3 castings are the same. In a photo I found the two bigger filler caps seem to have pipe connections, but the smaller one doesn't. However, without clear pictures it's hard to tell. I put the filler caps in a pin vice using the "pip" underneath and turned by hand against a file to clean up the edges, one was turned down to a slightly smaller size for the smaller (left end) opening. 

With no tap(s) in the pack I've had to improvise. The photo I found isn't clear but it looks like 2 or 3 pipes protrude from one end, presumably separate compartments in the tank (typical for road tankers) corresponding to the filler caps. I settled for two pipes from 0.7mm wire, with end "flanges" cut from plastic rod that had been drilled out (fiddly!), and a fine wire handle/lever stuck in a hole in top. Hopefully this will look convincing when painted. 


I thought the "loco tank" wagon would work well as a weedkiller wagon. It seemed unlikely to be an oil or fuel wagon and few railways had a need for a water tank, but many need weedkiller wagons and like many service vehicles an in-house conversion makes sense. I expect it could look at home on Hexworthy as well as Loctern Quay. Therefore, a tap for each tank piped into a "dispensing" pipe across the wagon seemed a likely arrangement. I used the long tap feed as the pipe down to the dispenser, which left the short stubby end (I presume meant to be the outlet) to fit into the tank, this seemed to work so I bent the long end of the castings to shape and soldered them both to a 1mm wire rod as shown. The "staple" shaped wire on the left is the balance pipe for the other end of the tank.

Here's the weedkiller wagon ready for painting, again the tank and (blackened) straps are not yet fixed in place. The tap and pipework arrangement seems to look plausible, it bends back under the wagon end slightly to avoid the coupling although I also had to move the coupling mount outwards too. The tops of the tanks were drilled for the handrail knobs using the dremel in its drill stand (a handy tool), although one was too close to the end and protruded through the tank end. Hence, this tank has had some filler and primer already. Despite the red primer, I think this wagon will end up black. 

Thursday, 2 May 2024

Tank and banana wagons

I've acquired a couple of unusual tank wagon kits which will add some interesting variation to Loctern Quay. Both are from the Meridian range and based on the Bagnall wagon chassis, but sadly are not currently available. 


The first is this distinctive round tank. I am a little confused with this one. There are three protrusions on top, two large and one small, three filler caps (all the same size), and three levers in different positions. The line drawing in the instructions shows the smaller protrusion with a smaller cap, I presume a vent. I'm not sure what the levers are supposed to do, I'd guess they latch the filler caps as I can't think what valve they could control? Also, the instructions list an outlet tap, but my kit doesn't seem to have one. 


The second recreates the side pannier tanks of the WD Baldwin locos which were sometimes carried on a wagon as a tender to improve the stability of the locos on rough tracks. The whitemetal tank castings will make this a heavy wagon! This kit includes two taps, handrail knobs and wire, but no brake stand (i.e. it's an unbraked wagon). I'm thinking of modelling this as a weedkiller wagon, it could then serve on Hexworthy as well as Loctern Quay. 


In assembling the chassis I used a new tool - the "axle reamer" by DCC concepts. This is popped in place of the axle, and rotating while gently applying pressure to the axle boxes opens them to a point. The axle then spins nice and freely, this is a tool that seems to work well!. There are two reamers in the pack with different shaped grips. I also used my back-to-back gauge to set the wheels correctly, these older Dundas wheels are usually too tight back-to-back causing them to bump through pointwork. 

That's the two chassis done, one unbraked and one braked (the brake stand will go on the end platform). The next job is to fit couplings, then on with the bodies.


At Narrow Gauge South last Saturday I was tempted by this Peco banana van on the 009 sales stand. Of course it is a joke for a narrow gauge van, but it will make an interesting visual addition to the shunting puzzle on Loctern Quay. It will need a little work first, hopefully I can fit Microtrains couplings in place of the Peco ones. Joke or not, I don't think I can live with the dayglow orange roof (what were Peco thinking of?) so that will get painted, and a little weathering will make it feel more at home, perhaps as though painted for fun by the railway staff.