Showing posts with label heljan. Show all posts

Tuesday, 5 March 2024

Readying ready to run - Part 2

I've collected several ready-to-run locos since they have started to become available in 009 and Hexworthy is an ideal place to run them. However, as with the Peco coaches, there is something about a pristine RTR loco that jars in a layout setting. They are just too clean. Now I don't want to model heavily weathered almost derelict locos, I'm modelling a preserved railway setting so locos would be kept clean, but even so a working loco will not be box-fresh pristine as soot settles from above, paint dulls due to heat, oil builds up on and near moving parts, and brake and track dirt is thrown up from below.


So here's my attempt at making Exe look used but clean. If you can't tell much difference from a fresh model, that's kind of the point, but subtle differences are there.

Having had issues with enamel-based washes starting to lift the lining on Nesta (fortunately recovered) and not having good results with dilute acrylics I was looking for a new solution. I've a couple of Vallejo ready-to-use washes which work well, but having seen the results of someone using water-soluble oil paints I thought I'd try them. The paints are found in art shops. A little paint is dissolved in water and used as a wash, the concentration can be varied as can how much is applied, but it can also be removed with a damp brush, cotton bud or kitchen towel while damp meaning it is very controllable. I've used a dirty brown mix on underframes and buffer beams, and black in spots where soot/oil might accumulate (like between boiler and side tanks), over brass and copper (it tones them down nicely) and on the motion too. 


With my recent increase in confidence with the airbrush I took the brave decision to use it for weathering locos. As with the coaches I've used a mid brown misted very lightly over frames and buffer beams, and black misted very lightly over the cab roof, smokebox, footplate, and a little over the boiler and tank tops. This is done by winding in the "end stop" at the tail of the airbrush (it probably has a proper name) until the needle stops opening with just a faint mist emerging, this means I can spray without risking a wobbly finger causing an unexpected splurge of paint. Better to spend time building up a level of weathering than accidentally overdoing it. The down-side is such a small nozzle opening can block up so every so often the stop is unwound, the needle opened fully and paint sprayed until it is flowing easily again, before winding the stop back in. 

I've also painted another batch of people, including crew figures from Faller, Dapol, and Model-U. There are also some "civilians" at the back which I will come back to later. 


So here's Exe from another angle. I may have overdone the track dirt up the rear, but the sides remain clean. The motion and pipework are toned down and look oily, while the cab roof, tank top and footplate are a more matt, sooty finish. The boiler top is a little sooty too. Hopefully a superficially clean but used look. A Dapol figure stands in the cab, getting him in was like getting a ship in a bottle! I figured one was enough, and still allows some of the interior detail to be seen. Finally, the bunkers have been filled with crushed coal. 


The Kato Prince comes with "brass" knobs to fit to the sand pots and tender, these are on a sprue "tool" which is cut off the main sprue and used to place the knob in the hole before being twisted off. Spares are provided which is useful as I broke one in the wrong place, but it is the work of a few minutes to fit them. I also glued a strip of microstrip to the vertical support for the slide bars, as the flat metal looked a bit too flat.


The can is tiny. Fortunately, it is easy to unclip (removing the blower pipe first helps), but even using Faller HO figures they needed their feet and heads filing down until they fitted under the (overscale thickness) roof. Of course, once in there they can hardly be seen, but nor can the basic interior. I installed a figure in the tender too, as often seen on the prototype! The plastic addition to the slide bar support was painted with gunmetal metalcote, as were some details under the cab. 


Again, the weathering aim is clean but used. A hint of the dark wash around the whistles, dome, and tank filler plus a misting of airbrushed "soot" makes the top of the tank look like it betrays a hard day's work, but not neglect. Real coal was added over the moulded plastic load. I've also fitted staples to the Peco coupling droppers for magnetic uncoupling. 

Next time, the rest of the RTR loco fleet...

Saturday, 20 February 2021

Magnetic uncoupling with standard 009 couplings

While I am happy with using Microtrains couplings for most of my 009 stock with its advantages in shunting, I have realised that fitting them to my Heljan Manning Wardle is too difficult but also unnecessary. It will only be likely to run with suitable coaches such as the Peco ones, and so long as it can couple up reliably and uncouple to run round the type of coupling doesn't really matter. So retaining the "standard" 009 coupling is easiest, except that the ones factory-fitted to the loco sit too high, and I've been unable to adjust them until they couple reliably to the Peco coaches. 


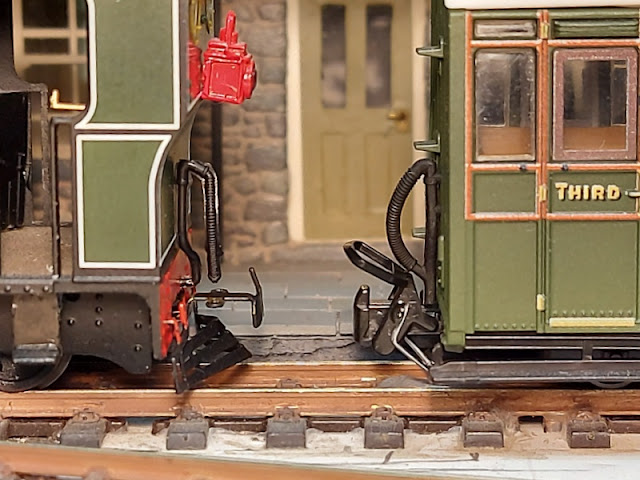
A while back I bought a pack of Greenwich couplings to fit the NEM socket, these were bent up following the instructions and simply push into the sockets on the loco in place of the existing Peco type couplings. Being thin metal they are easily adjusted to sit level, which the Peco ones don't. As you can see here by leaving the loops off and the pivot tabs up (or cut off) they clear the cowcatcher easily. 


Being pre-blackened the Greenwich couplings look discrete but are entirely compatible with the Peco coupling - though since I have left the loops off the loco (to keep the cowcatchers) the coaches will need loops at both ends. I do need to provide some auto-uncoupling though, and I don't like pop-up ramps for the Peco loops.


So here is an ordinary staple held centrally in some pliers. Both sides were bent upwards from the flat plane of the staple.


This makes a U shape with the ends bent up - these tails were leaned back slightly, and trimmed about 3mm. 


The bent U shape is fitted over the outside of the Peco loop droppers. They can be tweaked to be a cosy fit, but not too tight as that can stop the loop moving freely. The upright tails are fixed with a little bead of superglue gel. The couplings are easily pulled out their sockets to have the staple fitted. 


The Peco coupling works normally, but when positioned over a magnet the staple pulls down which lifts the loop. If there are two loops a pair of magnets might be needed, but I only want to uncouple the loco (without loops) from the coaches so this should work well with one magnet. Here a tiny 2mm x 2mm neodymium magnet is held between the sleepers with blue-tack, a Greenwich magnet would be ideal but I don't have one, I will try a slightly longer magnet set under the sleepers which should work with less accurate positioning. However, the experiment shows this is a simple mod to add magnetic uncoupling capability to the standard Peco 009 coupling. It might work with other types so long as the loop is not magnetic (the Peco loop is plastic).  The coupling on the Manning Wardle is level here and couples to the Peco coach, but does still look slightly high in this photo, a quick adjustment with pliers should fix that. 


Saturday, 22 December 2018

More on Heljan Manning Wardle Issues

While the inability of my new  Heljan L&B Manning Wardle to run through the PECO 12" radius pointwork of Awngate is a big disappointment, I did say I'd check it out on the newer 18" radius points. So I took it to the club last night and ran it on the new under-construction layout. It did manage to run smoothly through most of the points, but at a couple of them it derailed in the same way seen before - with the pony wheels lifting at the tip of the blades of a facing point.

I realised it seemed to occur taking the left-hand route (whether that was the curved or the straight route), so I looked again at the centring springs. Having tweaked them to reduce pressure in an attempt to help the loco negotiate 12" radius points (as advised by the instructions) the truck was not staying central. I've no tweaked them back to maintain just enough pressure to centralise the truck, ensuring pressure was equal each side. This helped a great deal.


I've also tested the loco on my also under-construction layout Hexworthy, which also has PECO 18" radius points. However despite the adjustments to the pony truck, it would still derail on three of the four points, depending which way they were switched. Eventually I could see no option but to take a file to the points...

The modifications used a small file, and only took a few seconds:

  • At "A" the inside of the blade was stroked with the file to sharpen the tip, taking care not to affect the top edge
  • The recess of the fixed stock rail was also stroked with a file at "B"

The idea is to reduce the amount the blade protrudes from the fixed rail so the flange of the pony wheels cannot ride up on the tip. This, frankly, should not be necessary for any RTR loco, but it does work, and now I can run the loco through all the points. This trick may well work on the 12" points used on Awgate too, but I don't really plan to use the loco on that layout.


That's not quite all the issues though. The couplings point upward, and are far too high to couple to stock, including the PECO coaches.


The club layout has 12" curves and gradients. The loco did manage the curves, which is a relief, but at some points it stopped with it's wheels spinning. These appeared to be at transitions in gradient, or to the super-elevated curves. Some of these track sections probably need adjusting, but it is clear that the loco needs more vertical movement in the pony trucks, which is currently restricted by the coupling extensions meeting the buffer beams or cowcatcher.

So we are getting there, but we're not quite there yet.

Saturday, 15 December 2018

Christmas come early, or very late?

Finally, my Heljan L&B Manning Wardle has arrived. To say this is long-awaited is an understatement, it's nearly two years since I ordered it, and it was already later than originally scheduled then.


I know they are not everyone's cup of tea, but I've liked these locos since reading P. D. Hancock's Narrow Gauge Adventure. The model certainly captures the lines of these distinctive machines, the detailing is impressive, and the livery is finely applied.


I fear it may be rather delicate though. The brass pipe under the right tank is hanging free at the rear, and the motion covers drop off rather easily, though I expect a drop of superglue could sort those. The rear cow-catcher appears to be bent upward and outward too. There are some plastic mouldings in the box, I think for brake rigging though the instructions don't mention them, I doubt I shall bother fitting them.


The cab interior is detailed too, though at this angle the distorted rear cowcatcher is clear. The instructions say couplings can be fitted with the loop removed, or the cowcatchers should be removed to allow the loop to be retained.


Running is smooth enough, though I've not been able to run it in properly on Awngate. The problem seems to be with corners, or at least point-work, where the pony wheels derail. The instructions claim the loco can manage 305mm (12 inch) radius curves, but if it derails, adjust the springs on the pony trucks to loosen the tension with tweezers.


Here's the front pony truck, and as you can see I've opened up the springs until they don't make contact at all until the truck is near the end of it's travel. However, so far, this hasn't helped. I've also tried adjusting the spring of the pick-ups (one of which can be seen above the wheel) which apply downward force to the wheels, but neither increasing or decreasing the force has helped.

Hexworthy is being built with 18" radius points so I will have to see how it fares on those, and on the club layout which has 18" points but 12" curves, I'm hopeful it will do better. But so far the performance seems disappointing.

Monday, 2 November 2015

EXPO NG 2015

It was a long weekend. We set out soon after 3pm Friday to pick up the layout, which filled a van, two estate cars, and a small hatch-back, with no space to spare. The convoy then set off - in search of a suitable dining place! Refreshed we resumed the journey to Swanley and started the unloading and setting up. With my 8-year old Son I had to leave for the hotel first (it was in any case a very late night for him!), but we were back at 8am to finish the set-up.


The layout ran reasonably well despite a few niggles, and occasional chaos when we got confused over the sequence. But the testing and practice paid off, and we kept things moving, though over lunch-time lack of operators meant the brickworks and quarry were "mothballed".


So show viewing time was limited, but I did get an hour or so - and I was pleased to see Ynys Gwyntog (in O14) by the late Bob Barlow, editor of Narrow Gauge and Industrial Railway Review. I missed seeing Bob, although I'd only met him briefly on a few occasions and exchanged emails, he was always bubbling with friendly enthusiasm. It's great to see he was a truly accomplished modeller too.


This model of  the Talyllyn Railway in 1865 (the year it opened) in 5.5mm scale, 12mm gauge, by Tim Ticknell, is unusual and fascinating. We're used to seeing Talyllyn and Dolgoch preserved and shiny, or decrepit and just holding the line together, but in brand-new condition in a relatively bare landscape makes an interesting scene.


I'd been looking forward to seeing Creech Bottom (009) by James Hilton since seeing it on-line, and in Railway Modeller a few months back. It has just as much atmosphere in the flesh, and Jame's superb loco collection looks right at home. It just shows that simple can be so very effective.


I've been watching Tom Dauben develop Isle Ornsay (009) for some years and it now looks largely complete - though Tom would point out there is a lot still to do. The scenic work is top notch already though, and I don't think I have ever seen sea modelled so convincingly as that. Even without a train this scene is full of interest and character.

I could go on, there were so many excellent layouts, but instead I'll point you to the full set of photos I've uploaded. I got a lot of pictures, partly to compensate for having little time to look at the layouts, but some are rather hurried. Apologies if I saw you but didn't have time for a proper chat, or just missed you, but even so it was good to see so many familiar friendly faces.

Finally, Peco had been entrusted with Heljan's prototype Lynton & Barnstaple Manning Wardle 2-6-2, due to be released as the first mass-produced ready-to-run 009 loco sometime next year. Andrew Burnham obviously decided it needed to be demonstrated on a layout, so it appeared at Evaleight:


My shots are not great as first I was the wrong side of the layout and had the backscene in the way, then found the viewing side was packed with people wanting a good look! Anyway despite being without livery and appearing to have had some demanding testing already, it looked finely detailed and seemed to run very smoothly. I'll have to start saving....