Thursday, 26 September 2024

Making ripples

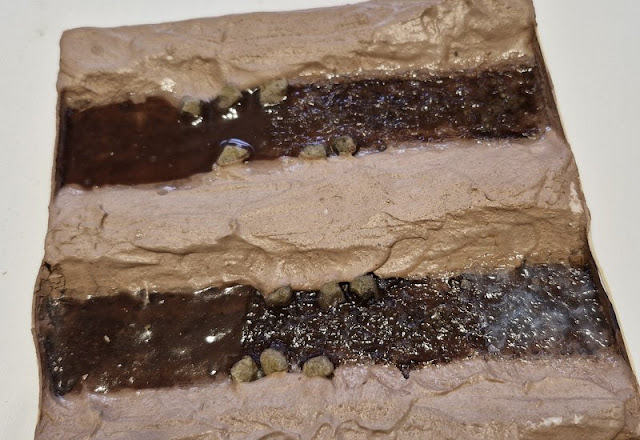
While the river and stream have depth and look shiny, I'm not sure the effect is quite what is needed. A little while back Tom Dauben suggested I add ripples using a thicker gloss gel, hence I got a tub of Liquitex Gloss Super Heavy Gel. Once again, out came the test pieces for the river for experimentation. The base river uses gloss Modge Podge with a brown tint as described previously. 

The gel was stippled on with a small brush, giving small surface undulations and enabling the gel to be worked up to the banks and around stones. Doesn't quite look like water though. 

I then used my airbrush - without paint - to blow the wet gel. I found about 30 psi pushed the gel into little wavelets which had direction. This looked much better than just stippling, though probably the wavelets are a bit high. 


I'd noticed on Loctern Quay that the gloss Modge Podge does gradually lose it's shininess, becoming a little dull. In my test pieces, the Delux Materials Aqua Magic hadn't gone far with a tendency to thin when drying, but it was noticeably more shiny than the Modge Podge, with no sign of dulling - astonishingly it's been 2 years since I first did these tests! So I decided to try a layer of Aqua Magic over the Modge Podge. The left-hand river here has Aqua Magic over smooth Modge Podge over the lower 25%, and over the stippled and blown gel covering the upper 25%. I also tried a deeper layer of the gel on the right hand river.


Here's the results. The deeper gel (lower right in the above picture, top right in the below picture) didn't dry clear, showing it can only be used in thin layers (as expected). The stippled and blown gel does look quite effective. The addition of the Aqua Magic (at either end of the upper / left hand river) definitely makes the surface look shinier and more wet, and over the textured gel it helps smooth and level the surface a little while leaving plenty of texture. I think this combination works well, there may be better ways of achieving wet looking ripples but this looks effective without a lot of effort. 


Just need to repeat over the several feet of stream/river on the layout now.

Wednesday, 18 September 2024

The writing's on the tank

I can't believe the last update on the tanker wagons was in May. Progress has been a bit intermittent. While sourcing some suitable transfers I finished the painting. The wagon chassis were painted grey, as usual for my freight stock, with black underframes. The round tank got sprayed with a red aerosol I had in the garage, I picked out pipes and valve/filler caps in metallic aluminium. The square tanks were painted off-black, as were strapping and other details. I'm not sure whether to paint the weedkiller pipes in a more visible colour?


I decided on Woodland Scenics/Model Graphics rub-down white gothic lettering. This provides a range of sizes, which was useful as I wasn't quite sure what size to use, and I thought rub-down lettering might be easier given I've not used transfers since my teens. I printed out the wording in the nearest font I could match at a range of sizes, decided which size would fit the wagons best, then found the nearest size on the transfer sheet. 


Before starting on the tank wagons I used an old Colin Ashby wagon as a practice run, lettering it for loco coal. I found the transfers easy to apply, but tricky to line up, especially if handling the whole sheet and where there is uneven detail. So, I decided the cut out each letter and align and space them onto a piece of masking tape, before transferring (ahem) to the model. Of course, this had to be done upside-down, I put a length of tape half onto a steel rule and flipped it over then placed the lettering on face down and back-to-front.


The tape was then peeled off the ruler and lined up on the model, ensuring the lettering is straight and positioned correctly, before rubbing the lettering down with a pencil.


The same technique was used for the round tank, this time I used one of the printouts to help get the right spacing - albeit in mirror! Positioning the right letters in the right order and the right way round when they are upside-down and back-to-front takes some concentration...


The tank was still attached to the coffee stirrer used for holding it for painting, so I taped that to the edge of a block of wood to hold the tank on its side. The ruler was flipped and positioned with the letters along the centre of the tank, and a second strip of tape used to hold the top of the letters in place. With everything checked for alignment, the letters were rubbed down and the backing sheet removed one by one.


And here's the result. The lettering gives purpose to the wagons, and should help make them stand out in Loctern Quay's shunting puzzle. 

I've refitted the wheels and couplings to the tank wagons, these are now just awaiting weathering, and of course picture cards for the shunting puzzle. I'm sure I put the wheels from the open wagon somewhere safe... when I find them it could get added to the fleet, though it has already served its purpose as a practice for the lettering. 

Saturday, 7 September 2024

A Baguley and a pair of Bug Boxes

A few additions to the stock list today. A couple of Ffestiniog bug-boxes and a yellow Baguley Drewry. 


The bug boxes will of course go well with the England and Double Fairlie locos. The Baguley will probably end up on works trains, I don't really need another modern diesel but it is nicely detailed, looks great on the layout, the yellow pops out, and of course it runs sweetly. 


However, I was also drawn to it because of the one at Amberley, in which I had a cab ride a year or so back. 


My model will no doubt get some weathering to make it look like a well-worked loco, but I don't think I'll go as far as the "weathering" on the Amberley loco!