Thursday, 30 November 2023

Ashover coaches Part 5 - Painting

 Having decided on the colour - the Tamyia deep green with white window surround - it was time to start painting the coaches. I'd primed them in white, but the areas to be white were painted an off-white (white with a few drops of beige mixed in) so as to be not too stark. 


The upper part of the body around the windows was masked. There's a handy recess between the waist beading and the top board, 9mm tall. The tape I had was 10mm wide.. so I cut to length and trimmed 1mm off the edge while stuck to glass, then transferred the tape to the coach body. I have the glass from a broken picture frame taped to it's backing board with graph paper in between, handy for assembling things square and flat but also for cutting tape.


The green acrylic paint was airbrushed. I'm still learning here, and find the frequent cleaning of the airbrush tedious, but I think getting getter. Mind you, I'm still getting used to acrylic paint too. I added some Tamyia acrylic thinners to the Tamyia acrylic paint and it seemed to start coagulating, and the airbrush clogged. Using water to thin the paint worked better, how is that? Anyway, it was worth persisting for the good finish from airbrushing. (The clothes peg helped to hold the coach while painting).


With the masking removed I was very pleased with how it had worked. There were a few places paint had leached under the tape as seen on the lower coach, which needed touching up, but mostly the join was clean and tidy. 


While I had the airbrush out I weathered the roofs (which were in grey primer) with a dark grey acrylic mix. This is varies a little in density and hopefully represents smoke deposits. 

The frames, steps, and handrails were painted with black acrylic, as were the lamptops. I considered masking but the matchboard sides and handrails would have made that difficult, and probably ineffective. Hand painting was tricky and even so some black paint wicked up into the matchboarding requiring touching up. I realised I should have painted the lamptops before fitting! The window drop-frames were painted very carefully with light brown enamel paint - I still prefer the way enamel paint flows - and the tiny door handles dry brushed with enamel brass colour. The insides were roughly painted with brown bench seats and cream/white walls, although I left the end vestibules in green. Not seen here, but the bogies were painted with a black-grey enamel. 

I'm very happy with the way the painting has gone, but there's a little way to go yet. I'd like to matt varnish them, but the weather isn't great for spraying at the moment. I'm wondering about subtle weathering - not to take away from the clean look expected of a preserved railway, but to add dust to the underframes. Then there will be glazing to cut and fit, including around all those open windows!

Sunday, 19 November 2023

Brighton show 2023

Yesterday I visited the Brighton show, a small club show in a community centre. Small as I think there were only six layouts excluding the "vintage" Triang (which I do), strangely layouts seemed to be outnumbered by club and association stands and the club sales stand seemed bigger than any layout. The layouts were nice though, and the venue seemed crowded with families which has to be a good thing. At a time when some clubs have not resumed regular shows, it's good to see Brighton are able to, even if it is small and local. 


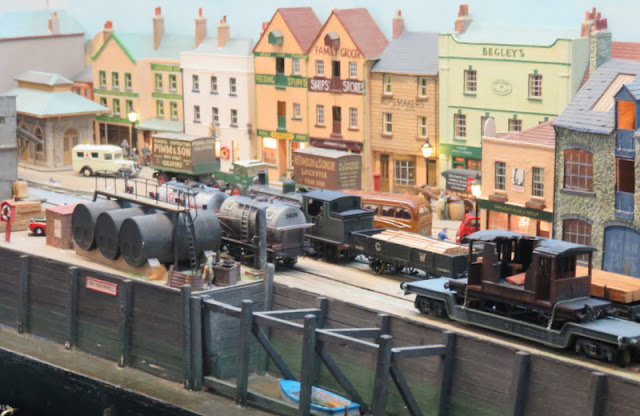
Orestone Quay (OO) I have seen before but always happy to see again, not many standard gauge layouts manage to cram this much character and colour as well as operation into a relatively small space. 


That street and quayside is beautifully modelled. 


I've also seen Portsea before and think this one is worth seeing again too. It's a loose copy of Portsmouth town and harbour stations in the unusual scale of TT, very nicely modelled and the harbour station is instantly recognisable as Portsmouth. 


EMUs and 3rd rail electric isn't really my thing, but I do like the layout. 


Holly Bank Grove (OO) is an engine shed scene with not much room for scenery although what was modelled was done well, including the track, and the varied weathering of the stock added to the realism.  


Lakeside depicts California in HO, a little different and nicely modelled including some unusal detailing (see the chain gang). Conversely, the locos here could have done with a little weathing, but I liked seeing some unusual locos such as this Heisler. 


Not strictly one of the listed layouts but Andy Knights had this micro layout on a demonstration stand, which people could have a go at operating. Nothing fancy here, but a small simple layout that anyone can have at home, which is always good to show at an exhibition.

Saturday, 11 November 2023

Ashover coaches part 4 - Shades of green

The Ashover coaches got primed today. Not much to share from that, but the next question is what livery to paint them? My usual livery is a light green, sometimes with white upper panels, sometimes with the drop window frames picked out in light brown. I think the usual green is Humbrol 101, although I am sometimes confused and the balcony coach in the background is Humbrol 76 - which is also my usual loco green. I'm also wondering if the lighter green is a little too bright, perhaps because of the way it looks under the daylight LEDs?


So, do I go for a plain green with beige window frames? The Ashover painted their coaches one colour (dark red), so this would make sense, and is much easier to paint. The modern interpretation is lined, but I don't see the lining in black and white photos of the original coaches.


On the other hand, white upper panels will look more interesting, on these coaches I'd go for white between the waistband and the top of the windows, rather like this (imagine green in place of blue):

(Photo from https://www.flickr.com/photos/kitmasterbloke/29351598477)

A two-tone livery can be brush painted, I've done it before, but may be neater/easier by masking which would allow airbrushing, although there's a lot of masking for 5 coaches. Airbrushing could give a nicer finish and is less likely to bleed under masking, but that means using acrylics (I have no spray booth and so no desire to vaporise solvents in the house). And so we are back to paint choice, and like decorating a room, we have paint samples on the underside of the coaches, seen under layout lighting:


From the right we have three shades of Humbrol enamel:

  • 101 is the usual coach green
  • 48 I thought would be a touch darker, but I think is too dark
  • 76 is my usual loco green, and used on the balcony coach seen above

From the left we have three shades of acrylic (all the shades I have!):

  • Vallejo mid green, actually not far off the current green. I used this on a couple of locos recently
  • Vallejo gunship green, rather an olive green (or, unsurprisingly, camouflage)
  • Tamia deep green, a darker but a nice shade
On the plus side, the roofs are simple - primed in grey, which I think will do nicely.

Monday, 6 November 2023

Ashover coaches part 3: Details and roofs

The instructions don't mention handrails but pictures of the coaches show them prominently, and with the steps for low platforms they are an obvious requirement. I realised that staples were slightly too long but would fit if I was happy to accept them running to the bottom of the door, lower than the prototype, and being a flat section. I'm not making an exact model so figured the precise length and bends would save a lot of time, and look better than I can manage bending wire.

I drilled all the holes (80!) with the dremel in the stand, using a slightly undersize bit as it tended to melt the hole bigger than the drill, even in short bursts (I wish it could go slower!) - but much quicker and easier than using the pin vice by hand. The staple legs were cut shorter (especially to avoid the window openings), and supergled in using a 20-thou strip of plastic for even spacing from the body. 

The brake coach had steps made up from plasticard. Those at the left (saloon) end were made to match those of the other coaches, those under the guard's compartment doors made to a similar style but longer to match the double doors, and passing in front of the frame bracing. The steps are 20-thou plastic but the upright supports are 40-thou, and with a second thickness of 40-thou between the steps to support them. 

I also added door handles. They are not very prominent on the photos and are quite slender on the frames of the sliding doors, so I just used short lengths of microstrip vertially on the outer edges of the doors, but horizontally on the brake compartment doors which are assumed to hinge inwards in the usual way.

Experimenting with roofs led me to realise that they didn't fit well to the ends of the coaches, and it seemed that the ends were too low, and the top edge sloped down to the outer edge. To avoid an unsightly gap I added a strip of 20 thou plastic to the top of the end, and filed it smooth to the front and level across the top. I also added a little microstrip to the top of the door frame. You can just see the door handle behind the left handrail here.

I decided on the drinks-can roof. The moulded plastic roof was slightly too curved and wasn't smooth underneath, making shortening and fitting complex, while fabricating a plastic roof to be a neat fit and not warp is challenging, especially as the partitions leave little room for bracing underneath. 

The metal was cut to size with a scalpel using lots of light cuts. I decided to cover the metal with masking tape to give a tarred cloth finish, it also serves to stiffen the metal slightly. I took care to roll the roof onto the tape rather than flatten it, so the curvature is maintained. The sides and ends are then folded underneath. 

To further strengthen the roof and prevent it distorting I added a couple of lengths of 40-thou plastic longitudanally underneath, the strips spaced apart with slices of plasticard then superglued to the roof. 


Some of the kits came with lamp ventilators but they didn't match, and some kits didn't. I found a load of matching whitemetal ventilators in my bits box, not sure of the original source. I think the prototypes had torpedo type ventilators rather than these "sea-shell" type, but at least all 5 coaches will have the same type. Holes are drilled with the dremel again and they are superglued from underneath. 

I'm also fitting rainstrips which, perhaps surprisingly given the doors being at the ends, curves over the whole length of the sides. The strips are tacked in place with plasticweld solvent, which doesn't really stick to the masking tape/metal roof, but holds it long enough to dribble some superglue along it. A fiddly job, 2 roofs are now done so just 3 more to complete!