Pages

Wednesday, 29 June 2011

The Barn

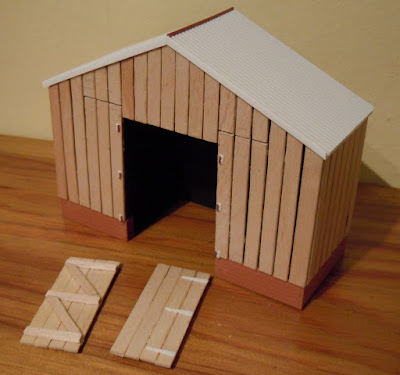
The third and final building is the animal barn. This is used for rearing the young cattle and pigs, and has a track running into it for animal feed delivery, and of course mucking out! Tatton Park Farm had a large wooden barn structure in the centre of the farmyard, so I was aiming for something similar, although the dimensions are set by the adjacent tracks and a need to have it high enough to hide the end of the box file. As with the other buildings that meant a removable section to allow the box file lid to close, and of course it is "low-relief" otherwise the entire box-file would be buildings!


The shell is from 40" black plasticard, with a slaters brick base, the wooden planking is from coffee stirrers procured from various coffee emporiums. This is the first time I have used them, and I am quite pleased with the result, although I would say they are best suited to larger scales. The roof uses Slaters corrugated iron. Compared to the other brick and slate buildings this should provide a nice variation of materials.


At least this building has square corners and parallel sides, making it easier, but even so getting the roof to slot in neatly adds an extra challenge. The tabs under the roof slot into the slots in the false ceiling.

Posted by Picasa

Wednesday, 22 June 2011

Solving a short

Having the Lister reassembled and working I have run it over every part of the layout to test out the trackwork. I really must make the off-stage track, as without it there is no way from the front sidings to the back sidings! That aside it all seems to work ... except that on the short-radius point that is the kick-back to the workshop the loco causes a short circuit and stops.

It seems that although the gap between the point blade and the stock (fixed) rail is correct for the back-to-back measurement of the wheels, i.e. the same as the check rails, it is close enough for the back of the wheel to touch, causing a short circuit as the blade was connected to the vee and so the opposite rail. I can't make the blade move over any further - it isn't long enough, and the switch that controls it doesn't have sufficient movement. So that means isolating the point blade from the opposite rail, and linking it to the adjacent stock rail.

As you can see from the photo, the point is such a tight radius and so short that this isn't an easy task without weakening it. I decided the best place to cut the rail was over a sleeper, so both sides of the cut were supported, and the only way to do this in-situ was with a slitting disc in the mini-drill. That has left a larger gap than I'd have liked, it doesn't seem to cause a problem but I am filling it with epoxy to rail height. The curved rail and blade were then only fixed by a small amount of solder at one end, so a piece of wire was soldered in to connect it electrically and physically to the stock rail, also further epoxy glue is being used to support it.


The result is not pretty but it does work, no more shorts. I guess there is a chance of the 4-wheel loco stalling over the big isolating gap, but it seems OK at the moment. You can see I have only done this fix to the straight route, as this is the point it shorted every time, the curved route does get the occasional short but seems better for some reason. I'm hoping paint on the back of the blade might help (electrical switching is done separately), but in any case while the straight route will be in constant use for shunting, the kick-back siding is likely to be rarely used - it is more for scenic effect! The other two point are of larger radius and don't seem to have this problem at all.
Posted by Picasa

Tuesday, 21 June 2011

Starting Young!

This month's 009 News arrived today, but before I had chance to look at it my 2-year-old daughter snatched it out of my hands. "Me read" she said ...
Posted by Picasa

Tuesday, 14 June 2011

More painting: Farm Buildings

And here are the results of further painting sessions!

I painted the brickwork mortar grey, then dabbed on brick red/brown with a kitchen roll, trying hard not to get it in the mortar courses. Further variations of red, dark brown, and orange were used to pick out individual bricks, or dabbed over areas.

The roofs were given several coats until I got the colour about right, the last being a well thinned black to emphasis the detail. I have made up some doors for the workshop, and all the "woodwork" was painted a dark red/maroon similar to that at Tatton. It's a rather nice colour too, I used it previously on Southon Yard! It was then lightly weathered with thinned acrylics.


As a reminder, this is one of the buildings at Tatton Park Farm, which shows the styling and colouring I am aiming for:


Actually that's not a great comparison because of the tungsten lighting I photographed the models under, verses the overcast daylight of the prototype! Never mind, I think it is close enough. Just need to add glazing and they will be ready to plant on the layout, although I also need one more building ...
Posted by Picasa

Wednesday, 8 June 2011

Lister Painted

Recent distractions and a family holiday means that progress has been slow the past few weeks, but I have used the warmer weather to do some spray painting in the garage. This has been followed up with some evenings with the brushes, and finally I have the Lister painted.

I started with an Etch primer from Precision paints, the green is from the Halfords enamel range which seems a good match for the Lister dark green so far as I can tell. Having said that most colour pictures I can find of Listers are post-preservation, so I don't really know the authentic colour! Details were picked out with enamels, and a well thinned wash of dirty brown applied and wiped off, to tone down the shiny green and give a careworn appearance. Some weathering powers, plus rust orange applied to panel edges with a cocktail stick, and coat of Testors Dullcote matt varnish complete the job.

I'm quite pleased with the result, which hopefully gives the impression of a working tool, without being over-distressed. The geezer at the controls has come out OK too. Just need to hide that screw, add some couplings, and re-attach a couple of details that have come loose when re-assembling. After scraping off some paint from between the chassis block and footplate to allow the electrons to reach the motor, it still works too!


Posted by Picasa