Pages

Thursday, 27 June 2013

Spikes

First here's an explanation for the limited progress for the last couple of weeks! The view from our Hotel room in Crete. It's rather bright because there was a funny yellow ball in the sky...

 
Since I've been back I've been concentrating on building the track for the layout - after all it won't be much of a model railway without rails! The track at Thakeham was pre-fabricated industrial track with steel sleepers, essentially 2' gauge train set track. The KB Scale Hudson track sleepers are ideal for this, albeit with a different profile but good enough for me. However looking at the photos it seems the track was laid on top of wooden sleepers, so I am using wooden coffee stirrers underneath the plastic "steel" sleepers.
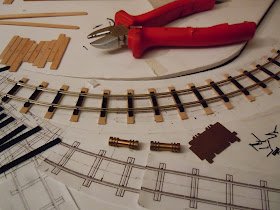

 
The approach is then to spike the rails (Peco IL-115 code 82 flat-bottom) to the sleepers using KB scale spikes. Although the sleepers have the holes pre-drilled, the coffee stirrers don't, so a drill in a pin vice was used, tedious but easy enough so far. Then I discovered the spikes didn't fit! The head   is too deep, meaning it didn't clear the head of the rail, and if it did it pushes into the web moving the rail out of gauge, and making the second spike impossible to fit. They fitted if turned about 80 degrees, but then they did't grip the rail well either... After some experimentation the answer was the big pair of side cutters seen above!

 
This close-up shows an unmodified track spike (left) with one that has had the head cut down (right), only about 1mm needs removing but it has made fitting them much easier, and the track stays in gauge. Also visible are the pencil marks used to locate the plastic sleepers as the wooden sleepers obscure the printed template. With plain track now sorted, and I have to say looking quite good from this close, it is time to move on to the points!
Posted by Picasa

Sunday, 9 June 2013

Scary Chassis Stuff

The scary part of the Hudson Hunslet kit for me is building the chassis. For the most part I've used commercial chassis under my locos in 009, and the two previous 014 locos I have built have had pre-assembled chassis blocks requiring very little work. The chassis in this kit though comes... well, flat packed!

The etched Nickel Silver parts assembled reasonably easily, and soldered together as square as I could (using the inside of a square). The sand-pipes were somewhat fiddly, and I think they are a bit short, but eventually I got them all soldered in place. So far so good!

 
At this stage I masked the bearings and applied a little primer to any parts that might be visible later.  The instructions suggest the brake-gear could be made removable, which I thought was a good idea as it makes painting easier, and avoids soldering to a completed chassis. Soldering the nice brake-shoe castings to pieces of wire was fun.

 
The next stage was assembling the wheels and gears. The idler gears are held in place by small brass collars which need super-gluing to the shafts, as the instructions say "do not allow the glue to wick along to the gear"! After a nerve-racking few moments, somehow they all still rotate. The axles need pushing through the wheels and drive gear while being passed through the chassis frames - yet another tricky job! I used small pieces of lead as packing while tapping the axle through. I have to admit the wheels are not entirely perpendicular to the axles though.

Having achieved a rolling chassis it was time to attach the pick-ups. As with the O&K I decided to substitute the wire provided for phospher bronze-strip, this meant attaching the small pieces of PCB  to the chassis side rather than on top of the sand pipe bracket as instructed, but that was easy enough. Finally the motor is attached and wired to the pick-ups.

 
To my amazement the chassis not only works, but runs smoothly and sweetly! The gears will get a drop of oil in due course, and of course the body weight will help, but even without that performance is good. The photo below shows the brake gear loosely fitted, after painting a drop of epoxy inside the frames will secure them.

 
So, really scary bit completed, and I think I can call it a success!
Posted by Picasa