Pages

Sunday, 28 April 2013

Block-work

It's only a couple of weeks since I started thinking about the Thakeham Tiles project, but since it must be finished by the end of October, I need to crack on. I've been experimenting with ways of auto-unloading the wagons, and I've made a start on the baseboard using 5mm foam-core board (found in within walking distance at my local W H Smiths), of which more another time. I also got some 3mm foam-core for the buildings. However I've been struggling with the best way to represent the concrete block-work which was used for all the structures - not surprisingly, since it was made on site.

My usual preference is embossed plastic sheets, especially Slater's, as they are easy to work with, give a good relief, and can be painted to suit. However I haven't found a block-work wall sheet in 7mm scale. The Slater's 4mm paving is the closest match, although the "blocks" have the wrong aspect ratio really (not quite sure of the size either).


(Image taken from http://www.gaugemaster.com)

Scalescenes do a downloadable print-yourself "brickpaper"of concrete block walling, which seems to have the right colours and appearance. It's a long time since I have used brickpapers and I worry about them being damaged by scenic work etc., and perhaps most about their lack of texture and relief - especially in 7mm scale. Representing different types of block and construction would be tricky too. On the other hand it would save a lot of time.

(Image from http://scalescenes.com/products/TX39-Block-Wall)

I have also been experimenting with home-made methods. The first is scribing card, which I have tried various implements with. Although the card has a good texture the scribing is tedious, difficult to get precise, and the scribed line is "fluffy". Below is a sample, the right side has been sprayed with grey primer.
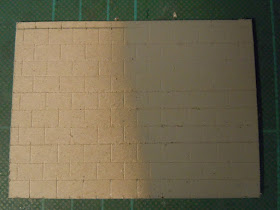


I've also experimented with expanded polystyrene foam, in this case pizza bases. I've seen this used to good effect before, and indeed the results are encouraging. Scribing is still tedious but seems to come out much better, the texture is good too. The bottom piece has been primed, amazingly the aerosol didn't dissolve the foam. However I am not sure the blocks are regular and sharp enough to be concrete, the courses too rounded and corners lacking definition. This would be great for stonework, but for concrete I'm still unsure...


So which is the best approach? I'm tempted to try the Scalescenes print, it doesn't cost a lot, but let me have your thoughts...
Posted by Picasa

Wednesday, 24 April 2013

Body building

Since my last post about the O&K and despite recent distractions (!) it has made surprisingly rapid progress. The body is not complicated, and with minimal cleaning up the parts they were assembled using Epoxy over the course of a few evenings. The most time-consuming job was opening out the coupler blocks and buffer beams for the Microtrains couplings, ensuring they will be at the correct height. These will be fitted after painting, as will the starting handle, to be attached on the inside of the rear sheet.


The kit instructions are very good and include black-and-white photos, nonetheless I have found it helpful to refer to my own photos taken at Amberley last year. There are several O&K's there, but this blue one is the prototype for the kit:


For more photos click here to see the set.

The next question - what colour should I paint it? I have a feeling these were originally supplied in red, can anyone confirm that? I'm not sure about that blue, though it is different and shows up the red controls well. On the other hand I have some of the green I used for the Lister left...
Posted by Picasa

Monday, 22 April 2013

Site Visit

Visiting a garden centre on a Sunday afternoon is a perfectly normal thing to do, but it just so happened that the garden centre my wife wanted to visit was about 3 miles from Thakeham. "Let me drop you off" I said, picking up a camera and a tape measure...

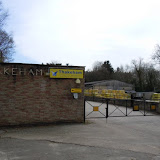
I wasn't expecting to see a great deal, but even pictures of the surroundings and the colouring of the walls would be useful, and I knew the bridge crossed a footpath. As it happened I got some good views. This one from the front gate of the site shows, in the distance, sand in the top of the hoppers that used to feed the trucks, but now a conveyor belt.

Round the back of the site this is the bridge over the footpath. The tipping shed was on the left, to the right the engine shed and hoppers. Above the bridge the conveyor is seen.


The striped beam in front supports - or at least protects - a pipe, and I believe is the site of an earlier bridge. I could get some measurements, and some useful photos of how the bridge is made. It is a simple structure, the 8" beams are at 3' centres. 


Climbing the embankment next to the bridge it was possible to see the top of the bridge, the tipping dock is too the left although it seems the shed has been re-built with the advent of the conveyor. 


I thought I could make out the engine shed in the opposite direction, but it could have been any other shed, and it didn't show in photographs. I couldn't see the hoppers, though I could see where they were. Clearly I didn't want to risk trespass, but nonetheless I was happy to get such a good feel of the site. 15 minutes well spent!

Click below for the full set of photos.
Thakeham Tiles Railway


Saturday, 20 April 2013

Front Page News!

 
When I posed my newly-built train on Chris Ford's layout at the Haywards Heath show, Mick Thornton (known as the Roving Reporter within the 009 society) was keen to get a picture. I thought it might get into his photo-report in the 009 News, but it is a real compliment to see it make the front cover!

Also in the News is the news that Tom Dauben and Steve Fulljames will be jointly taking over the editorship - I'm sure they'll do a great job!
Posted by Picasa

Tuesday, 16 April 2013

Hang on lads, I've had an idea...

I do like doodling track plans and layout ideas, I just can't help myself. Regular readers will know I have a weakness for "challenge" micro-layouts, such as the Dave Brewer challenge at EXPO-NG. This year's rules are for a triangular layout with sides in proportion 45:40:30 (up to 1.8 cm times those factors), now I have no intention of entering but still couldn't help sketching some ideas. Then I came up with this plan:

 
This is a full-size mock up for an 014 layout inspired by the Thakeham Tiles Railway, which was used to deliver sand from hoppers (previously a quarry) to the factory which made concrete products such as garden walling (confusingly, not tiles!). Thakeham Tiles are still trading from the site in Storrington, West Sussex - just a few miles from my home - but the railway ceased operation in 1982. Fortunately the locos were preserved at Amberley museum, and there is a book about this simple but fascinating line by Graham Lelliott.

 
The idea prompted me to dig out the book, which showed that a more accurate plan could in fact be fitted in to the area. I ditched the short siding in favour of one next to the engine-shed, where it actually was, meaning the loco always operates from the factory end of the train (2 skips), which it did. This even meant there was space to fit in the footpath passing under the line just before the factory tipping shed. Hopefully this is clear on the plan below - the sand hoppers on the right, shed at the bottom, and factory on the left.

 
The front cover photo of the book shows the train rounding the curve by the engine shed, just beyond the shed can be seen a spare skip wagon on the siding. The scene is dominated by the concrete walling products awaiting dispatch.

This would make a somewhat different model - not exactly interesting to operate, no an accurate rendition of the prototype, but close enough to capture the main features of the line. However there would be a lot of work - not least, making all those concrete blocks! And the competition is only 6 months away. So should I give it a go? Hmm....
Posted by Picasa

Thursday, 11 April 2013

Better Pickups

I wasn't really happy with the wire pick-ups on the O&K, they didn't seem flexible enough to make good contact without applying too much drag to the wheels. So at Brighton I picked up some phospher-bronze strip, which is much more springy.

 
The strip was easily soldered to the PCB on each side, and with a little bending the pick-ups could be arranged onto the backs of the wheels without shorting on the block. The result makes much better contact than the wire, with far less friction, and from the test run I think it runs better too. Plus in my experience pick-ups on the backs of wheels suffer less from dirt build-up in use than those acting on the treads.

 
Posted by Picasa